The Caret and the Grid
This article is an expanded, paraphrased and enriched transcription of the excellent video by Anthony Hughes. Go watch it, then come back for a recap, or follow along while watching.
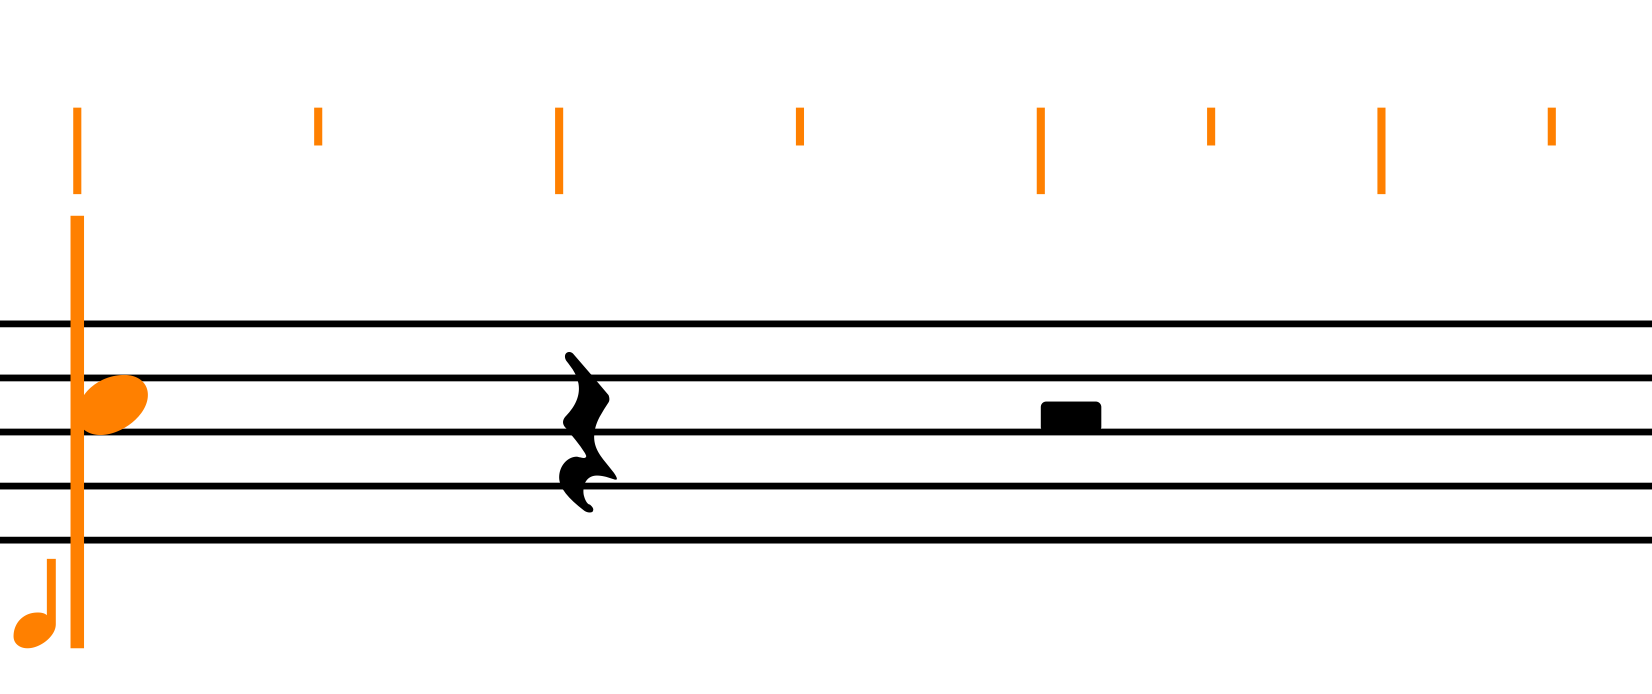
As soon as you engage Note Input in Dorico, the program provides the user with two useful reference aids, both shown in a bright orange colours: a vertical line called the caret, and a set of short dashes representing the rhythmic grid.
The caret
The caret indicates the rhythmic position at which notational elements will be input—that’s right, not only notes! Notes, though, are the only elements to cause the caret to advance. As soon as you insert one, in fact, the caret will advance to the rhythmic position equal to the starting point plus the duration of the inserted note. As an example, here is where the caret would be after inputting a quarter note:
The caret can also be advanced manually in two ways:
- Pressing the Space bar will advance the caret of the selected duration in the Notes palette in the left zone.
- Pressing the Left/Right arrows on the keyboard will advance the caret by the rhythmic grid, which in our simple example above is set to have a resolution of an 8th-note (quaver).
We actually have an even greater control: the Up/Down arrows, in fact, move the caret between adjacent staves and instruments. Add the Cmd/Ctrl modifier to this to obtain the following results:
- Cmd/Ctrl — Left/Right arrow: move to the beginning of the current / next bar, incrementally.
- Cmd/Ctrl — Up / Down arrow: move to the topmost / bottommost (is that an accepted word?!) stave in the system.
The greatest advantage of this system is that you do not need to input rests when entering music since Dorico will automatically pad the notes you’ve added with the relevant rests. There will be times when you want to be specific about rests and syncopations, but let’s keep it simple for now.
The rhythmic grid
Switching briefly to the rhythmic grid, we can see how not all of its lines have the same length:
The longer lines represent the beats, while the shorter ones represent their subdivisions—in this case we are in 4/4 time, which has four beats, each with two subdivisions. As a solfège teacher, I feel my heart warming up at this, since whenever a student has some difficulty in deciphering a particular rhythm, I always suggest them to draw a rhythmic grid above the offending bar, with beat lines longer than subdivision ones. I believe this feature to be a fundamental tool in an Educational environment.
We can consider the rhythmic grid to be a scaffolding segment in that it allows us to position and move different kinds of notational elements and also to shorten/lengthen notes, dynamics, and playing techniques. Another advantage is also to provide visual aid to show where notes will appear when inputted with the mouse.

There may be times when the default grid resolution is not as small (or large) as you would like it to be. Luckily, it is effortless to change, in either of two ways: by pressing the button in the bottom-left corner (the one showing a note duration) or by using a keyboard shortcut. Pressing the button in the bottom-left corner expands a drop-up menu that allows you to choose among several options, from 32nd-notes (demisemiquavers) to whole note (semibreves).

Alternatively, you can hold down the Option/Alt key and press either of the square bracket keys to decrease [ or increase ] the rhythmic grid resolution.
Caret superpowers!
When the mode of operation of note input changes, the caret changes dress to make you aware of it. For example, in its most basic state, you will have for sure noticed that there is a small orange quarter note to the bottom left of the caret. Its role is to show you what voice you are inputting notation into. If it is the first voice—either upstem or downstem—, it will only show the note itself, while if it is the second (or more, since Dorico supports virtually infinite voices1), it will show an index next to the note:
When chord input is active, a + sign is displayed above the caret to remind you that every note you input will be added on top of any existing note at the same rhythmic position. That means that the caret will no longer automatically advance until you press the Spacebar or Q to exit chord mode.
I emphasised “on top” because regardless of the interval, the input note will always be the one higher than the one you just added. In the picture it is shown how pressing A after B gives me the ‘A’ a seventh above and not the nearest one, which may have been more logical from a certain point of view. This approach, of course, has other advantages that the other one doesn’t have. Do not worry if it will take a while to get acquainted with exiting chord mode before progressing. Observe the result of your mistakes, have a good laugh about it—possibly in company!—, and move forward!
When inputting grace notes—which are smaller—the caret becomes shorter, brilliant!
The great thing about this approach is that it is straightforward to alternate grace note and ordinary note input, something that I find quite painful to do in Sibelius, instead.
Finally, when Insert Mode is enabled—a most powerful mode we will dedicate a lot of attention to in the future—, the caret is adorned with finials, and uses a dotted line to indicate a wider scope. In summary, this mode allows you to insert music by pushing subsequent music along, and it is possible either for a single stave, a whole player, globally, or globally for just the current bar! Too much power for a single man, I know!
Few more goodies!
If you hold Shift and press the Up/Down arrows on your keyboard when the caret is active, the caret will extend to adjacent staves. This has a somewhat limited usage if you do not have a MIDI keyboard, but it can still prove useful, for example when wanting to insert a “comma” breath mark on multiple staves at once. Activate the caret, hold down Shift, extend the caret to the desired staves, insert the notational element you want, and press Return.
If you have a MIDI keyboard, though, this feature can create wonders such as automatically distributing chord notes onto multiple staves. This is perfect for writing piano music since Dorico automatically distributes notes between the two hands, or for wind parts in orchestral tuttis.
Finally, you can input other notation while the caret is visible. For example, input a few notes, then press S to add a slur from the note you’ve just entered to the next one(s). I said one(s) because until you press Shift-S the slur will keep being extended. Activate an articulation for it to be added on future notes, invoke a popover to add a dynamic or tempo marking, and so on…
Personally, while I have tried this approach several times in the past, it doesn’t fit my workflow well, possibly because I am blazing fast when inputting notes, and I have found to be more productive when working in layers. This because every new pass counts as a proofreading pass! Please try it, though: if you are even marginally slower than me in note input, it may prove very helpful.
iPad check
Let’s go back to the beginning and see what works on the iPad and what not.
The caret
To invoke the caret on the iPad, do any of the following:
- Double-tap on the bar you want to start entering music into
- Press the “8th-note with plus” button in the left toolbar
To move the caret without a physical keyboard, use any of the four arrows at the top left of the interface:
The rhythmic grid
To change the resolution of the rhythmic grid, tap on the resolution button in the top middle of the interface, next to the selection extension buttons:

Voices and more
The way the caret changes according to its mode is the same as it is on desktop. The only difference is what you need to do to access those modes without a physical keyboard, something that we will cover in a future lesson.
From my testing, it is not possible to extend the caret to other staves, not even by holding Shift on the keyboard. I believe this to be a limitation of the iPad version of Dorico, which is equivalent to Dorico Elements for desktop.
Bottom Line
That’s it for today!
If you enjoyed it, please like this article, subscribe to get notifications about upcoming articles, and don’t forget to do the same for Anthony’s video and for the Dorico YouTube channel.
Should you be interested in my other activities, please visit my website and consider joining my mailing list, where you will be able to follow my journey through music notation and independent music publishing!
Thank you for your time, and see you here next time.
- I believe there is a limit because of how computer math works, but it may be absurdly large, something like 128 or 256. I would be curious to know, though! ↩
