
Inputting Music Using the Mouse or Keyboard
This article is an expanded, paraphrased and enriched transcription of the excellent video by Anthony Hughes. Go watch it, then come back for a recap, or follow along while watching.
This video covers six main areas, which are:
- Choosing the duration of notes to input
- Determining pitches and accidentals
- Erasing notes
- Using the keyboard panel in the Lower Zone
- Adding or inserting more bars
- Understanding and managing the Select Tool.
As we saw in the first two episodes of this series (Overview of Note Input and Starting Note Input), using the mouse or trackpad (more generally, the pointer) to input notes in Dorico is possible but, as soon as one graduates from the initial training ground, not recommended. It is way faster to use the computer keyboard, perhaps in association with a MIDI controller, to achieve the most optimised workflow. In the end, a mixed approach is necessary, and we will explore each specific case as we encounter them.
Choosing the duration of notes
The choice of a duration for the note we are about to input is made by selecting the corresponding value in the Notes panel to the left. The panel doesn’t initially show all available note values, but pressing either of the arrow buttons at its extremities will expand it. From this:

You get this:
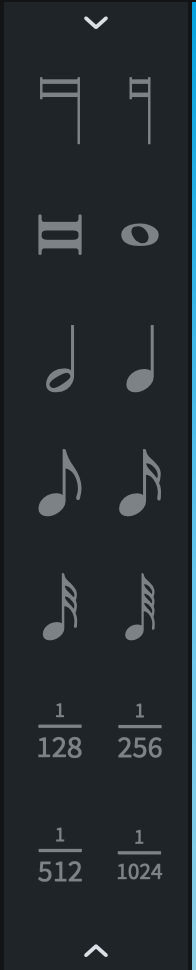
It can be a very useful pedagogical tool for your music theory classes where students may struggle to memorise all the different values. They may be especially surprised by the Longa and Maxima, which one rarely sees these days. Note values are ordered from longest at the top to shortest at the bottom.
Please note that this panel will be active only during Note Input Mode or when you select a note or rest in Write Mode. If one or more notes are selected, and you choose a new duration, their duration will change, so this:
Will become this when selecting 8th notes:
The selection of a note value can be performed by using the number keys along the top of the computer keyboard.
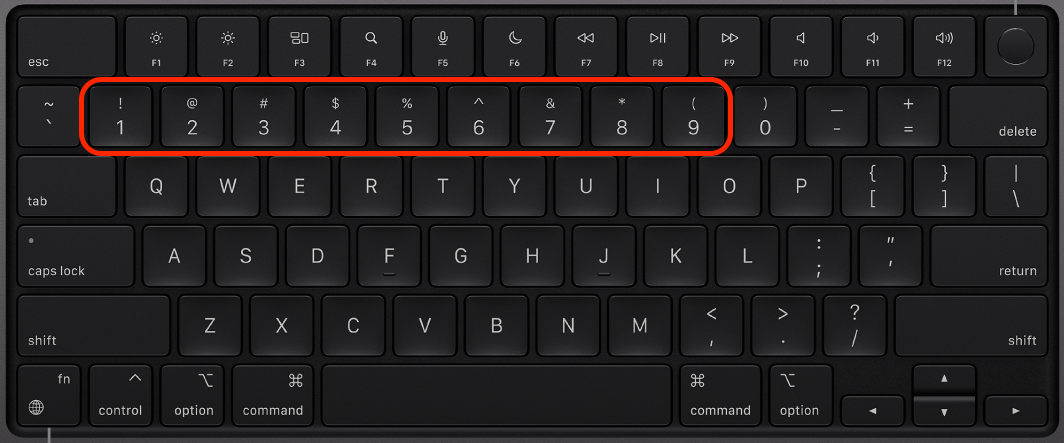
Dorico has set up the number six (6) as the shortcut for a quarter note (crotchet). Shorter durations are accessed by pressing lower numbers, and longer durations by pressing higher numbers. This allows quick access to the most commonly used durations, from a 128th note (5 flags) with the 1 key to a double whole note with the 9 key. As an additional treat, hovering with the pointer over a note in the palette shows its duration and associated key command.
Determining pitches and accidentals
Once the morally taxing quandary of choosing a note duration has been solved, it is now time to pick a pitch. This is achieved in one of several ways:
- Clicking with the pointer on the staff where the shadow note appears
- Using the letters A to G on the computer keyboard
- Clicking the desired pitch on the on-screen keyboard
- Playing the pitch on a MIDI keyboard

One of the most important rules to remember when inputting pitches in a notational software is what happens when you input the following note on the alphanumerical keyboard. In Dorico, the note at the closest interval will be created. For example, if one types an E after a C, the created note will be a third above that, since the other E would be a sixth below. This is a very practical approach, even if, as a cellist, I have found it not to be ideal when inputting arpeggiated chords which, on string instruments, have to consider the tuning by 5ths.
In Dorico, though, there is a way around this: starting from the above example, I could have held down the Ctrl key on Mac (that’s Ctrl-Alt on Windows) to get the E below the initial C. If then, after the E, I wanted to go back to the upper C, I could have held down the Option-Shift keys on Mac (that’s Alt-Shift on Windows). For certain keyboard layouts, specific combinations will not work; a few known examples are Option-Shift-E for the Italian layout and Option-Shift-B for the Norwegian layout.
If you have a MIDI keyboard, you can ignore all this and just input notes at the desired octave and pitch—I don’t have one because of space constraints on my desk.
There are three ways to select an accidental to be added to notes:
- Using the key signature panel where they live.
- Using one the last 3 keys along the number row at the top of the keyboard (0 for natural; dash for flat, and equals for sharp—this will vary according to your keyboard layout. On my Italian keyboard, for example, they are zero, apostrophe, and accented i)
- Using either of the above methods on selected notes, that is, after input.

The last input note remains selected until you input a new one, meaning that it is possible to interact with it in a few ways:
- Hold down the Option/Alt key and use the Up/Down arrow key to change its pitch diatonically (add Shift to do this chromatically).
- While pressing Option, add the Cmd/Ctrl key to change the octave with the arrows.
- Hold down Shift-Option/Alt and tap on the Left/Right arrow key to shorten/lengthen the note duration by the amount set in the rhythmic grid resolution (bottom-left corner).
Erasing Notes
While Note Input Mode is active, you can press the Backspace key to delete the note to the left of the caret, moving the caret alongside and allowing the insertion of a new note in its place.
If outside of note input, notes need to be selected before the Backspace key may have any effect.
Using the keyboard panel in the Lower Zone
As briefly mentioned before, there is another way to mouse clicking and computer keyboard tapping, that is, using the on-screen piano keyboard. To access it, reveal the Lower Zone either by clicking on the upward-pointing arrow at the bottom centre of the interface or by pressing the shortcut Cmd/Ctrl-8. Normally, this reveals the Properties Panel, which is the first panel to the left, so just go ahead and tap on the second option from the left, the one with the small stylised keyboard icon:
Once there, please take a few moments to familiarise yourself with the interface: at the top, you get an Advance Caret button—that advances the caret by the rhythmic grid resolution, the Backspace key to delete notes, a set of the most commonly used note durations, a few articulations, the Respell buttons—to chromatically respell notes, example a C-sharp into a D-flat. The final button to the right allows you to vertically resize the whole panel.

Right below that lies a small keyboard overview, containing all the 88 keys of a standard piano. You will see that a certain zone is more illuminated than the rest, and that it is limited by two dark grey highlights. The luminous zone represents the keys that you will see in the main keyboard panel at the bottom.

Drag either of the two dark-grey or the bright areas to change the number of keys covered or their height.
Finally, at the bottom, there is the keyboard view. Simply tap on any key during note input to automatically add the proper pitch.

A nice addendum is that if you select a bar with contents already in it, the keyboard will show the keys already being pressed down by blue dots on it.

There is a small issue with using the keyboard panel to input note with the pointer because—sadly, quite often—one of the tapped keys will remain stuck pressed down, and it will be necessary to tap it again to free it. Same as the issue with certain keyboard layouts described above, this issue doesn’t show up in the same way for every user, making it terribly difficult to fix.
Adding or inserting more bars
Dorico is smart enough to keep creating new bars of the current time signature size as one inputs music using a computer or MIDI keyboard. There is also the option to add more bars manually precisely where needed, in a few different ways.
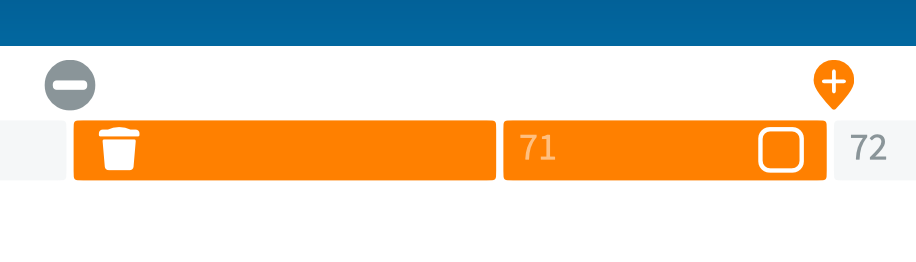
With the System Track shown (press Option/Alt-T or go to View > System Track), click on the Add Bars button (shaped as a plus sign enclosed in a drop-like figure). This will add as many bars as there are selected in the track—so, if you want to add four bars, select four bars and press the button. The new bars will be added after the selection; keep this in mind when you would like to use this function to insert bars in the middle of a flow.
Another method consists of using the Insert Bars section of the Bars and Barlines panel:
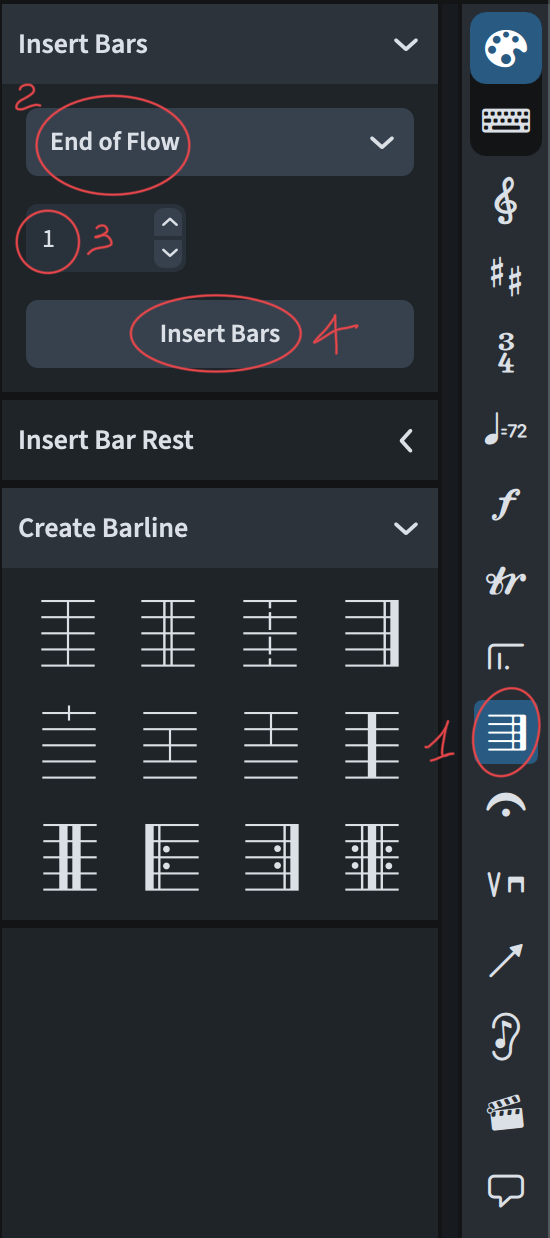
Step 2 involves a dropdown menu proposing the following options: Start of Flow, Start of Selection, End of Flow. Only the last option will add bars after all others, while the first two will add bars either at the very start of the piece or before the selection.
Finally, you can make a selection at a point where you would like new bars to be inserted—which can be in the middle of an existing bar!—, press Shift-B (that’s the Bars Popover), type the desired number, and press Return.
Understanding and managing the Select Tool.
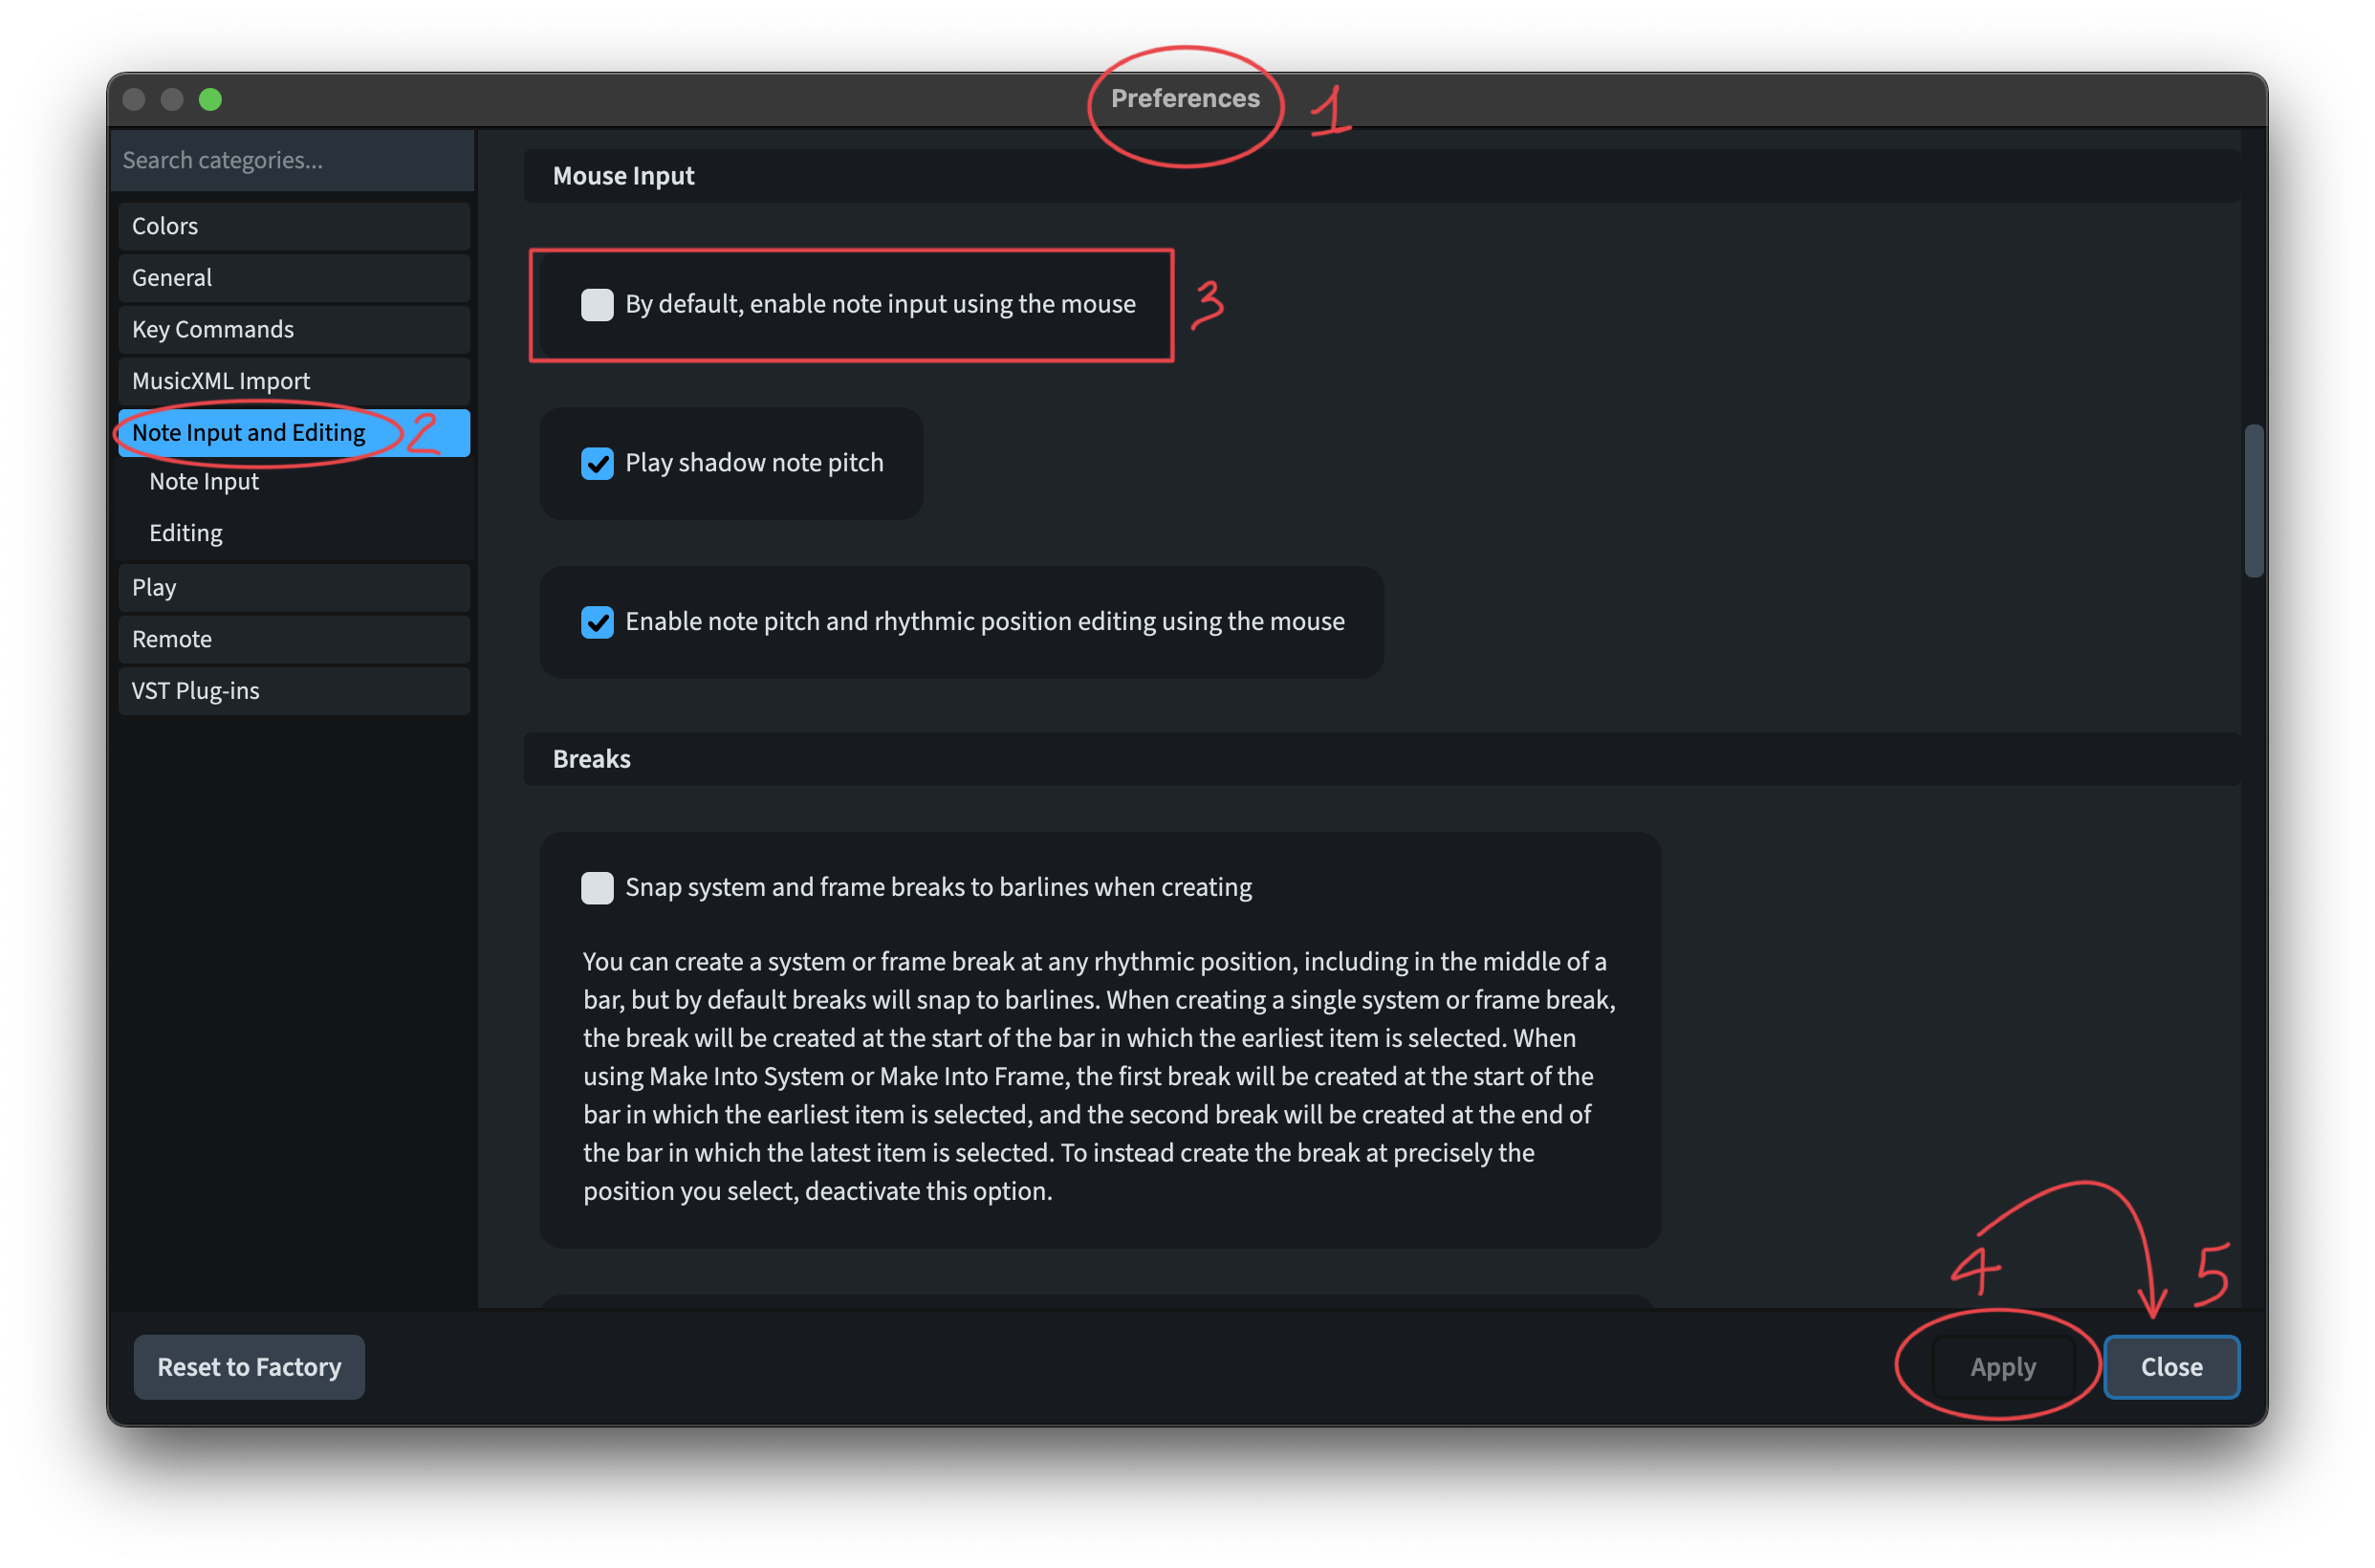
Activating the Select Tool, that’s the arrow button at the top left of the palette interface, disables mouse input. Any interaction with the pointer will now select items, even when Note Input Mode is active. This offers an extra layer of protection for those users—like me—who prefer to do as much as possible with the keyboard.
This can be set as a preference by unchecking the Enable Note Input Using the Mouse option, which will take effect in all new projects. You can then always uncheck the button in the interface to temporarily enable mouse input.
iPad check
Choosing the duration of notes
Dorico’s iPad version is configured assuming you have a bluetooth keyboard connected to it. Even if iPadOS supports mice and trackpads, Mouse Input does not exist in Dorico for iPad. I would not call it a limitation per se, rather a design choice. A double-tap on the screen will activate Note Input Mode, but you will then need to use either the on-screen piano keyboard or a bluetooth alphanumerical keyboard. The Notes panel otherwise works in the same way as it does on desktop.
Pitches and accidentals
Without a keyboard, you need to use the Key Signature panel to the right with a selected note, while with a keyboard, everything behaves as if on the desktop. As an exclusive bonus, though, you have a floating bar which allows pitch editing—both chromatic and diatonic, rhythmic position, and duration editing of an existing selection.

Erasing Notes
To erase note, either use the Backspace key on your keyboard or the dedicated button on the Piano Keyboard panel in the Lower Zone.
Adding / Inserting bars
The System Track being on by default on the iPad, you can use the on-screen controls as if you were using the pointer on the desktop. Remember to use the selection extensors at the top centre of the interface (the dotted squares with a plus and an arrow) to select a range of bars in the system track. I suggest using the button with the arrow, as the one with the plus will not add more bars to the selection.
The method with the Popover is still valid if you have a keyboard, and the Bars and Barlines panel works just as expected.
Bottom Line
That’s it for today!
If you enjoyed it, please like this article, subscribe to get notifications about upcoming articles, and don’t forget to do the same for Anthony’s video and for the Dorico YouTube channel.
Should you be interested in my other activities, please visit my website and consider joining my mailing list, where you will be able to follow my journey through music notation and independent music publishing!
Thank you for your time, and see you here in the next episode!

One thought on “Dorico Tutorials — Episode 4 (EN)”