A review of Dorico 6’s improvements to system-attached items
This article is an expanded, paraphrased and enriched transcription of the excellent video by Anthony Hughes. Go watch it, then come back for a recap, or follow along while watching.
System-attached item improvements
Introduction
As many other items in music notation, system-attached objects are a double-edged sword. They are essential because they automatically appear in all part layouts, but they are at the same time a hindrance because they may conflict with each other for premium vertical space. To help with this, Dorico 6 introduces a greater flexibility when it comes to choosing where a system-attached item should be positioned.
Show system-attached items above specific instruments
Before Dorico 6’s release, system-attached items such as tempo markings, repeat ending lines, rehearsal marks, etc., would all appear above each system’s top staff and above the first staff of selected instrument families. This was—and still is—managed in Layout Options ▶︎ Staves and Systems, but the category has been slightly renamed to System-attached items:

Notice how there is a new segmented control at the top of the families list which allows you to switch from Families to Specific Players, opening a new world of possibilities:

You can now check each box independently to make sure each system-attached item is positioned exactly as you want it to be. This is particularly useful if you have long tempo markings that cause rehearsal marks to be moved too far from the staff, thus creating layout issues. This can now be solved by positioning tempo markings at the top of the system, and rehearsal mark above another group, e.g., above the strings.
Another scenario could be triggered by the presence of spoken text (e.g., “Peter and the Wolf”). While this should be input as system text in order to appear in part layouts, it would make sense if, in the score, it appeared only above the top staff.
A potential issue with this approach is that Dorico doesn’t distinguish between staff-attached and system-attached paragraph styles (like Sibelius does); rather, one can use any paragraph style in either fashion. This is good but, in this case, it makes all system-attached text equal, meaning that we cannot have a specific text style show on the top and another, different, specific style show above another family. Sibelius solves this by setting system-object position globally, and then allowing each paragraph style to “subscribe” to specific positions. Both approaches are as powerful as they are different, and plenty of workarounds exist to adapt them to one’s needs.
Large time signatures
The same kind of improvements is being applied to large time signatures, which can now be placed in correspondence of specific player groups. But that’s not all: for each group, you can now also specify the vertical alignment of the time signature. In Layout Options ▶︎ Time Signatures, set the Time signature position and size: to Show once per bracket and then tap on the Manual button in the underlying segmented control:

Since the new table control that appears beneath comes precompiled with the current settings, it is perhaps easier to erase everything and start again from a blank slate.

Now, the Players list to the right becomes populated with all available players. Either click on the first item and Shift-click on the last or drag with your pointer over the instruments you would like to include, then press the + button to create the new group. Subsequently, click on the dropdown menu arrow to the right of the newly formed list to access the available Vertical Alignment options. Notice how adding players to a group to the left removes them from the list to the right, preventing any possible confusion.

Not all players need to be assigned to a group; simply set the ones you want to bear time signatures.
It is possible that, once you have carefully set up these options, you are not satisfied with the scale factor of the resulting time signatures. The solution is then to go to Engraving Options ▶︎ Time Signatures ▶︎ Time Signatures Centred on Brackets and fine-tune the scaling factor for each possible occurrence:
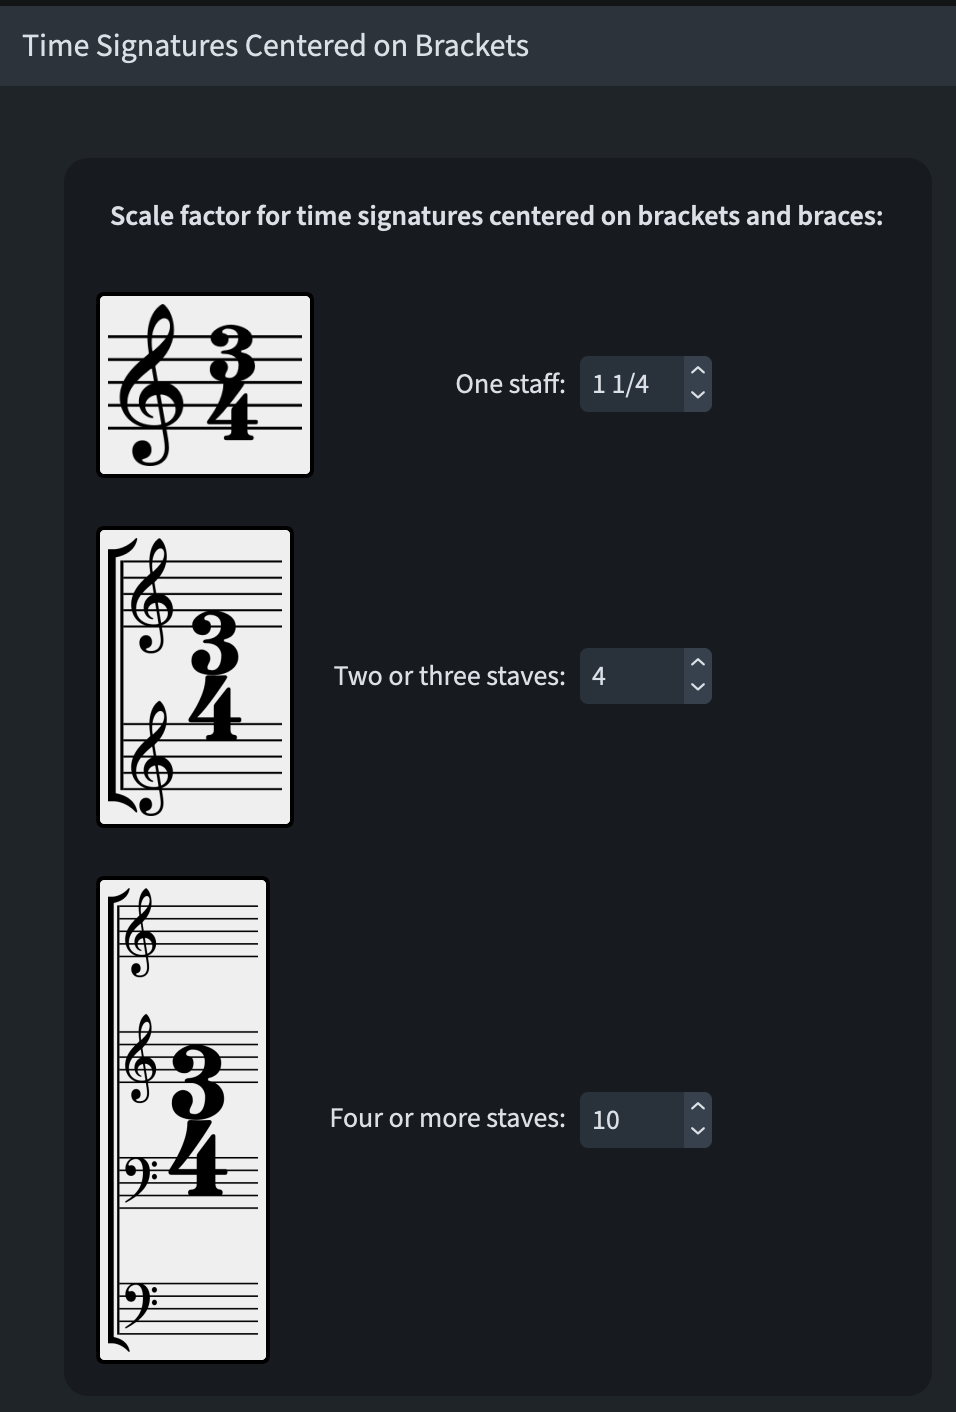
Please note that the current settings will produce gargantuan results if you do not use the narrow design. There is also a couple of extra features available below that you may want to keep in mind:

The first one governs the default vertical alignment when you create a new group (or if you use the automatic mode). The second allows you to decide whether instruments between brass and strings (percussion, harp, piano, soloists, etc.) should be considered as a single unit.
iPad check
I am thrilled to report that, on the iPad version of Dorico, everything related to Layout Options works exactly as on the desktop version. This version lacking Engraving Options, though, prevents us from managing their appearance properly. Still, I would look at a half-full glass in this regard.
Bottom line
That’s it for today!
If you enjoyed this post, please leave it a like, subscribe to get notified of upcoming articles, and don’t forget to do the same for Anthony’s video and for the Dorico YouTube channel.
Should you be interested in my other activities, please visit my website and consider joining my mailing list, where you will be able to follow my journey through music notation and independent music publishing!
Thank you for your time, and see you here in the next episode.
