
As previously said, I am switching to English for these articles. Whoever codes in Swift needs to know this language anyway as no documentation exists for the Italian language and the few attempts I have seen at tutorials has been not satisfactory.
State of the project
We left the project in a state where it could navigate between view controllers, edit the text field of the checklist cell and, apparently, create a new ChecklistItem object. Unfortunately it was not so as the object would not be passed over.
In the first video Brian explains that we could solve this with an extra view controller but that would look the same as the AddItemTableViewController so we would break the DRY rule (Don’t Repeat Yourself!).
We therefore need to add our own protocol as a glue between the elements. Our protocol will contain two methods, one to notifies the callee (nice word to learn, it seems to mean “the one being called”) that the user cancelled the add action and one that is called when new item is created.
Making our protocol
The first thing we have to do is to create our own protocol. It will bear the indication : class because it needs to be limited in application to classes and it will contain two methods. Interesting thing: methods declared inside of protocols contains only their name and no other code! Here is our protocol, added above the class declaration of AddItemViewController.

My main concern here is that, by now, our protocol does nothing, but we will see how it goes, as long as it works.
Delegation
This is one of my favourite subjects… starting from the bottom… that is because I really do not get how they can work. We are now asked to create a property of the AddItemViewController class called delegate of type AddItemViewControllerDelegate?. So, wait a minute. Missing the () at the end this property is not yet initialised, so far so good. But how can a variable be an instance of a protocol which contains only two empty methods? *head scratching*
Whatever, inside the cancel action we insert a call to delegate?.addItemViewControllerDidCancel(self) (starting to see where this is going?) and inside the done action we do some more work:
- we create a
ChecklistIteminstance - we optional bind the text of the
textFieldin this view controller to thetextproperty of the created instance (calleditem, btw…). - we set its
checkedproperty tofalse - …and we call the
addItemViewController(didFinishAdding:)method of thedelegateproperty onselfand onitem.
Quite a lot to chew, right?
Yet another extension
As I said, we were starting to see where things were going when the self keyword was used. It refers to that view controller, which is itself tied to the main ChecklistViewController.
We move to that view controller’s Swift file and, at the very end, we add an extension of type AddItemViewControllerDelegate with, inside, the two methods which, this time, are completed with a call to navigationController?.popViewController(animated: true).
This is said to be a placeholder, but at least it does something.
Segues
Segues in iOS serve two purposes: they connect view controllers and can also pass data between them. When a segue happens the prepare(for: sender:) method gets called as the transition happens. If we want to exert some control over what the segue and this method do we need to give our segue an identifier and this is done in the storyboard. Simply click the segue and, in the Attributes Inspector, write “AddItemSegue” in the Identifier field.
Prepare for segue
Now, in the ChecklistViewController.swift file we need to add an override to the prepare method and to cast the segue’s destination as an AddItemTableViewController. Final thing: make the ChecklistViewController in which we are writing the code the delegate of the AddItemTableViewController.

Final magic!
In the extension at the end of this same page we need to add some lines in the addItemViewController(_: didFinishAdding:) method.
We need to store the new position of our ChecklistItem() which, being at the end of the list, will be equal to the count of the todos array of the current todoList.
We then have to use this position in the indexPath (a tuple made of a row and of a section in the table), store that into an array of indexPaths and then insert the new row containing our data in the new position!

Nice, right?
Challenge
This time the challenge is theoretical one: we need to think about what are the changes we need to perform in order to use the AddItemViewController as an EditViewController. Brian suggested we needed four of them.
I confess that while I paused the video and thought about the possible solution I did get four ideas but … they were all wrong, or at least sort of. I did not try them in practice to see why they may have been wrong but, still, they were not the solution. For your curiosity, I had thought about:
- Add another segue this time from the text label to the next view controller and call it EditItemSegue.
- Add another protocol to handle the edit.
- Create the delegate variable as before, this time of the new protocol’s type
- Modify the code.
I realise these are not really four things but about four steps in a direction so, I guess I was quite far from the solution.
Solution
- The title must read “Edit Item” instead of just “Title” as now.
- The new view controller must contain a
ChecklistItem(because we want to modify one). - We need to update the user interface to allow editing (right now we have a Cancel and an Add button which would not be very useful).
- Any edits we make must be applied to the
ChecklistItemwe are interacting with instead of creating a new one in the end.
Detail disclosure indicator
The first thing we have to do is to update the UI: let’s go into the Storyboard and let’s select the cell in the ChecklistViewController. With that, open the Attributes Inspector and modify its Accessory to Detail Disclosure.
Next we need to find a way to show the checkmark anyway because now, with the Detail Disclosure in place, it will not show anymore nor respond to our previous code.
We simply have to insert a new label in the cell, with the text “√” (Alt-V) inside, and position the two labels as shown in the following picture.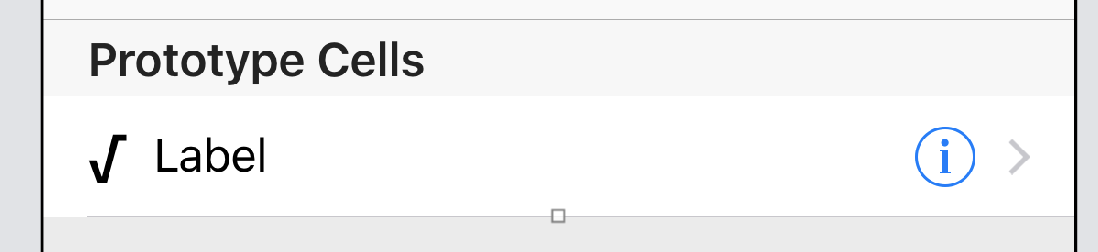
This is one of the least elegant solution I have ever found in my very short career as iOS Apprentice but, not knowing how to do it better, I will just shut up and wait for new inspirations.
The code in ChecklistViewController.swift needs to be changed as well, but to do so we need to give the new label a Tag to identify it in code: give it 1001. Then change the configureCheckmark(for: with:) as follows:
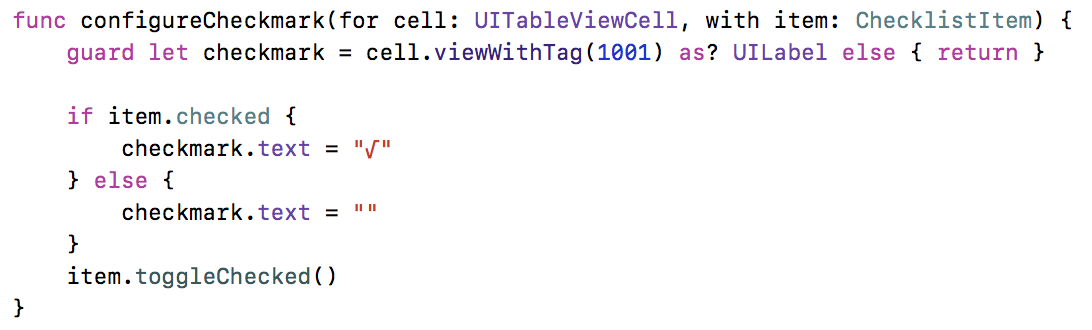
Of course you can experiment with other text (like an emoji!) instead of the square root character! I used the pikado one 🎯 but you need to be careful because you will need more space between the two labels.
Challenge: second segue
This one was easier but it makes me think: then I was right before! :-)
- add a second segue from the detail disclosure indicator to the
AddItemViewController - make sure it is a show segue
- name it
EditItemSegue.
Be careful about point 1.: the detail disclosure indicator is not selectable directly. Just click and drag with the Ctrl button pressed from above it and it should work. You will not get the same dialog as before but a “Accessory Segue” (before it was an “Action Segue”).
Also, do not select the “Selection Segue” as this will do other things.
These little things seem trivial but to me they are so important (because I am a geek!).
Passing data in segues
Our next steps are the following:
- create properties on the receiving view controller so that it can know that something is being edited.
- initiate the segue, that is let the
prepare(for:)method know that we are calling it in this case. - check the identifier
- get an instance to the receiving view controller
- assign data
The first step is pretty straightforward: just open AddItemViewController.swift and add the following two variables:

weakbut, well, such is life…The first one is an optional ToDoList and the second one is an optional ChecklistItem. They need to be there so that we can access them in the prepare(for:) method, apparently. This part is not really well explained in the videos. It seems typical for all these tutorial to just show you the way and then if you do not understand it is your problem.
Initiate the segue & check the identifier
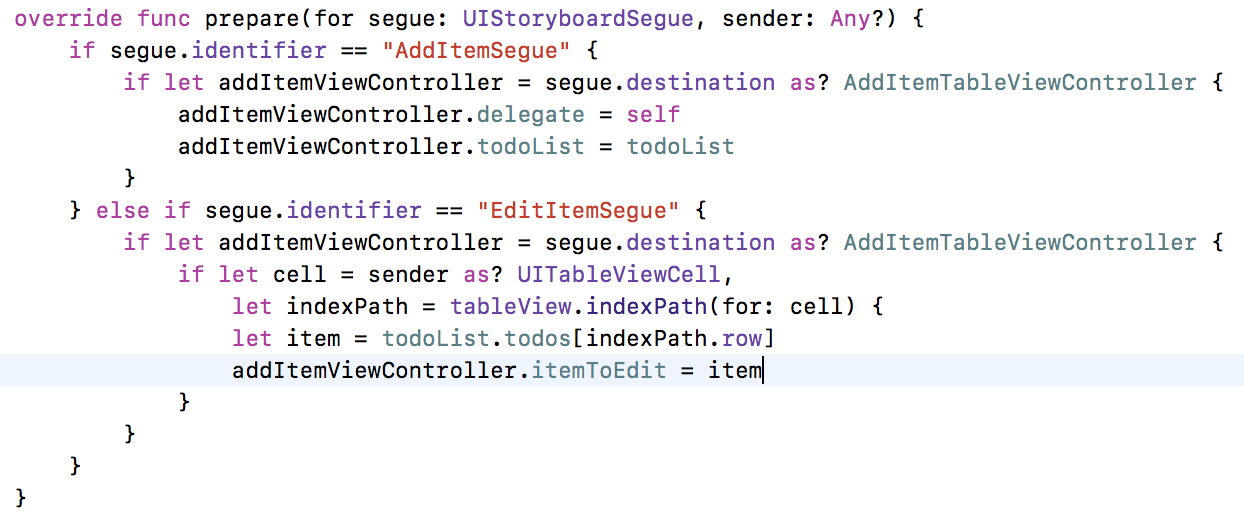
We already have a prepare(for:) method in ChecklistViewController.swift so we just need to update it. In the first part of the control flow statement we need to add a reference to the todoList so that the one we are trying to access here is the same as the one on the other view controller (*noise of brain starting to melt*).
We then create an alternative to this set of events with an else if segue.identifier == "EditItemSegue". The destination will be of the same kind (that is why we can use the same storyboard item (read: view controller) but then we want to access the cell inside of it so that we can edit it.
Get an instance to the receiving view controller
In the prepare(for:) method one of the parameters is called sender and it corresponds to the part of the screen connected to a segue that the user tapped on.
We get the sender as a UITableViewCell and an its indexPath in the optional binding statement (if let). We then store the corresponding item in the addItemViewController.itemToEdit statement. Here is the new prepare(for:) method:
Assign the Data
The party is about to begin as we move back to AddItemViewController.swift and we modify the viewDidLoad method. Just under the super.viewDidLoad() call we optional bind itemToEdit to item and we set:
- the title to “Edit Item”
- the
textField.texttoitem.textso that we get the same text of the cell we tapped upon. - we enable the addBarButton.
The only problem now is that, clicking the Done button, the data is not getting passed back to the previous view controller. Time for another challenge it seems.
A little comment here: all this calling many variables with the same name is incredibly confusing to me: I have an
itemhere, anitemthere… which one is which?
What is the problem?
The issue here is, as we saw, that editing the item doesn’t modify the original list. This is a big issue and understanding why it is so is not easy. After all, our prepare(for:) method looks pretty good.
The problem is in our done() method, which creates a new ChecklistItem and uses it to populate the todoList. Also, we call the addItemViewController method on the delegate here but we do not assign self to be the delegate in the else if statement of the prepare(for:) method. Phew 😅 , this is a big one!
Apparently we need to enrich our protocol so that it can also edit items instead of just adding them. Let’s see how to do that!
NSObject
My programming apprentice path starts with Swift and I have only done a bit of practice in the C programming language so I have no idea what Objective-C looks like but it seems that we have to inherit some of its functionalities to allow our app to pass data between view controller. I know nothing of all this but this seems pretty low level stuff that should be included in Swift but well, we will see how life evolves! Let’s cut the chatter and get back to work!
Delegation
First thing we need to add this line to the prepare(for:) method, right at the end: addItemViewController.delegate = self, exactly as in the first part of the method.
Update the protocol
Back in AddItemTableViewController.swift we want to enrich the functionalities of our protocol (personally, now that I think about it, I would have created the protocol as a separate Swift file but, I guess there three lines of code do not make any harm). Add this line to the protocol declaration: func addItemViewController(_ controller: AddItemTableViewController, didFinishEditing item: ChecklistItem).
Edit the IBActions
From both the cancel and done IBActions we need to remove the call to the popViewController method. Just erase all the line entirely. They are not needed because the delegate method is already doing that.
In the done method some more work is required (we actually need to rewrite it in a clearer way):
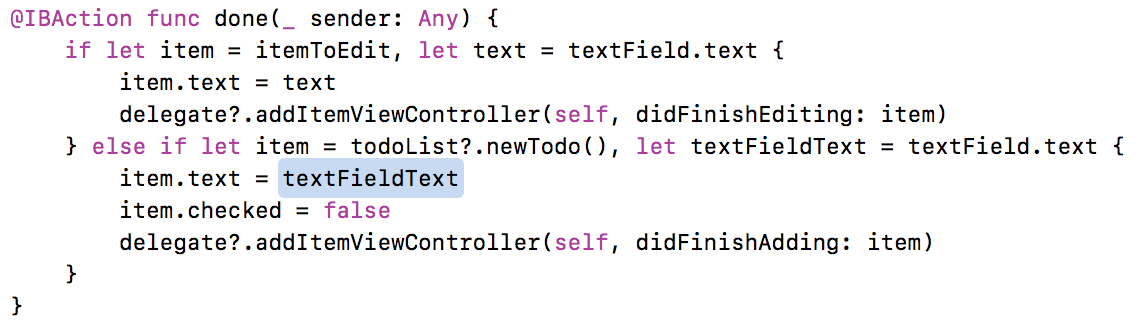
This control flow + optional binding segment allows us to distinguish between two states of our app, the one in which we are editing the item and the one in which we are adding a new todo. This is a brilliant way of coding in my ignorant opinion (IMIO, just crafted right now!) because, finally, I feel I understand how things work. Would I be able to rewrite all of this code on my own? Of course not! But I hope this will come, sooner or later!
Update the extension
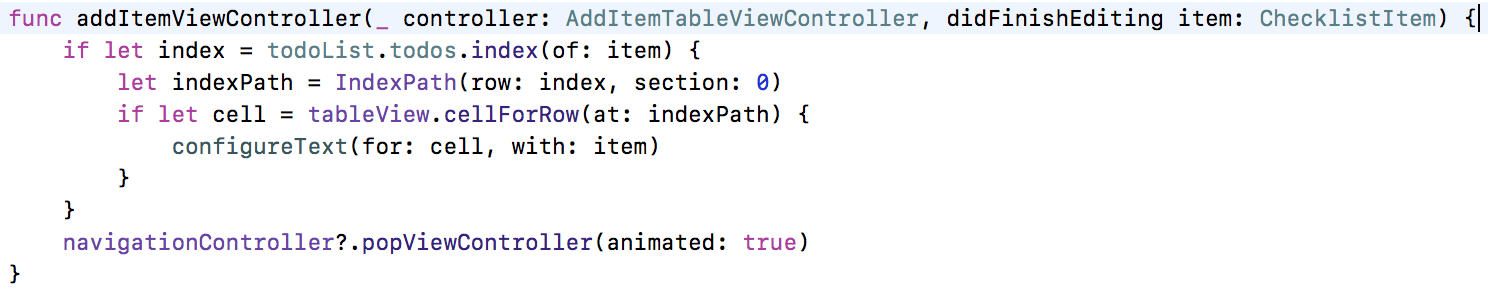
Back in ChecklistViewController.swift we need to populate the addItemViewController(_: didFinishEditing:) method. The first thing to do is to find where my ChecklistItem is located and, to do that, we need to open ChecklistItem.swift and add : NSObject after the class declaration so that we are inheriting the functionality of this apparently very powerful piece of code!
We then store the index of the item we are trying to edit (if it exists) with optional binding, get its “address” (the indexPath) and then, if we find a cell in that location BUM, we call configureText! Brilliant, really!
Then we just need to pop our ViewController to go back to the main screen! Amazing! Here’s the code!
Everything is fine!… or is it?
We now feel so good because our app is able to edit the items and to bring them back to the Checklist view controller but, did we try to see if the rest of the app is still working? No we didn’t because if we did we would have noticed that our todoList.todos array is out of sync.
If we try to add a new ChecklistItem the app will crash because it will expect index 5 +/- 1 and will get asked for 7, not finding it.
To fix this we need to erase the call to creating a new item in the addItemViewController(_: didFinishAdding:) method and modify the rowIndex constant with a - 1 in the end.
I’m not really sure why this is working now because we based all our building on the fact that we needed to create a new row at todoList.todos.count, that is, at the end. Maybe it is because in the done method we are already asking for a todoList?.newTodo() which appends a new item to the array…
It still sounds nebulous to me and I wonder when I will be able to understand this. If when we are calling the didFinishAdding method we are looking for the count -1 place, does it mean that our app has an increasing amount of empty cells at the bottom of the array? Isn’t this a waste of resources? Is there a better way of doing this?
Refactoring
At this point Brian suggests that the name AddItemViewController is not a good one and that we should substitute it with ItemDetailV … I mean, after spending all this time with such long names are we really now starting to abbreviate? Come on… If I recall correctly in the iOS Apprentice book this class is called ItemDetailViewController in the end, but, again, such is life! Let’s move on, we are almost done!
Ok… that was a joke!
In our next challenge we had to play with Xcode’s refactoring tools so that we change the name of the class to ItemDetailViewController and the name of the protocol methods to itemDetailViewController...
This was done either via the contextual menu of the class name or via the find and replace tool.
Really nice!
So we came at the end of this Fourth Part!
I can’t wait to begin the new one!
See you there!
Happy coding!
If you like what I’m doing here please consider liking this article and sharing it with some of your peers. If you are feeling like being really awesome, please consider making a small donation to support my studies and my writing (please appreciate that I am not using advertisement on my articles).
If you are interested in my music engraving and my publications don’t forget visit my Facebook page and the pages where I publish my scores (Gumroad, SheetMusicPlus, ScoreExchange and on Apple Books).
You can also support me by buying Paul Hudson’s books from this Affiliate Link.
Anyways, thank you so much for reading!
Till the next one!
