How to create trills with accidentals
PART 3 – EXTENSION LINES
Now that we have completed our array of trill symbols with accidentals, we need to create dedicated lines for each of these symbols. To do so, go to the Notations tab in the ribbon where you found the Symbols before, and tap on the downward expansion arrow next to the Lines category.

Find the trill line and press Edit… to learn more about it. At the start (left column) we have the ordinary trill symbol, while for the continuation part—that is, that beginning of the line in successive systems—the parenthesised trill symbol has been chosen. We now need to create a line for each of the symbols we created before, but we do not yet have the parenthesised symbols for all of them. Sadly, they need to be created one by one. I will show you how to do one of them, and you will create the other ones as a homework.
Creating the parenthesised symbol
First, let’s see how the ordinary symbol with parentheses has been created. Go to Notations > Symbols > select the parenthesised trill and tap on Edit… The two symbols used are to be found in the “General” category of symbols, here:

In my professional scores, I create dedicated parentheses symbols according to the text font used, since it looks much better, but for this tutorial we will use the symbol provided by the chosen music font (in this case Opus).
As we did before, create a new symbol, tap Add… and select one of the custom symbols we created before. I suggest using the same name of the custom symbol for this new one, and just adding brackets around it. If you prefer, you may add something like “_brackets” or “_parentheses” at the end of the name to make them easier to find. Now, add the two parentheses glyphs via the Add… dialogue and nudge them into place. You can take inspiration from the values for X and Y shown in the default trill symbol or, better, use your taste to find the best-looking position. Once you get to a result like this one, press OK, then Close.

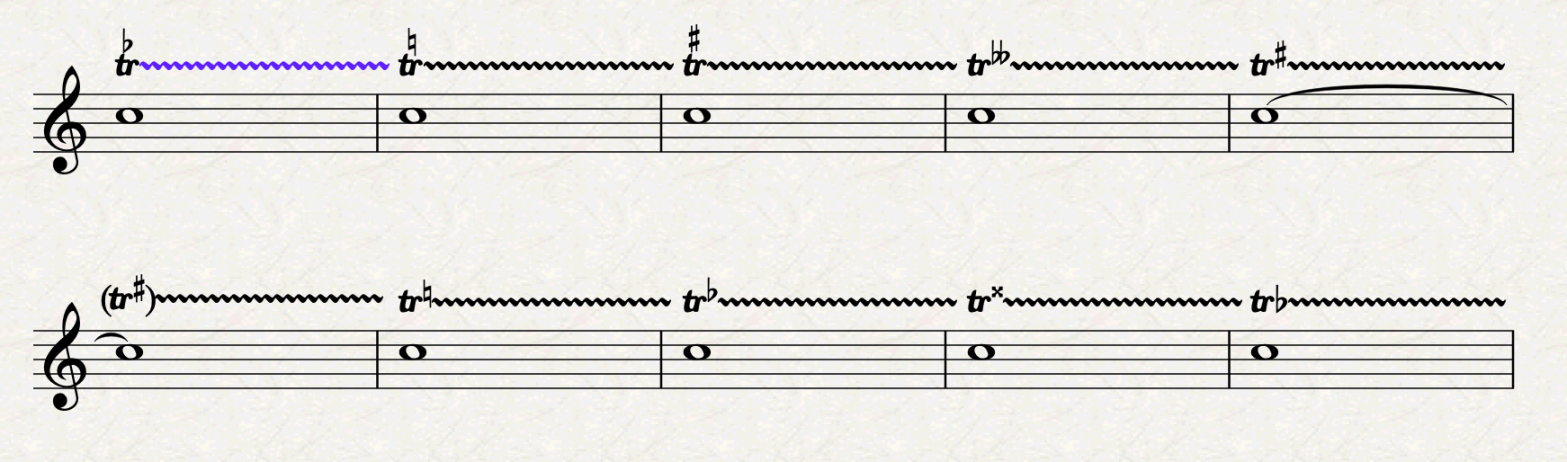
Before we proceed, I recommend you create all the other symbols to be ready for any scenario. Your final array should look something like this:

Creating the line objects
Get back to the Lines dialogue (expansion arrow in Notation > Lines). Unlike with symbols, it is not possible to create a new line by starting from a blank slate. Instead, you need to select an existing line, then tap on New…, confirm the prompt, and proceed with the next steps. This approach sadly has several inconveniences, since lines are grouped by categories, which are not clearly visible in this state. Creating your custom line will add it to the group to which the original line belonged, often causing needless confusion if you are not very experienced. I personally created hundreds of custom lines before realising what had happened. Did I create them again from scratch? No, I simply renamed them to leverage the power of the new search field introduced in recent years.
Select the basic trill line and tap on New…. Now, immediately change its name, possibly matching the name of the trill symbol you are going to use (e.g., “TRILL-beside-sharp”). Instead of suffixing a descriptor such as we did previously with the bracketed symbols, I suggest prefixing something like “LINE_” to distinguish it from the symbol with the same name and to make your custom lines immediately noticeable among the sea of custom ones.
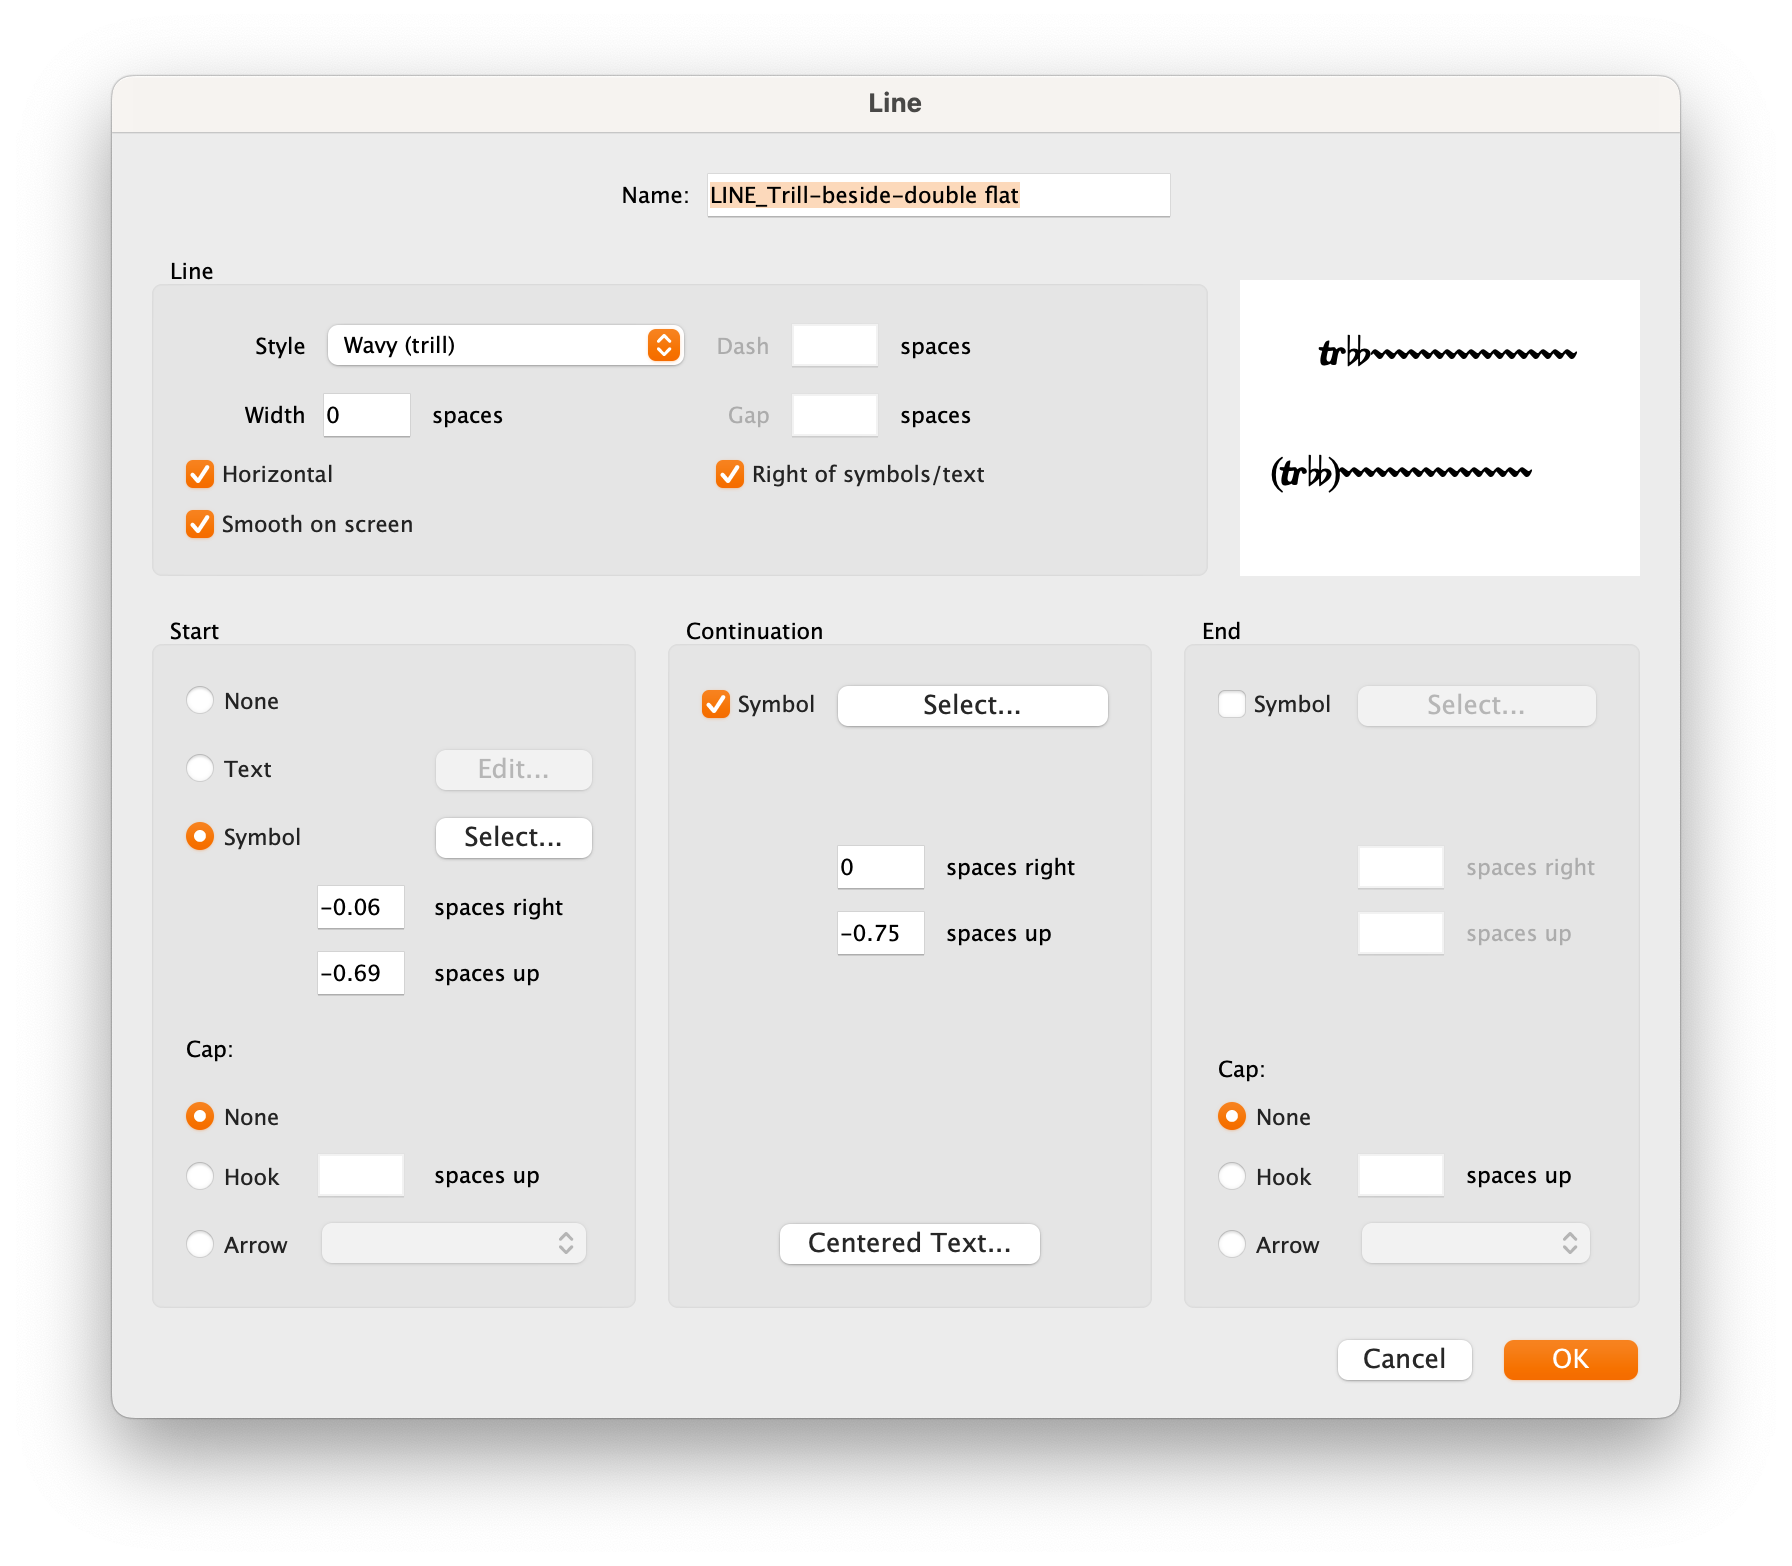
In the left column, next to the Symbol radio button, tap on Select… and browse to find the desired symbol. Since this is a very similar symbol to the one we are substituting, the positioning should be already spot on. Should you be unhappy with it, simply edit the “spaces right” and “spaces up” fields to your liking, knowing that positive numbers mean right or up and negative one mean left or down.
Move now to the middle column, “Continuation”, where a checkbox is ticked next to “Symbol”; this is because having a continuation symbol is optional. Since having the continuation line without the bracketed trill symbol is indeed possible and an accepted alternative with some publishers, you can also simply uncheck this box to make your life 50% easier! In my engravings, I always keep it checked, so I will proceed in this direction. Tap on the Select… button and proceed as before, this time choosing the bracketed symbol. The nice thing is that the continuation line automatically starts after the symbol.
You can ignore the right column unless you also want to add the stop vertical line, which, at least in ordinary classical music, I have never seen used much. The final result should look like this:
Press OK, then either close or keep creating all the other lines. For the “TRILL-beside-double sharp”, I suggest you change the “spaces right” to “-0.19” instead of “-0.06”, since the continuation line conflicts with the double sharp symbol. Here are the lines in action, look at how the last line of the system continues in the next system with the correct symbol.

POWER TIP: It looks beautiful, but there is an issue: every trill line overflows in the next bar, due to a setting in the line’s Default Positions options. This may not appear problematic at first, but as soon as you create a new line that occupies the whole bar, or the remaining portion of it, the line will also appear in the next system, whether we like it or not. We are now going to correct this for every line we created, but, for future lines, remember to edit the main line you are taking as a model so that every copy will inherit the new settings. In the Appearance tab of the ribbon, find the Design and Position section and tap on the expansion arrow. The Default Positions dialogue will open. Select the Lines radio button and browse to find your lines (this should be easy since we took great care in naming them). Now, in the “Creating Lines” section of the right-hand-side portion of the window, change the “Horizontal position of right-hand end” from “-0.25” to “-1”. Repeat the process for all lines, then tap on OK. Every line you have already created will need to be selected and have its position reset via the shortcut Cmd/Ctrl-Shift-P (or via the equivalent command in the ribbon or in the command search).
And we are done!
Bottom Line
Thank you for following me so far in this Third Part. Tomorrow we will close this series with some dedicated Bonus Material!
If you like what I do, please consider liking this article, sharing it with your peers and colleagues, and subscribing to this blog to be notified of upcoming articles.
If you use an iPad and would like to improve your Sibelius experience, please give a look at my viewset for MetaGrid Pro here.
I also have a newsletter that follows my publishing journey, check it out if you are interested in cello (and more) and would like to receive special gifts. You can also browse my online catalogue here.
Thank you for your time and continuous support.
See you in the next episode!
Michele

One thought on “Sibelius Tutorials – Episode 1 C”