How to create trills with accidentals
PART 4 – BONUS MATERIAL: trills with different intervals
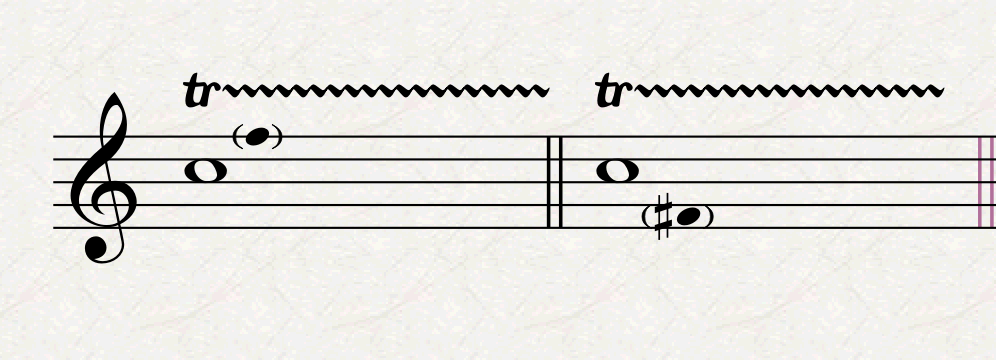
In the first part of this tutorial, I showed you an alternative way of notating trills that has been getting very popular in the last few decades. It consists of only showing an ordinary trill line and, in smaller size, stemless, and parentheses, show the note between which the main note has to trill with. It is a very practical approach because it allows to express trills that are below the main note, whereas the ordinary method would not allow this. It looks like this:

In the first case, the trill is between C5 and F5, while in the second case it is between C5 and F-sharp4. It could be written as two notes tremolos but, besides the tremolo notation being harder to realise, it also creates more visual noise than needed.
There’s a challenge in creating this sort of notation in Sibelius, though, since many composers see something in the second page of the keypad that makes them think they got it:
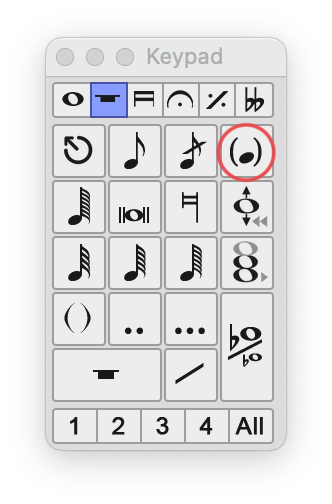
If you hover over that button, you will get the tooltip “Pre-bend note”, which is something that comes before a note, not after. So, what do composers usually do—innocently, of course—? They select the next note, activate the pre-bend note, insert the small note, then drag it in place. Does it work? Kind of, if you have a solo instrument, and you will never reset the note spacing of your piece. As soon as there is more than one instrument involved, chaos will erupt.
How to get over it?
The trick is to use the powerful hiding capabilities of Sibelius to create a note that is perfectly placed in the rhythmical grid.
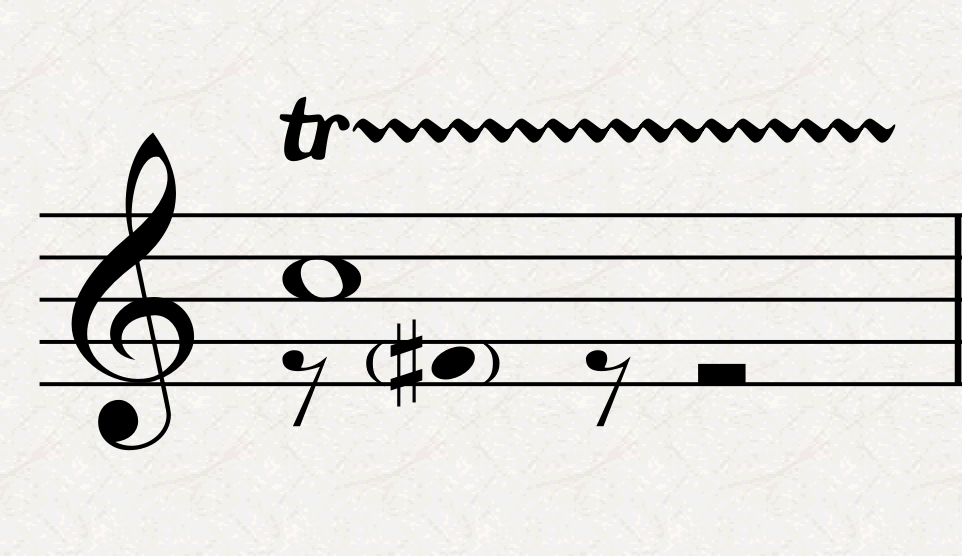
Let’s start from one of the above examples, let’s say the right one, trilling between C and F-sharp. Activate note input (N) and write a whole note C. Now, press ESC, then N again. Activate the second voice (Option/Alt-2), then insert an 8th-note rest and an F-sharp 8th. You should see something like this, since Sibelius fills the remaining part of the bar with rests automatically:
Now, select the entire bar by clicking in an empty spot inside it, then filter for rests by going to Home > Select > Filters > Rests. Now hide the rest using the shortcut Cmd/Ctrl-Shift-H or by going to Home > Edit > Hide or Show > dropdown menu > Hide. Select once more the complete bar and reset note spacing using the shortcut Cmd/Ctrl-Shift-N. If you have any version of Sibelius from 7.x to 2023.3.1 you should be good to go, but if you are using anything beyond 2023.5, you will see this:

There has been a massive update in the way that hidden notes work and interact with other elements of notation since the May 2023 release and, I must say, at least for my work, this has been highly disruptive. They added a new shortcut to have rests still occupy space as they did before, which is obtained by adding Option/Alt to the previous shortcut, thus Cmd/Ctrl-Option/Alt-Shift-N. One can change the default shortcut of this new Reset All Notes Spacing to be the old one, but I still find this not ideal. I wonder why, when introducing new features, software developers do not think more of those they are damaging with their actions, but only of those they are benefiting. It would have been better, in my opinion and from my personal perspective, to introduce such a game-changing feature as an optional switch buried somewhere in the software’s Preferences. Sadly, so far, my pleas have gone unanswered. It also seems that the majority of ordinary users of Sibelius (which are not professional engravers, for your information) are liking this new feature, so, for now, I will keep my deepest concerns for myself.
In any case, this and the trill’s finishing notes can be created in this way. Simply, the trilling note is created just after the main note, while the finishing ones are created at the very end before the next note. The process, though, is the same.
Epilogue
We have finally reached the end of this massive tutorial, which I’ve decided to split into smaller chunks after seeing how much there was to say on the topic. If you want me to cover how this is achieved in Dorico, please let me know by dropping a comment below. In that case, the tutorial will be much shorter, since Dorico realises almost all of this at the press of a few buttons, allowing us to create more and more quickly.
In case you would like to avoid all the hassle of creating all these symbols and lines by yourself, I have put together a Sibelius file that you can purchase if you would like to support what I do. This file contains all symbols and lines already made as described in this tutorial. You can find it here on Gumroad. Don’t worry, there is nothing there that is not covered for free in this article, it just cuts your time and effort by about … 10 times!
Thank you for following me so far, If you like what I do, please consider liking this article, sharing it with your peers and colleagues, and subscribing to this blog to be notified of upcoming articles.
If you use an iPad and would like to improve your Sibelius experience, please give a look at my viewset for MetaGrid Pro here.
I also have a newsletter that follows my publishing journey, check it out if you are interested in cello (and more) and would like to receive special gifts. You can also browse my online catalogue here.
Thank you for your time and continuous support.
See you in the next episode!
Michele

One thought on “Sibelius Tutorials – Episode 1 D”