
Episode 2 – First Steps
Choose paper, margins, and staff size
The first thing to do when engraving a big symphonic work such as an opera is to choose the two main parameters that will accompany you for the rest of your journey. At full power, an opera orchestra may have around 30 to 40 active staves, plus singer and choir in the most crowded scenes. To accomodate all these forces, I suggest picking A3 or Tabloid (11×17”) paper, that is the biggest paper available that will fit on a conductor’s stand.
As margins, I prefer to set them for something relatively small, to give more space to the music. In the opera I recently completed, I used 10 mm top, 12.5 mm outside, 15 mm inside, 10 mm bottom mirrored margins. These allow plenty of space for the binding without taking away too much space from the staves. If I have to allocate more margins, I prefer more space on the top part of the page, rather than at the bottom.
When choosing a staff size, try to avoid anything below 4.0 mm at all costs. Should you ever find that, at 4.0 mm, you are running out of vertical space, consider increasing the page size, but I hope you will never encounter such a scenario. For this opera, I selected 4.6 mm as my base size and then created three extra sizes for emergency situations. Sibelius allows for up to four staff sizes (don’t know why so few), and they are available in Engraving Rules > Staves > Staff Design. There, instead of the default values, set the second to fourth values as shown in this picture:
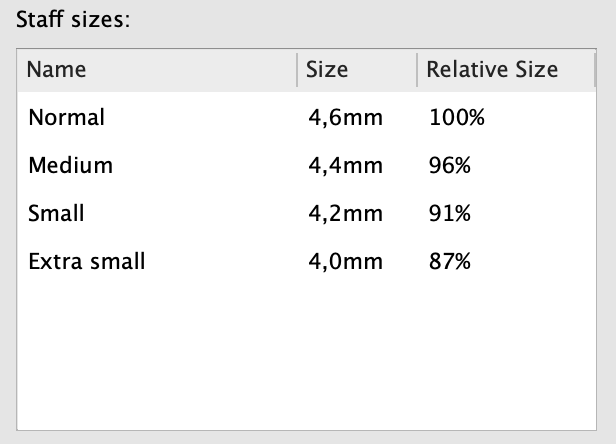
Having these four values set up like this saves my nerves countless times.
Instruments set-up (Part 1)
I assume you already know the instrumentation of the opera you are going to engrave, but let’s play safe by starting from the simplest instruments to allocate. A piano, if present, should always use 2 staves, but create a 3-staves one just in case the need arises. The celesta, if present, may be played by the same player, so you could get away with an instrument change to all staves but, unless the change is rapid, I would still create separate instruments. Place these two instruments alongside the harp just above the strings.
Strings
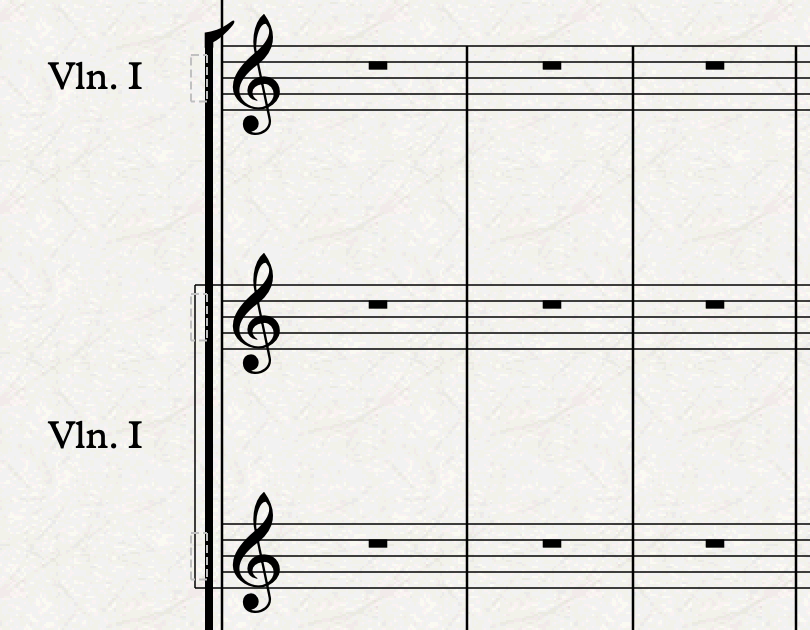
The number of staves required for strings highly depends on the kind of writing the composer chooses to have. Starting from the simplest, five staves are needed: Violin 1, Violin 2, Viola, Cello, Double Bass. Very often, though, you will need a “Solo” + “gli altri” divisi, that is, the section leader playing alone against the other members of the section. While you can get away with this by simply adding a second stave and use the top one for tuttis as well, I suggest a safer approach. I need not remind you that this will be a long piece, so we need to strive for the maximum possible optimisation. Recently, Sibelius introduced the Staff names feature, allowing us to give a full and short name to each staff of a given instrument in addition to a full and short Instrument name. To keep things super simple, you could get away with a single instrument and several staves, but I prefer two instruments for each section. The first will be for tuttis, the second will be for every possible combination of divisi. To achieve that, in the Instruments dialogue (shortcut I), add two “Violin I” or “Violin 1” instruments, then select the lower one and tap on the Below button in the “Extra staff” section. You should get this result in the dialogue:

…and this in the score:
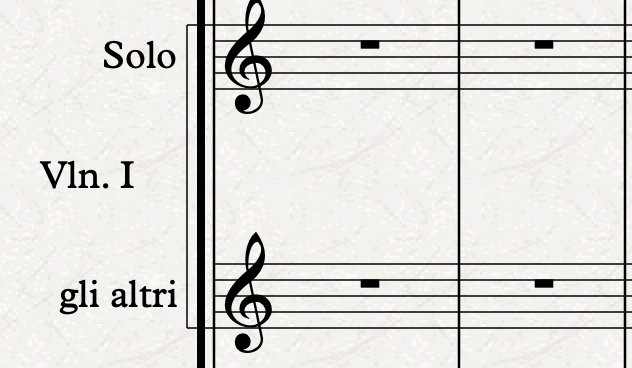
See how Sibelius created an instrument name that is centred between the two lower staves. While we may want more flexibility like group names, vertical text, brackets, etc…, but enough is as good as a feast! Now, slightly to the left of the initial clef, you will see a smallest dashed rectangle in light grey, not easy to see at all. Double-click on the rectangle next to the top Violin I stave and type “Solo”, then press ESC or click away; repeat the same for the lower stave and type “gli altri”. Check that you got something like this:
Repeat this process for all strings. During the copying or composition process, you can come back to the Instruments dialogue and add extra staves as needed, e.g., “1 desk”, “2.-3.”, or any other division you may encounter.
I also suggest you add an extra Double bass or Cello stave at the bottom of the score and name it “Violoncello & Basso” for when these two sections play unison and you need to save vertical space.
Choir
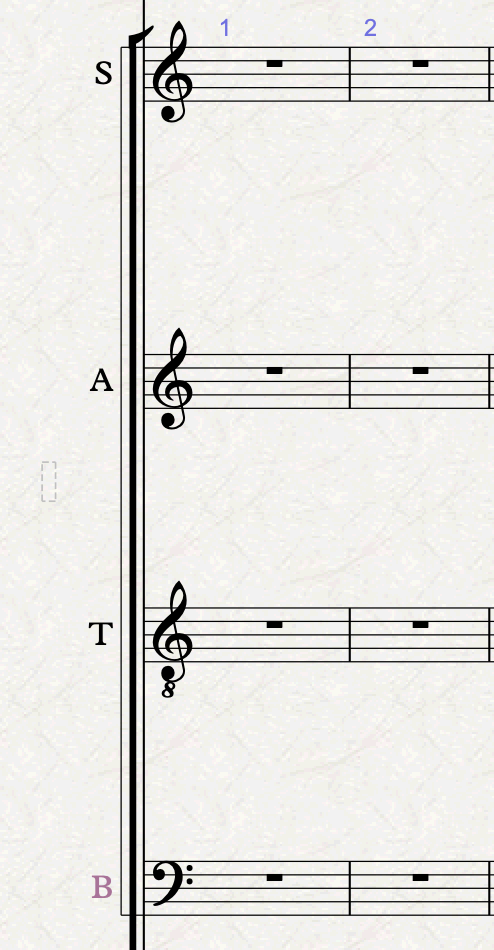
Moving up above harp, celesta, and piano, we have the choir. I suggest having two “Choir” instruments, one with two staves and one with four. The two staves one is the default result you get when searching “Choir” in the instrument picker, and assumes Soprani and Alti above and Tenor and Basses (in bass clef) below. This setup will be used every time vertical space is at a premium in the score (in my case, I used it all the time in the full score). The four staves one is a copy of the same instrument, but with the top and bottom stave duplicated. Once you’ve done that, change the instrument of each stave to Soprano, Alto, Tenor, and Bass, to distinguish them in Panorama view. To achieve this, ensure you have nothing selected but those staves in view, then:
- Press Cmd/Ctrl-Option/Alt-Shift-I to invoke the Instrument change panel
- Browse for “Soprano” (ordinary, not solo)
- Uncheck “Add clef (if necessary)” and “Announce at last note of previous instrument”
- Tap on OK
- Tap on the clef of the top stave
- Repeat the process for the other three voices
- Double-click on the “S.” Instrument name and change it to “Choir”, or leave it empty, which is possibly better.
- Double-click on each of the empty rectangles next to the four staves and write “S”, “A”, “T”, “B” (with or without an abbreviation dot at the end).
The final result should look like this:
Obviously, you will only have one of these two set-ups in the score active at any given time, with the other one hidden. In the vocal score you will always use the expanded setup, so I’m afraid you will need to start with this one and then condense/reduce it in the full score when needed.
Bottom Line
This episode was already getting too long, so I’ve reserved the other instruments for Episode 3, which will be available soon enough.
Thank you for reading so far!
If you enjoy what I do, please consider liking this article, sharing it with your peers and colleagues, and subscribing to this blog to be notified of upcoming articles. If you use an iPad and would like to improve your Sibelius experience, please give a look at my profile for MetaGrid Pro here.
I also have a newsletter that follows my publishing journey, check it out if you are interested in cello (and more) and would like to receive special gifts. You can also browse my online catalogue here.
Thank you for your time and continuous support.
See you in the next episode!
Michele

One thought on “How to engrave an Opera (in Sibelius) – Ep. 2”