Episode 11 – Building the front matter (Part 2)
Welcome back! Today we continue from where we left last time, building the front matter pages in Sibelius.
Copyright Page
I prefer it on page 4 (verso) but for this tutorial I will place it on page 5 (recto), leaving page 4 blank. If you want to change this, simply cut and paste the content from one page to another. In episode 9, we saw what fields are suggested for this page. I recommend using as few text styles as possible, to avoid overcomplicating things. Use this wildcard to automatically insert the text from the corresponding field in the File > Info section:
\$copyright=Copyright © [year] by [holder]\
A problem that will arise now is that we cannot have more than one copyright field in the “Backstage” area. Usually, you will not need more, but in case you need, simply type the info in.
In the 4th line, use the “\$publisher\” wildcard. For the cover painting, use the “\$artist\” one, instead.
After compiling all these fields, create a new Text Style, based again on “Subtitle (on blank page)” and call it “Copyright (on blank page). I recommend an 18pt size or smaller.
Now, create a new object with this same text style and paste in these details:
Published separately:
Libretto ISBN <code>
Vocal score ISBN <code>
Orchestral parts available on hire from the publishers
\$title=[Title]\ is recorded complete on <CD code & title> with the cast of the original <production name> production
and the <orchestra name> conducted by <conductor>.
Upon pressing ESC, you will notice that this new text object ends up above the previous one. This happens because every text style has a creation place set up in its settings. What is misfiring here is that the Reset Position command doesn’t work for blank text styles, yet another Sibelius bug caused by who knows what. Just drag your text objects around until you find them placed as you please. Here is the result you can find in my template:

Dramatis Personae page
Sibelius word-processing capabilities are, sadly, quite limited compared to Dorico or, better, to dedicated DTP (Desktop Publishing) apps (InDesign, Affinity Publisher, etc…). Creating this page with a column for the character name and another for their role will be tedious, but we will do our best.
Use the “Title (on blank page)” style to create the “CHARACTERS” text object, then create a new text style based on this, call it “Heading 1”, reduce its size to 32pt, and set its vertical position to 60 mm (or equivalent) from the top of the page.
Now, below that, we need to write character names and their role. We cannot use a centred text style because we want the list to be aligned flush left. Create a new text style based on the “Plain text (on blank page)” style and call it “Characters List (on blank page)”. Apply these settings in the Horizontal Posn tab:

For vertical position, based on the “Heading 1” style, set it to 70 mm. Using the contextual menu on the blank page, create a new text object based on this style and write this text as the first line: “FIRST CHARACTER NAME, first character role basic description first character vocal range”. Between the description and the vocal range, insert 15 (fifteen) tabs (the key above the ALL CAPS). This will ensure that all vocal ranges are aligned among themselves.

Some place below that, insert a basic description of the scene, centred horizontally. The “Subtitle (on blank page)” should provide a good base, but always create a new text style to keep things modular and flexible to edit for the future. I suggest a size of 20pt and a distance of 50 mm from the bottom of the page.
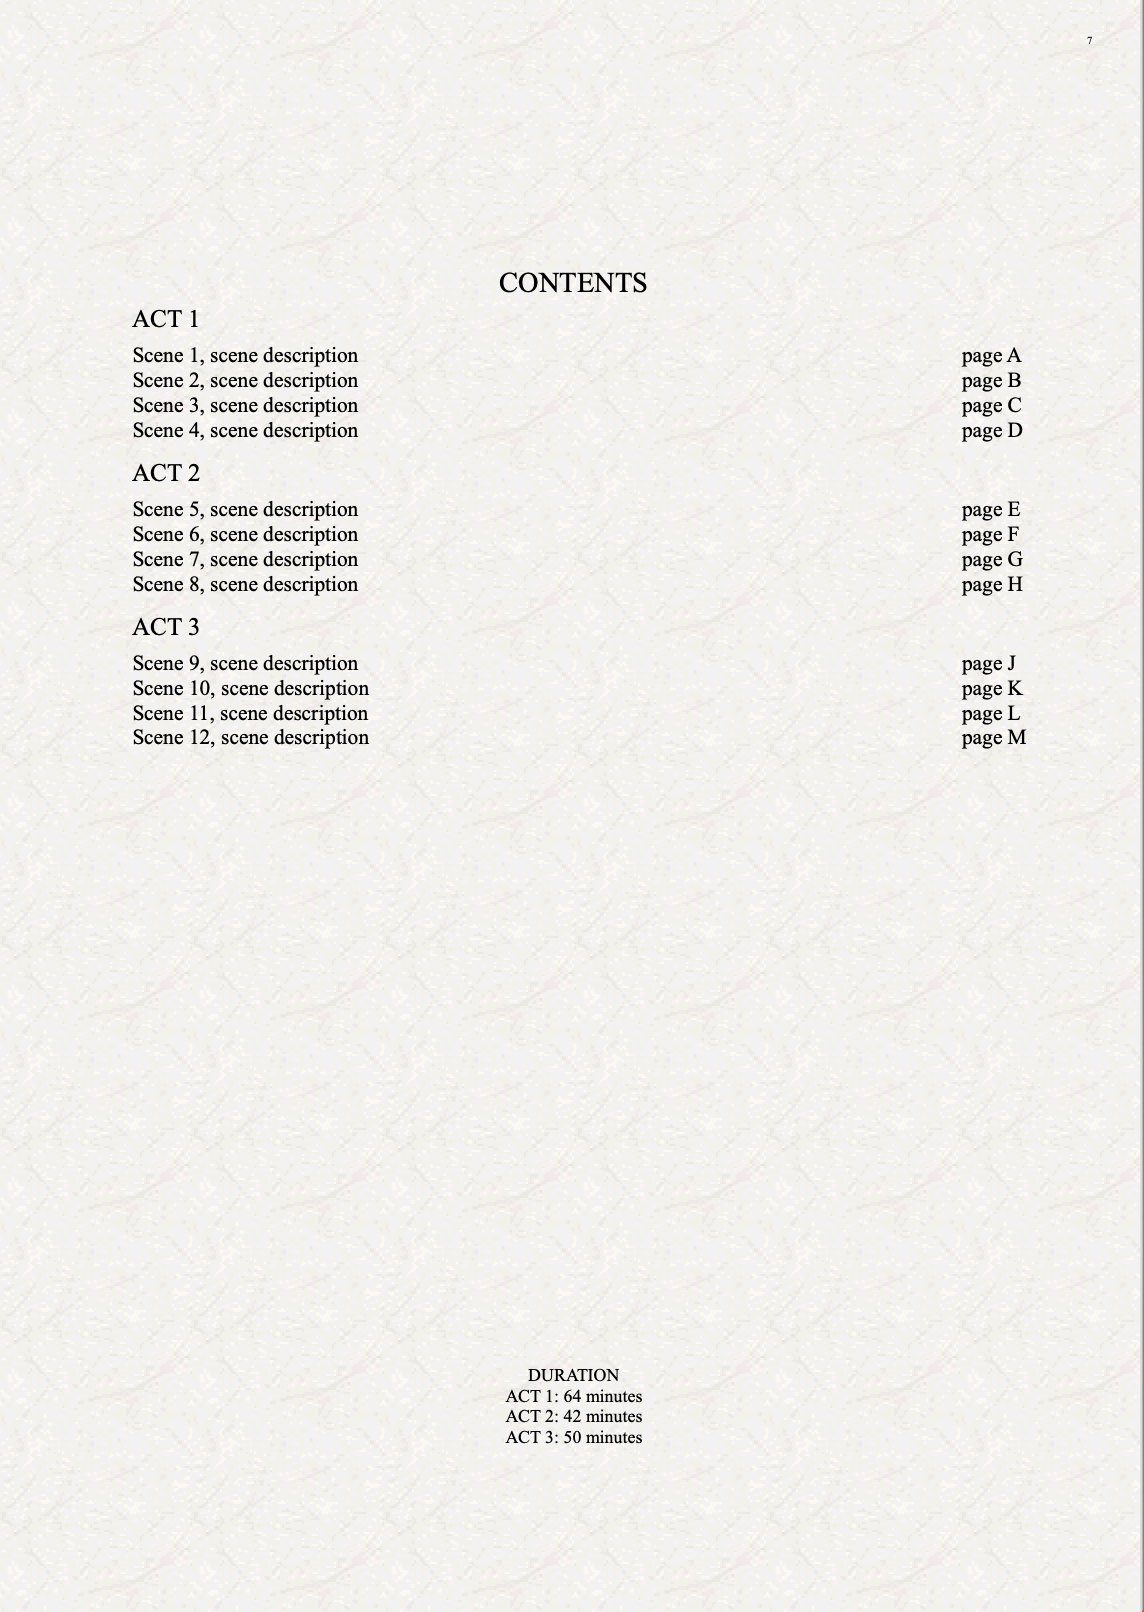
Table of Contents
This is where Sibelius eventually falls: while word processors and DTP programs will be able to create a dynamic and auto-compiling Table of Contents (ToC)—if given the proper settings!—, your ToC in Sibelius will need to be manually populated. Still, this is possible if you want to keep everything inside a single software.
For this tutorial’s sake, we will do our best with the tools at our disposal. First, write CONTENTS using the same “Heading 1” style (you see? Here comes the power of modularity!). Now, create a text style for the ACT’s heading. I propose something flush left, but it is sadly not possible to set how far from the left margin a text box should be. You could work around that by using the Indents tab of the text style, though. Create a “Heading 2 (on blank page)” text style based on the “Heading 1 (on blank page)” style. Change the vertical position from 60 to 70 mm, then set alignment to LEFT for both frame and text, check the “Snap to margin” option (this is crucial) and, in the Indents tab, set 20 mm for both first line and consequent lines. Finally, reduce the size from 32 to 28 pt. Now, create a text object with this style and write “ACT 1”.
Proceed by creating a new text style based on “Heading 2 (on blank page)”, give it a sensible name for the scenes in ACT 1, reduce the size a bit (26 or 24 pt) and set the vertical position to 80 mm from top margin. Create a text object and input “SCENE <number>, <scene description>” then as many tabs as needed to bring you to the other side of the page, then “page X”. On a new line, proceed with the next scene.
For successive Acts, you need to create a copy of the style used for the previous act, then change the vertical position according to how many scenes you have already added. It’s a hit-and-miss process, so be patient. In my template, I have created three acts of four scenes each.
At the bottom of the page you can add the duration of the whole opera or of each act separately. Create a dedicated text style for that, as we did so far. The final result for this page should look something like this:
Bottom Line
That’s it for today! In the next episode, we will conclude this part of the series with the last remaining pages. Stay tuned!
If you enjoy what I do, please consider liking this article, sharing it with your friends, and subscribing to this blog to be notified of upcoming articles. If you use an iPad and would like to improve your Sibelius experience, please give a look at my profile for MetaGrid Pro here.
I also have a newsletter that follows my publishing journey, check it out if you are interested in cello (and more) and would like to receive exclusive gifts. You can also browse my online catalogue here.
Thank you for your time and continuous support.
See you in the next episode!
Michele

One thought on “How to engrave an Opera (in Sibelius) – Ep. 11”