System Settings — Part 3
Welcome back!
Last time, we covered Wi-Fi, Bluetooth, Network, and Notifications within the System Settings app. Let’s see how much progress we can make today!
Sound
The Sound panel has two main sections: Sound Effects and Output & Input. The first one uses a 6-row table view to show everything one needs. Starting from the top, we have Alert sound with, at the right-end of the row, a drop-down menu and a play button.

A nice little touch of UX is that, when you expand the drop-down menu and hover over each alternative sound, it previews the sound for you. It’s the little things, right?
The Play sound effects through row will only show your Mac’s speakers if you do not have something else connected. I left Alert volume as I found it, at full throttle. Then, we have three switches: the Play sound on startup, ON by default, will draw a questioning expression on younger users, since they do not know that, at a certain point in the past, this iconic sound was removed via software from our Macs. Luckily, it came back by popular demand soon afterwards, and we can gracefully enjoy it again. The Play user interface sound effects, also ON by default, is triggered when the user performs certain actions, such as dragging an item to the Trash. The last one, Play feedback when volume is changed, OFF by default, is there to play a sound when the user changes the volume so that one can hear the new volume in effect straight away.
The Output & Input section starts with a segmented control, letting you decide whether you want to engage with Output or Input. Basically, one will see the name of the output/input devices (minimum one, your Mac’s speakers and microphones), and will be allowed to alter the volume and balance. For the Input, besides the Mac’s microphone, you should see any iPhone connected to the same Apple ID, with the Type set to “Continuity Camera”. The Input Volume is set in the middle and should stay there unless someone tells you they can’t hear you. An animated bar will show your input level if you want to test it.
Focus
The Focus settings are normally inherited from your other devices if you so chose. If you haven’t, feel free to press the Add Focus… button and to follow the detailed onscreen instructions. This is a marvellous feature that has increased my productivity tenfold. Besides, I am using it to the 10% of its potential, especially on my iPhone where I’ve never had the patience to arrange the home screens too deeply.
Going into each single Focus mode will let you change the Notifications, Schedule, and Focus Filters settings, but, interestingly, it doesn’t allow you to change its name and/or to remove it.
Below the list, you will see “Share across devices”, which I turned ON, and “Focus status”, which I’ve also set on (in this specific feature, you can share your focus status only for selected statuses).
Screen Time
This section was added in Ventura and perfection in Sonoma. It has four main sections and a bottom area: Activity, Limit Usage, Communication, and Restrictions.
Activity
Activity has three rows, the first of which is App & Website Activity. Tapping on that opens a detailed view that shows the average daily usage of the machine, with three main colour-coded categories: Productivity & Finance, Creativity, and Entertainment.

I’m not sure if I would qualify Sibelius usage as “Entertainment” but it seems they know best! Below this, there is a list of used apps ordered by used time, from high to low. There is also a dropdown menu that lets you choose between “Show Apps” and “Show categories”. There is even a search bar, very useful if, for example, you want to check how much time you spent on a specific app during the last week.
Thanks to this tool, for example, I discovered a website (schubertsong.uk) that remained active as if always in front of everything else from Wednesday 6th March 2024, at around 12 PM until Friday 8th March 2024 at around 10.30 PM, time when, in frustration for Time Machine not working, I restarted the Mac. I will set a reminder to give a look at this page now and then. At the top, where it says, “Today, 9 March”, there is a dropdown menu where you can select a weekly view instead.
The next row is dedicated to Notifications, showing you how many notifications apps sent to your Mac. I’ve always found this fascinating and a personal challenge to reduce them. On average, I get about 50 notifications per day. Assuming the computer is accessed at least 12 hours per day in my case, that makes a bit less than 5 per hour. Not too bad, but it can be improved!
The Pickup section, honestly, doesn’t make too much sense to me on a Mac, since even if this is a laptop, I’m not physically lifting it. Maybe it is referring to the times I turned on, or woke the Mac up and saved what was the first app to be used? The macOS User Guide is not clear here, since it assumes one can browse devices from here, but I do not see any. This might have been due to Device Sharing being turned off on the other two devices. After turning it on, though, nothing changed on the Mac. Always in the guide, the Apps section is not there. Instead, there is an All Apps row showing the sum of all pickups.
On iPhone, there is a “Devices” button which, when pressed, shows a list of my devices. In there I do not see the Mac (neither of them), I see an iPad called “iPad (6)” which is not how my iPad is called, then 3 iPhones, only one of which is the correct one. All very strange, but since all the world is a database, I should not be surprised that things became so confused.
Limit Usage
This new section has four rows: Downtime, App Limits, Always Allowed, and Screen Distance. Inside of Downtime, there is a switch to turn it ON/OFF and, below, a section where one can schedule it. Going in order, one has to hope the configuration is in one of the other pages, but certainly, from a user’s perspective, having it here would have greatly helped.
Inside of App Limits, which for me must have inherited its ON state from my other devices, one can set limits specific to this machine. It’s interesting that I certainly use email apps more than 1h per day, which should trigger the block set up on iPad, but it never does. I generally do not want to limit what I can use on my Mac, so I will not configure anything specific now. Checking on my other devices, it appears that updating to iPadOS 17.4 wiped out my previous settings here, and the same happened on iPhone after the 17.4 update. What was it with this update? macOS 14.4 was a long and painful update, and it also apparently reset some iCloud Drive permissions and settings. I will now start again from the Mac, hoping it propagates.
The Always Allowed page manages what apps and contacts should remain available during Downtime. One can set only specific contacts to be allowed to reach out during downtime, as well as specific apps to keep working. In my case, FaceTime, Maps, Messages, and Phone are set to be always available and, for now, I’ve not set up Downtime in general. I believe these are settings more important for the iPhone, or if you are a parent and want to control how much time your kid is spending in front of the screen.
The Screen Distance feature, something truly remarkable and useful, and that I suggest everyone activates on their iPhones and iPads, shows once more how Apple may have gone a bit too far with SwiftUI and with their haste in bringing Screen Time to macOS. The Screen Distance page, in fact, while containing a setting that can be activated on the Mac as well, states that it will send an alert if one holds an iPhone or iPad with Face ID too near. I’m turning it on, hoping it will sync to the other devices.
Something I’ve discovered upon further testing is that if you turn on Downtime, it will extend to all your devices at the same time! Of course, one can uncheck the syncing feature and have separate settings, which will probably be my case, since I want to stop using the phone quite early in the day, but keep the iPad and Mac available and handy.
Communication
The first page is Communication Limits. Apple warns that limits apply to phone calls, FaceTime, Messages and iCloud contacts and that communication to known emergency numbers identified by your network provider is always allowed. The page is divided into two sections: During Screen Time and During Downtime. “Screen Time” is a fancy way to say “while you are using your device, and it is not locked by the Screen Time limitation settings”. By default, everything is set to “Everyone” and, at least for me now, it will stay so.
The second page is Communication Safety, which, when turned on, can detect nude photos and videos before they’re sent or viewed on your child’s device, and provide guidance and age-appropriate resources to help them make a safe choice. It specifies, also, that Apple does not have access to the photos or videos. The feature is OFF by default, and there are two more sections: Child Safety Resources with a View Resources button and Improve Communication Safety. Upon clicking on the button, a modal screen appears, translated in the language of your region, which surprised me since I expected it would have opened in a browser. The second is a switch to help Apple with the users’ analytics. It defaults to OFF, and it will stay as such on my Mac. The Learn More… button at the bottom of the list, instead, opens in your browser and contains additional information.
Restrictions
There is only one page here, Content & Privacy. It is OFF by default and until you turn it ON, you cannot access the table view below. Seeing how many options are in here, it would require a whole article on its own. Please let me know if you would like to see it.
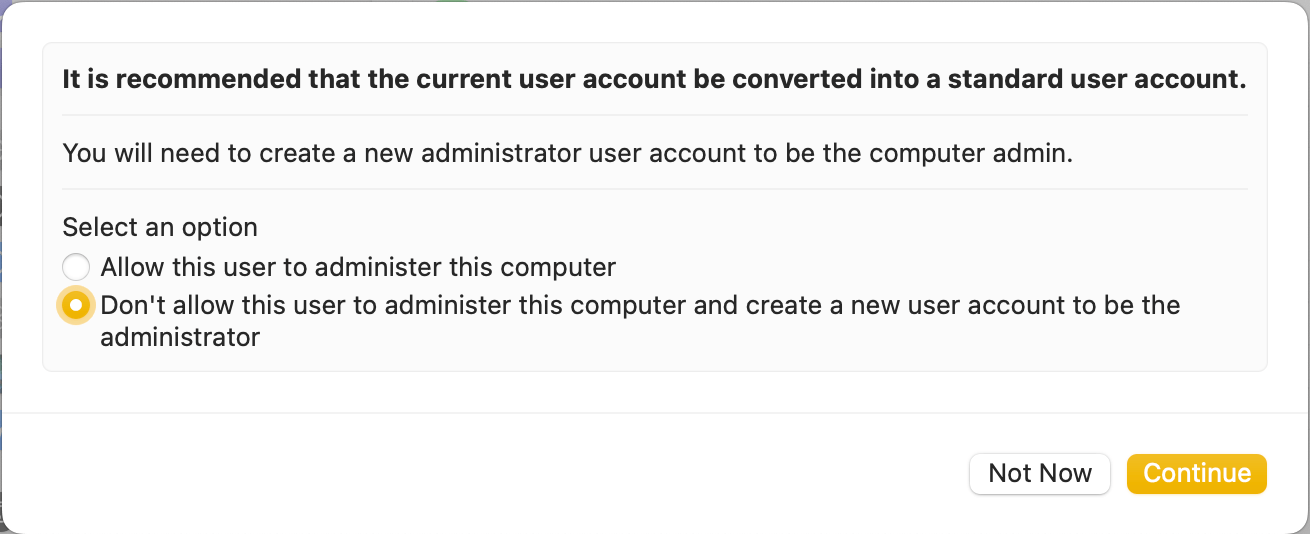
The last three options on this page are Share across devices, which I’ve kept turned OFF on the Mac and ON on iPhone & iPad, Lock Screen Time Settings, and App & Website Activity. This last one is ON by default, and turning it off would disable real-time reporting, Downtime, App Limits, and Always Allowed settings. I have left it ON. The middle one is a bit more delicate, as it is thought for a user account that is not an administrator (e.g., your kid’s account). It is described as a setting that lets a passcode be added to secure Screen Time settings. The reason is clear: since one cannot restrict access to this page on a user-account level, one can protect these settings so that the user cannot change them if they do not know the passcode. When trying to activate it, you get this warning, to which I answered Not now.

I could have chosen “Allow this user to administer this computer”, but until I plan to have different users on this Mac, this setting will remain dormant.
Bottom Line
In the next episode, we will continue our exploration of System Settings with the General page. Stay tuned!
If you are interested in music notation and editorial design, please consider joining my mailing list here, I would deeply appreciate it.
I hope you found it useful. If you did, please leave a like, share it, subscribe to be notified of upcoming articles! Please share your experience setting up your Mac down in the comments, and have a great day!

One thought on “My upgrading path to Apple Silicon — Part 9”