A review of Dorico 6’s improvements to workflow
This article constitutes the second part of our expanded, paraphrased and enriched transcription of the excellent video by Anthony Hughes. Go watch it, then come back for a recap, or follow along while watching.
PART 2
View Options dialog
With all the improvements shown in the previous article, it is clear how there are now several elements that can be displayed on the music page but that, at the same time, are not necessarily part of the music itself. They are, not-exhaustively, the system track, highlighted repeated bar regions, the grid, rulers, or, for musical elements, cautionary accidentals. Since every user has their preferences when it comes to a working interface setup, the new View Options dialog has been added to allow you to set all of these in a unified place. Even better, you can now save your choices as default, recall them in existing scores, and have them always there already waiting for you in new projects.
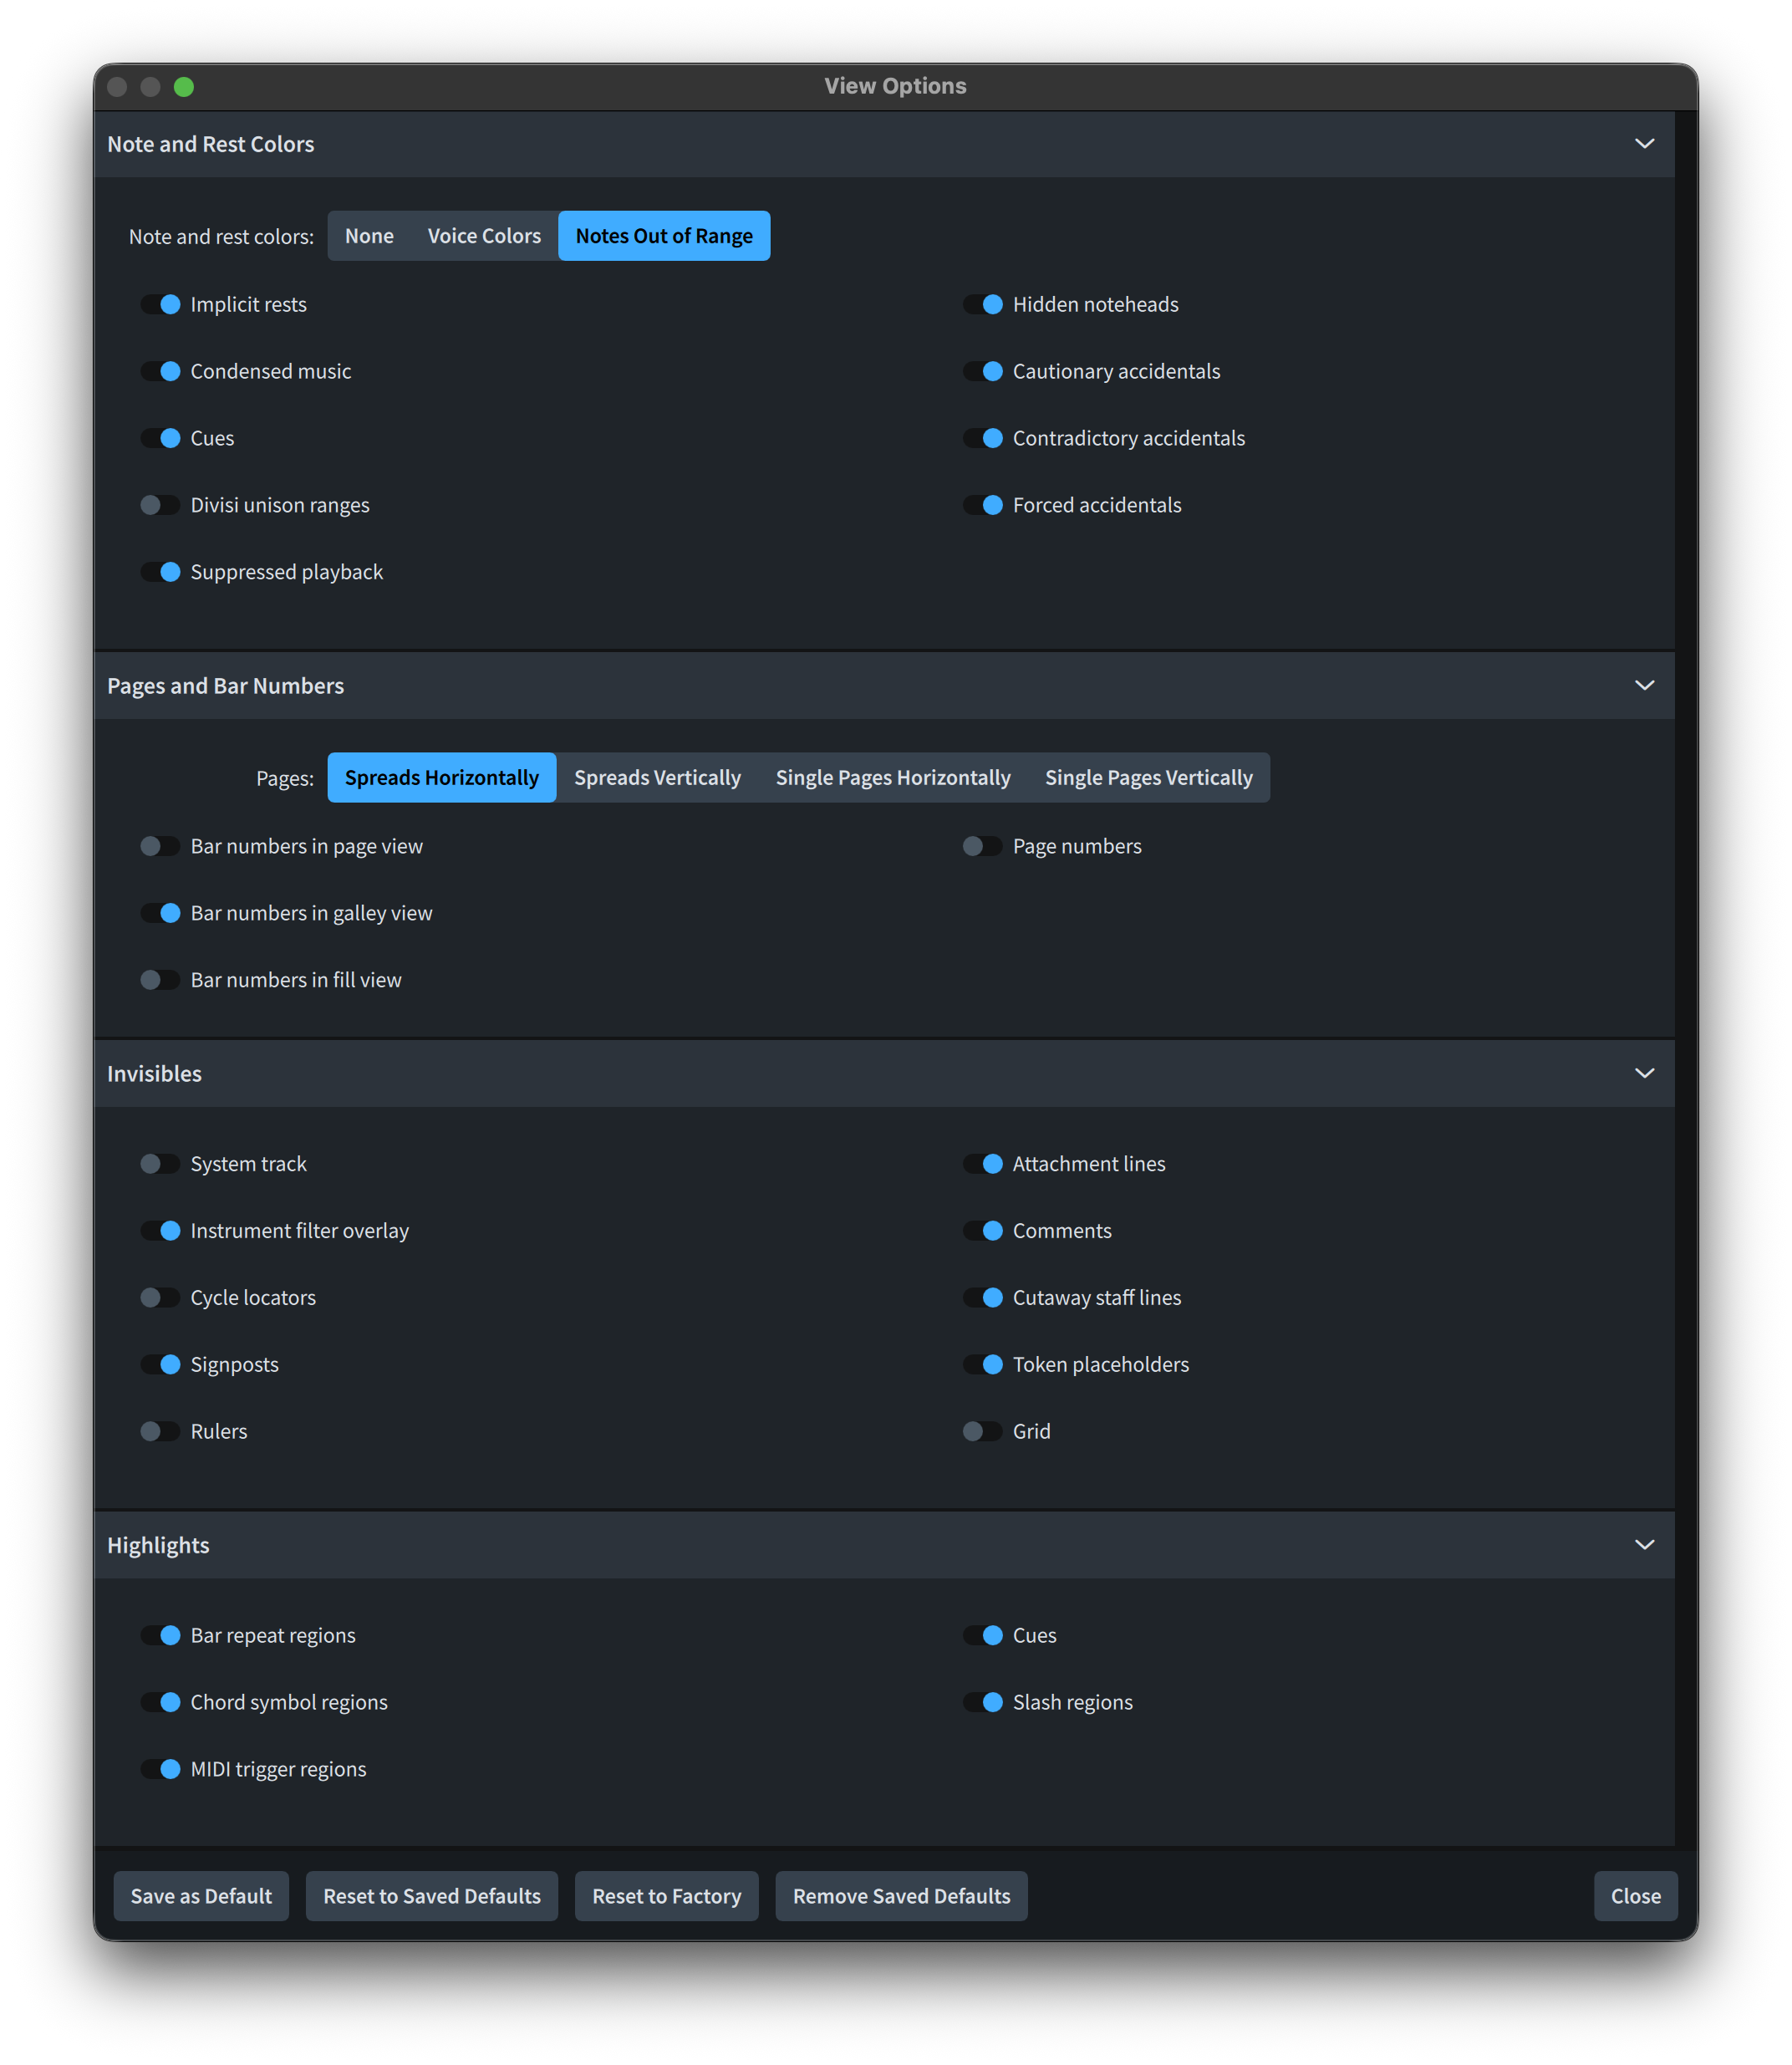
Another novelty is represented by the new View Options selector in the toolbar, hidden behind an eye-shaped icon. Tapping on it expands a dropdown menu that allows you to rapidly show or hide certain frequently used elements, such as the system track and signposts. If interacted with from Engrave mode, also rulers and grids can be selected.

One thing that I would love to see improved is that tapping a second time on the button does not collapse it, instead quickly closing and reopening it again. One needs to click on something outside of it to close it for good.
Editing Staff/Player Group Labels
A very welcome addition to version 6 is the possibility to avoid a trip to Setup mode when one needs to edit staff labels or player group labels. It is instead now possible to simply double-click (tap) on them to open the editing dialog.

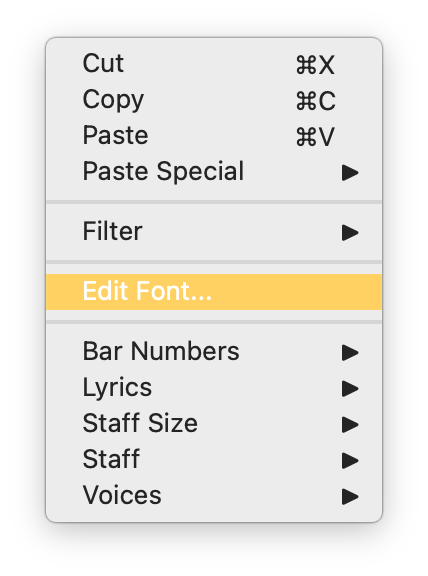
Improvements to Font settings
Up to version 5, when you wanted to make edits to a specific paragraph or font style, you had to select an object, go to Engrave mode, then through the Library ▶︎ Paragraph/Font Styles path, hoping that the correct style would remain selected. Now, instead, you can simply open the contextual menu for a selected item (right-click or Ctrl-click on Mac) and choose Edit Font. This will immediately open the corresponding style menu, eager to welcome your desired modifications.
A major quality of life improvement is also the implementation of a search bar atop several popup menus that contain long lists—such as available fonts or SMuFL glyphs. Typing in the field will let you narrow down the selection:

Text frames
In the past, the correct (or most optimal) workflow for editing objects in text frames was a bit obscure. It would happen frequently to accidentally create page overrides just after a double-click and an as much accidental keystroke. Now, when double-clicking a text frame that contains tokens (such as {@projectTitle@}), Dorico will prompt the user to either edit the frame’s content directly or, as suggested by the blue highlight around the button, to open the Project Info dialog. This will let you enter the relevant information in there without overriding the currently applied page template.

If you check the “Do not show this again” box, Dorico will always open the Project Info dialog. There is also a preference in the Note Input and Editing page of the Preferences dialog:

Additionally, when there are token placeholders in text frames that are currently empty (i.e., no detail has been entered in Project Info), they are shown in light grey in page layout. Do not worry as they will not print, and you can even turn their visibility off in View Options.

Finally, there are new tokens for displaying the instruments being used in a specific layout, useful for parts belonging to a player holding multiple instruments. That is {@instrumentlist@}.
Properties panel (lower zone)
An old feature that was most loved and that had gone missing possibly after the introduction of the new interface in Dorico 3 was the possibility of directly accessing the Properties panel with the search field already in focus. This has now been brought back through the key command Option/Alt-8, and it will allow you to filter for the required property immediately. I have to say that I do not use this much because the filtering parameter stays stuck in the search field until you remove it, making it a pain when I need to select different objects one after the other. I see the use of the current behaviour, it just does not suit my personal workflow.
An addition I most appreciate, instead, is the fact that, now, selecting any combination of notes, rests, grace notes, and tuplets will keep the “Notes and Rests” property category visible at all times. On this same line, performing a mixed selection would show only properties that were in common to all selected objects. Now, instead, all properties for all selected items will be shown. There is a preference for that if you do not like it, and it is found in Preferences ▶︎ Note Input and Editing ▶︎ Note Input:

Status bar
The Status bar—the small strip running at the bottom of the window—has been updated to show more information related to the current selection. It can now show the page (or pages) on which a selected item appears, or the timecode position of any individual item (or time range of a multiple selection).

Right-clicking on the status bar now gives you the option to choose what information you want to be displayed.

Modal dialogs confirmation
Modal dialogs—which prevent the user from interacting with any other part of the application until dismissed—can now be confirmed (that is, the OK button can be pressed) automatically via the key command Cmd/Ctrl-Return.
Bottom Line
That’s it for today! Come back next week for the third part of this walkthrough of all improvements to workflow in Dorico 6.
If you enjoyed this post, please leave it a like, subscribe to get notified of upcoming articles, and don’t forget to do the same for Anthony’s video and for the Dorico YouTube channel.
Should you be interested in my other activities, please visit my website and consider joining my mailing list, where you will be able to follow my journey through music notation and independent music publishing.
Thank you for your time, and see you here in the next episode.

2 thoughts on “It’s about the added milliseconds!”