
Today is Day 47 for me (March 19th, 2019) and I am starting to catch up after the disaster that Consolidation Day IV has been for me. Of course, when one is filled with things to do at work, it is very difficult to accept that the extra hour you are squeezing to fit in some learning is ending up in just a blank staring at an even blanker screen.
Today I start looking at Day 42 where the menu is composed of three topics: the usual Setting up (this time for Project 10), Designing UICollectionView cells and UICollectionView data sources.
Let’s get rolling!
Setting up
This project will create an app to help us remember the names of the people we have met. It could prove really useful to me because I usually have a great photographic memory but you can tell me your name three times in ten minutes and be sure that in half an hour I will ask it again to you!
The great news for this project is that we will learn how to make a new data type from scratch for the first time.
Also for this app we can use the Single View App Template in Xcode.
Designing UICollectionView cells
In this app we are going to use a different kind of interface that works in a very similar way to table-views but has grids instead of rows and sections.
The first thing to do is to change the conformance of our view-controller class to UICollectionViewController. Then, in Main.storyboard, we delete our view-controller and replace it with a Collection View Controller from the Object Library. We make it our Initial View Controller and embed it in a Navigation Controller. Last but not least, we need to change the class in Interface Builder as well.
Design fine-tuning
The default collection view has a small cell in the top-left corner but we want it to be bigger and a bit indented. Through the Size Inspector we change its size to 140 x 180 and all of its insets to 10.
In the Attributes Inspector we change its background color to be white (no visible change now but it could matter if the main view’s background color were ever to change) and give it a “Person” identifier for future reference in code (so far it looks a lot like the table view cells’ configuration).
Next we drag an Image View inside the cell and change its X and Y attributes to 10 and its width and height to 120. This will hold the people’s pictures.
Just below it we drag a UILabel of x = 10, y = 134, width = 120 and height= 40. Thanks to Paul Hudson for providing us with these already tested values so that we do not have to reinvent the wheel!
With the label selected we go to the Attributes Inspector and change the font to be a Marker Felt Thin 16, set its alignment to entered and its number of lines property to be 2 so that long names can automatically expand on two lines.
Creating a custom class
We need to create a custom class to manage this new element because we inserted two custom views that we want to manipulate in code. If you recall we couldn’t do this directly inside the table-view controller unless we selected the custom type for the table-view cell and elaborated from there on (something we have not yet ventured into).
Thus, we create a new Cocoa Touch Class that subclasses from UICollectionViewCell and call is PersonCell, we connect it in the storyboard and create two @IBOutlets thanks to the Assistant Editor, one called imageView and one called name (I’ll let you guess what they are each for!).
We also meet the Connections Inspector for the first time, where we can see our two newly creating outlets. So far we created outlets by ctrl-dragging either from the item in the storyboard (or the item itself in the document outline) to the code but we could do the opposite: we could just write the outlets’ code in our custom class, then open our storyboard, select the collection-view cell, go to the connections inspector and drag from the empty circle to the view we want to connect the outlet to. Brilliant!
UICollectionView data sources
After arranging the basics of the UI we need to tell the compiler what to do with it, that is we need to provide the data source for our collection view. This is remarkably similar to what we used to do with table-views. The only real change is that we do not have numberOfRowsInSection but rather numberOfItemsInSection (ooooh!, so exciting!) and we do not have cellForRowAt but rather cellForItemAt (can’t hold the excitement to see how all this works!!… I mean, yeah…!).
For convenience we return 10 for the “how many items we want” and we dequeue a reusable cell exactly as we did for table-views. This time, though, we are using a custom class and we have to perform a downcast to our custom type. In case we do not find it (this should never happen but who knows?) we will throw a fatalError with a custom message.
If we build and run now we will not be able to see the image-views but we can easily fix it by changing the collection-view’s background color to something like black.
Now, Day 43! Yes, I’m coming back!
Today we are going to learn a big lesson about privacy and about what makes iOS so much different from many other systems where user’s privacy is taken for granted but, in the end, it is not given the importance it should have. After all, nothing is given for free in life and whenever you see something “free” well, there is a catch and the harder you have to look for it the more dangerous it could be in the end. Yes, it is as sad as that.
Importing photos with UIImagePickerController
The image picker controller class is designed to let the user select an image from their camera (or camera roll I guess) and import it into the app. We create a bar button item to the left of time .add to store this controller (exactly as we did for the activity controller for sharing and for the alert controller for alerts and action sheets). The target will be a #selector(addNewPerson) which we will be writing now.
The addNewPerson method instantiates a UIImagePickerController, allows the user to crop the image via the .allowsEditing property set to true, marks the view-controller as its delegate (that is, the object which can act on its behalf) and finally presents it with an animation (exactly as we did for the other controllers—we start to see a path forming in the sky).
Right now this will make Xcode scream in terror because our view-controller class doesn’t conform to the protocols needed to become a delegate of the image picker controller… We therefore modify our class definition to add conformance to the UIImagePickerControllerDelegate and UINavigationControllerDelegate.
The first one is defined as follows:
A set of methods that your delegate object must implement to interact with the image picker interface.
The methods of this protocol notify your delegate when the user either picks an image or movie, or cancels the picker operation. The delegate methods are responsible for dismissing the picker when the operation completes.
The methods contained in this protocol are both optional but we need to implement at least one of them for our code to be of any real use.
The second protocol, instead:
Use a navigation controller delegate (a custom object that implements this protocol) to modify behaviour when a view controller is pushed or popped from the navigation stack of a UINavigationController object.
As you can see it doesn’t do anything really apart from managing the transition between the view-controllers of our app. Yes, it is important but, beside conforming to it, we do not need to do anything else.
The method we need to implement is imagePickerController(_, didFinishPickingMediaWithInfo:):
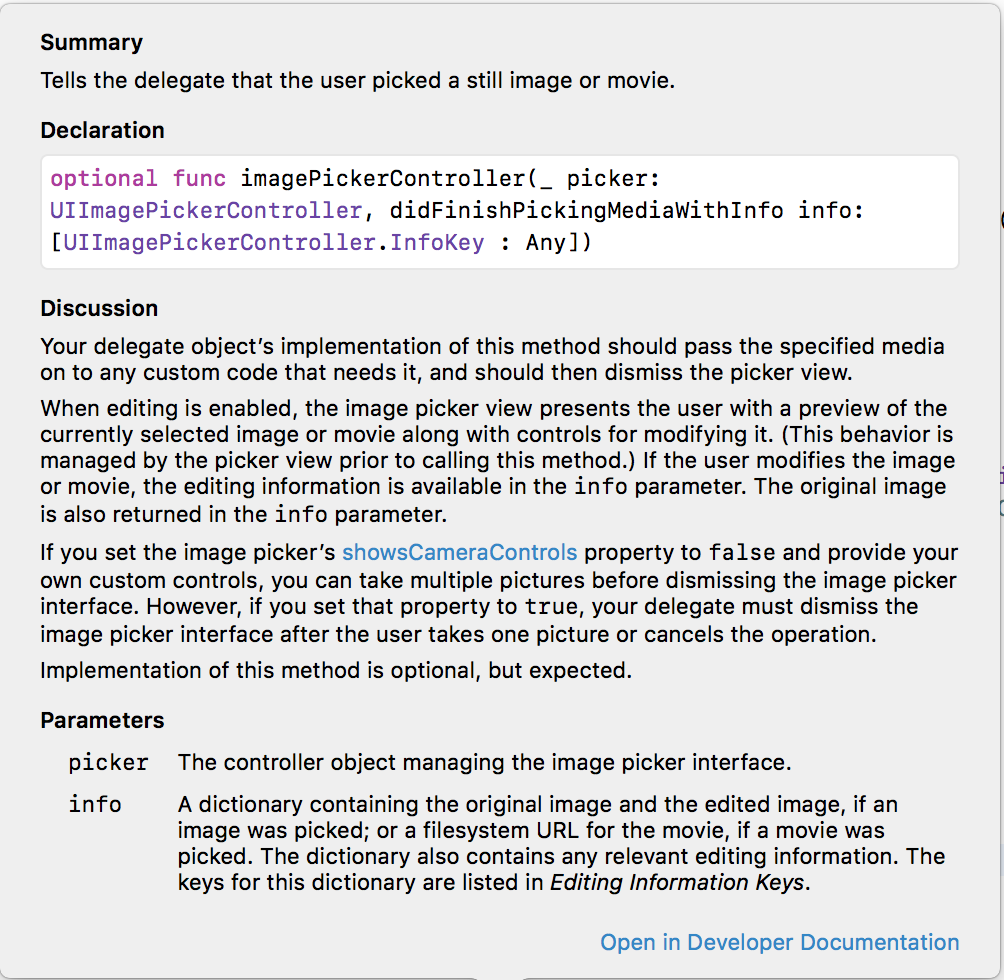
In summary, this methods extracts the image from the dictionary that is passed as a parameter (which dictionary?), generates a unique file-name for it, converts it to a JPEG (with a said compression) and writes it to disk before finally dismissing the view controller.
As Paul says in his article:
it’s very common for Apple to send you a dictionary of several pieces of information as a method parameter. This can be hard to work with sometimes because you need to know the names of the keys in the dictionary in order to be able to pick out the values, but you’ll get the hang of it over time.
This dictionary will either contain an edited image or an original image, according to how we set the allowsEditing property. Again, we need to take all this very safely because we do not know a priori if such a piece of data exists, which obliges us to typecast it using guard let.
The generation of a unique filename is the next important thing we need to do because we do not want to overwrite anything on our disk accidentally. To do this we need a type we have not met yet which is called UUID or, for profanes, Universally Unique Identifier. Calling the uuidString instance property on our instance of UUID we will get a unique string from the file path.
Concurrently, we need to generate a path to disk calling a method we have not written yet called getDocumentsDirectory and the .appendingPathComponent method to it.
Now for the interesting part: the UIImage data type has a method called jpedData() that allows conversion from itself to a Data object in JPEG image format. After this, we meet a method of Data that allows to write data to disk called… drumroll… write(to:)!
The issue we are having right now is not how to write data on disk, but where! Every app we have on our devices have access to a directory called Documents where we can save any private info for the app itself (and yes, it is also automatically synchronised to iCloud—even if I would have a few not too kind things to say about iCloud—). How to find that directory will be the goal of the next method we write getDocumentsDirectory() which finds a path (in reality an array of urls) in the default part of the file manager and returns its first element.
Calling FileManager.default.urls asks for the documents directory and for the user’s home directory in its two parameters.
To summarise this last part, the delegate method we are calling right now is typecasting the image from the image picker (so that if we fail we can get out immediately), creating a universally unique identifier (and a string from it), a precise and unique path to it via our custom method, tries to convert it to JPEG and writes it to disk. Once this is done we dismiss the foremost view controller.
Easy right?!
But … wait … we are picking the image, we are writing it to disk and … it is not appearing in our app … so cruel from us… Let’s see how to fix this.
Custom subclasses of NSObject
This lesson was quite brief and although it had the potential of sounding awfully complex, Paul made it a breeze! The point here is quite straightforward: we already know how to create an array of strings to hold some names or some sentences but what should we do if we want to create an array of people?
The solution is the same as when we created a custom cell, but this time we are going to inherit from NSObject which is like the father of all things! It comes from almighty Objective-C and we will encounter it a lot more in the future!
For now we simply create a new Cocoa Touch Class that inherits from NSObject and call it Person. We give it two properties, both Strings, called name and image and we initialise them with the class initialiser.
Now, back in ViewController.swift, we add an empty array of Person(s) objects as a property to our class and we modify the image-picker delegate method so that every time we successfully import a picture we initialise a new Person object, append it to the people’s array and reload the data.
Something is still wrong here, like the return value for the number of items in section which is hardcoded but we will fix it very soon!
Connecting up the people
This last part was not too difficult but it was very hard to follow. The speaking was very fast and sometimes the explanations of what was being achieved and why was not very clear. But anyway, we will go through that once more and see to make it a bit more clear! We have three goals now:
- Show the correct number of items
- Show the correct information inside each cell
- Give the user the possibility to change a person’s name
The first one should be trivial by now as we simply have to modify the return value for the number of items in section to return people.count instead of an hardcoded number.
The second one requires us to enrich the cellForItemAt method so that we can pull out the corresponding name from the people’s array, synchronise the name label and set up the image—which seems easy but it is not—by dragging it out of its file path. We also play a bit with the design, changing the border color to be a very warm shade of grey and meeting a new friend: .cornerRadius. This is a very welcomed addition and something I will definitely invest some time into in the nearest future.
The last part is a “simple” recap on how we create text-fields in alert controllers. But this is not the genius part because the point is not what we are doing, but where! We are calling the didSelectItemAt method and, inside that, program the alert controller so that it happens every time we tap on a cell! Brilliant! No, really!
Inside the action relative to the text field we create a closure that will verify that the text field has something inside and, if so, assign that value to the person’s name!
Amazing project!
Please drop a hello and a thank you to Paul for all his great work on Twitter, don’t forget to visit the 100 Days Of Swift initiative page and, if you need, feel free to access the repository for this project on GitHub.
Thank you!
Until the next one!
If you like what I’m doing here please consider liking this article and sharing it with some of your peers. If you are feeling like being really awesome, please consider making a small donation to support my studies and my writing (please appreciate that I am not using advertisement on my articles).
If you are interested in my music engraving and my publications don’t forget visit my Facebook page and the pages where I publish my scores (Gumroad, SheetMusicPlus, ScoreExchange and on Apple Books).
You can also support me by buying Paul Hudson’s books from this Affiliate Link.
Anyways, thank you so much for reading!
Till the next one!
