
After the Termopili that was Consolidation Day VII I am really looking forward to learning something new, or even just to consolidate what was learned before. In my music class we always had to perform and that was always a challenge of course, but the true challenge came 2-3 times per year and you had plenty of time to prepare for it. I really wish we could do something like that here, but I already have my plans for what to do after I finish these first 100 days of learning.
This is the beginning of day 73 for me and I will be tackling project 19, which is day 67 of the curriculum. By reading the introduction it seems that you study something (I said study, not learn!), then after some time in the future, you come back and look at it to apply it again. So, as that guy in the company I applied as apprentice for:
[…] we just take templates and chunks of code and put all of them together for the customer. No need to reinvent the wheel.
If this is really all there is to it in coding, I don’t want to do it. Or I will just later switch to something more creative like Unity or graphical design which is more in my strings.
Setting up
The basic is always the same, a Single View iOS app and we will call it JavaScript Injection as the title on the book is. As usual, I will create a Git repository on my computer for this.
Making a shell app
All what is needed here is to create a UILabel with a text of “Hello, world!” placed in the very center of the screen.
In between the gibberish that I was hearing and than thanks to the availability of the written text I understood that there are two kinds of extensions: one the show help information and to show basic settings for the user to adjust. We are going for the first option here.
Adding an extension: NSExtensionItem
At least he said this was hard…!
Go to the File menu and choose New > Target, then iOS > Application Extension > Action Extension. Give it the name “Extension” and check that the Action type is set to “Presents User Interface”. Then click Finish and Activate on the next dialog.
This extension will appear as its own yellow folder in the Project Navigator. Open the disclosure arrow and open ActionViewController.swift. Cancel all the code under super.viewDidLoad() and substitute it with what follows.
First, we need to extrapolate the first item of the array of data the parent app is sending to the extension (called inputItems), which is located in the extension’s context (extensionContext). As all this may fail or not exist we will add a ? after extensionContext and a conditional downcast as? NSExtensionItem at the end. An NSExtension Item is described as an immutable collection of values representing different aspects of an item for an extension to act upon.
Second, if this succeeds we need to extrapolate the first item of the attachments array our inputItem had inside (if it had one!)
Third, if also this succeeds we should be happy enough and call the loadItem(forTypeIdentifier:) method on what we found. What this does is to ask the itemProvider to actually give us the item to work with it, but we will need to write a closure so that it executes asynchronously (it will keep executing which the data is being loaded and sent to us).
Fourth and final, we need to weakly capture self and also accept two parameters, the dictionary given by itemProvider and any possible error.
What do you want to get?
Open the Info.plist file in the project navigator. Open the disclosure arrow next to NSExtension, it should have NSExtensionAttributes, NSExtensionMainStoryboard and NSExtensionPointIdentifier inside it.
Open the disclosure arrow next to the first item and change the type of NSExtensionActivationRule to be a Dictionary, then open its own disclosure arrow and click the + button to the left of “Dictionary”.
Change the “New Item” string to be exactly “NSExtensionActivationSupportsWebPageWithMaxCount” then change the value to be 1. This value means we want to receive only web pages (no images or other data types).
Now select the NSExtensionAttributes line and add a new item called NSExtensionJaveScriptPreprocessingFile, giving it a value of “Action”. This means that when our extension is called the JavaScript action called “Action.js” will be run.
Right-click on the Info.plist file and choose New FIle > iOS > Other > Empty. Call it “Action.js” and proceed.
Just copy inside it the following code:
var Action = function() {};

Action.prototype = {

run: function(parameters) {

},

finalize: function(parameters) {

}

};

var ExtensionPreprocessingJS = new Action
Establishing communication
In the Action.js file, modify the run function like this:
run: function(parameters) {
    parameters.completionFunction({"URL": document.URL, "title": document.title });
},
This means: tell iOS that JavaScript has finished preprocessing and give this data dictionary to the extension.
In ActionViewController.swift replace the // do stuff! line with this:
guard let itemDictionary = dict as? NSDictionary else { return }
guard let javaScriptValues = itemDictionary[NSExtensionJavaScriptPreprocessingResultsKey] as? NSDictionary else { return }
print(javaScriptValues)
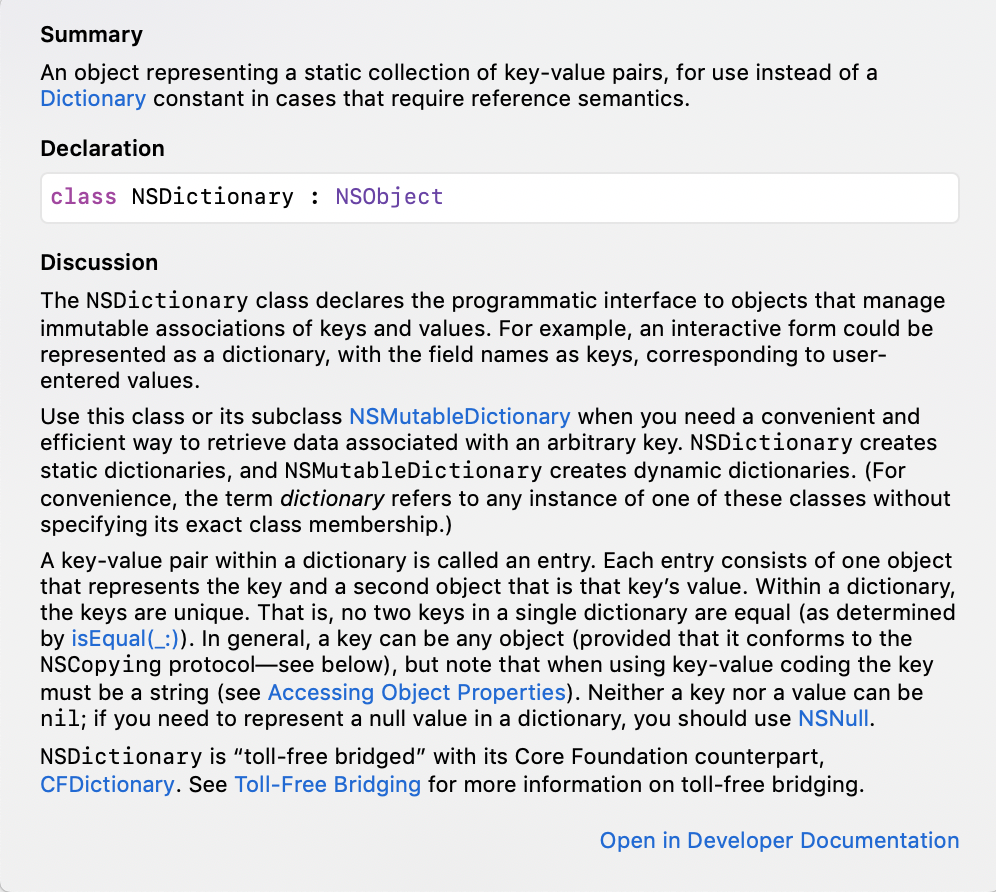
We meet a new data type here, NSDictionary, which is simply like a Swift dictionary, but that can hold any type of data. This is both an advantage and a disadvantage but one part of me is liking Objective-C more and more as I get to know it. We put all the received data in the javaScriptValues constant then typecast it into an NSDictionary again and print the value.
All being well, it should work.
Just for my curiosity, here is the description of the NSDictionary data type:
Editing multiline text with UITextView
After looking at the video I’m thinking what all this is for but never mind, let’s move on.
Inside MainInterface.storyboard, delete the UIImageView and the navigation bar, then embed the view controller in a navigation controller.
Drag a UITextView into the canvas and make it occupy all the space available, followed by a click on Resolve Layout Issues > Reset to Suggested Constraints.
Use the Assistant Editor to create an outlet named script and delete the previous UIImageView outlet. Scrap out all the default text in the text-view and turn off all the automatic text corrections provided.
In ActionViewController.swift add two empty String properties called pageTitle and pageURL.
In viewDidLoad replace the print statement with this:
self?.pageTitle = javaScriptValues["title"] as? String ?? ""
self?.pageURL = javaScriptValues["URL"] as? String ?? ""

DispatchQueue.main.async {
    self?.title = self?.pageTitle
}
The last async call is to be sure that the UI update happens on the main thread. Also, there is no need to recapture self because it has already been done for us before by the other closure.
Always in viewDidLoad create a right bar button item in code with the .done system item and the done selector. Then change the code inside that method to this:
@IBAction func done() {
    // create a new extension item object that will host our items
	let item = NSExtensionItem()

	// create a dictionary containing the key "customJavaScript" and the value of our script
    let argument: NSDictionary = ["customJavaScript": script.text]

	// put that dictionary into _another_ dictionary with the appropriate key
    let webDictionary: NSDictionary = [NSExtensionJavaScriptFinalizeArgumentKey: argument]

	// wrap the big dictionary inside an item provider object with the "kuTTypePropertyList
    let customJavaScript = NSItemProvider(item: webDictionary, typeIdentifier: kUTTypePropertyList as String)

	// place that item provider into our extension item as an attachment
    item.attachments = [customJavaScript]

	// call the complete request method that returns our extension item
    extensionContext?.completeRequest(returningItems: [item])
}
Inside the Action.js file, modify the finalize function so that we pull the “customJavaScript” value out of the parameters array and then pass it to the eval() function.
To check that this works, once the app runs, enter the code alert(document.title); in the text field and tap Done.
That’s it for today for me, tomorrow I will go on with the rest and possibly the challenges.
Welcome to Day 74. I should very quickly finish this project and then plunge directly into the review.
Fixing the keyboard: NotificationCenter
There seems to be a bug in our extension, in the form that when we are writing in the text view we cannot scroll down if we write enough text to fill all the view (or if we hit return enough times). I wonder why this would ever happen seeing that we would only write some code here but, fine, better to be more precise than less.
Paul’s solution is brilliant and quite simple to follow as it asks to be notified when the keyboard state changes using the NotificationCenter class. Among all the notifications iOS is constantly sending we care about two of them: keyboardWillHideNotification and keyboardWillChangeFrameNotification. The name is quite misleading because it has that “notification” at the end. To make things simpler: we care about when the keyboard will have finished hiding and when the frame will change (for example when we rotate the device).
To be notified of these changes we need to become observers which we do by creating a reference (read: create a constant!) to the Notification Center with let notificationCenter = NotificationCenter.default and then adding the addObserver method for each of the needed notifications. Having nil in the last parameter means that we do not really care who is sending the notification.
The adjustForKeyboard method accepts a Notification parameter that contains the name of the notification and a dictionary containing specific informations called userInfo. The key we are interested in is called UIResponder.keyboardFrameEndUserInfoKey (simple right?!) which is just the frame of the keyboard that has just been animated. This will be of type NSValue which is a simple container for a single C or Objective-C data item, in this case for a CGRect struct (this is needed because in good-old Objective-C arrays and dictionaries could not contain structures so they needed to be wrapped into a container of type NSValue). This is done in the guard let statement of the method, which is as follows (comments included for further explanation).
@objc func adjustForKeyboard(notification: Notification) {
    guard let keyboardValue = notification.userInfo?[UIResponder.keyboardFrameEndUserInfoKey] as? NSValue else { return }

	// get the size of the keyboard after unwrapping it
    let keyboardScreenEndFrame = keyboardValue.cgRectValue

	// convert the found rectangle to our view's coordinate (rotation is not factored in the frame)
    let keyboardViewEndFrame = view.convert(keyboardScreenEndFrame, from: view.window)

	// adjust the indents of our view
    if notification.name == UIResponder.keyboardWillHideNotification {
        script.contentInset = .zero
    } else {
        script.contentInset = UIEdgeInsets(top: 0, left: 0, bottom: keyboardViewEndFrame.height - view.safeAreaInsets.bottom, right: 0)
    }

    script.scrollIndicatorInsets = script.contentInset

	// make the view scroll so that the text entry cursor is visible
    let selectedRange = script.selectedRange
    script.scrollRangeToVisible(selectedRange)
}
The - view.safeAreaInsets.bottom part is due to the latest iPhones with notch and without home button which have an extra safe area around the bottom of the view. Adding this will solve the issue.
That’s it!
You can find the code for this project here (even if really this is just what Paul did, nothing more apart from the comments). Actually I changed the @IBAction mark with @objc for the done method, it looked more coherent to me.
Please don’t forget to drop a hello and a thank you to Paul for all his great work (you can find him on Twitter) and don’t forget to visit the 100 Days Of Swift initiative page.
If you like what I’m doing here please consider liking this article and sharing it with some of your peers. If you are feeling like being really awesome, please consider making a small donation to support my studies and my writing (please appreciate that I am not using advertisement on my articles).
If you are interested in my music engraving and my publications don’t forget visit my Facebook page and the pages where I publish my scores (Gumroad, SheetMusicPlus, ScoreExchange and on Apple Books).
You can also support me by buying Paul Hudson’s books from this Affiliate Link.
Anyways, thank you so much for reading!
Till the next one!
