Review of the Swift Programming Language
Day 117 part 2
Generics
Generic code enables us to write flexible, reusable functions and types that can work with any type, subject to requirements that we define. We can write code that avoids duplication and expresses its intent in a clear, abstracted manner.
The Problem That Generics Solve
Let’s start from here:
func swapTwoInts(_ a: inout Int, _ b: inout Int) {
    let temporaryA = a
    a = b
    b = temporaryA
}
This can be used only with Integers so we can solve it using Generic Functions such as this one:
func swapTwoValues<T>(_ a: inout T, _ b: inout T) {
    let temporaryA = a
    a = b
    b = temporaryA
}
The generic version of the function uses a placeholder type name (called T, in this case) instead of an actual type name (such as Int, String, or Double). The placeholder type name doesn’t say anything about what T must be, but it does say that both a and b must be of the same type T, whatever T represents. The actual type to use in place of T is determined each time the swapTwoValues(_:_:) function is called.
When the function is called the placeholder is removed from the function name.
Type Parameters
Naming Type Parameters
Generic Types
The provided example proposes to write a variation of the collection type to represent a stack. Here it is in a generic form:
struct Stack<Element> {
    var items = [Element]()
    mutating func push(_ item: Element) {
        items.append(item)
    }
    mutating func pop() -> Element {
        return items.removeLast()
    }
}
Extending a Generic Type
extension Stack {
    var topItem: Element? {
        return items.isEmpty ? nil : items[items.count - 1]
    }
}
Type Constraints
However, it’s sometimes useful to enforce certain type constraints on the types that can be used with generic functions and generic types.
Here we finally get the first explanation of what hashable means:
the type of a dictionary’s keys must be hashable. That is, it must provide a way to make itself uniquely representable.
Thank you, Apple!
- Type Constraint Syntax: we write type constraints by placing a single class or protocol constraint after a type parameter’s name, separated by a colon, as part of the type parameter list.
The hypothetical function above has two type parameters. The first type parameter,T, has a type constraint that requiresTto be a subclass ofSomeClass. The second type parameter,U, has a type constraint that requiresUto conform to the protocolSomeProtocol. - Type Constraints in Action
Example of the logic we want to achieve:
…and here it is written as a generic function (theEquatablepart is important!):
Associated Types
When defining a protocol, it’s sometimes useful to declare one or more associated types as part of the protocol’s definition. An associated type gives a placeholder name to a type that is used as part of the protocol. The actual type to use for that associated type isn’t specified until the protocol is adopted. Associated types are specified with the associatedtype keyword.
- Associated Types in Action: example of a protocol requiring an associated type
Here is a type that conforms to this protocol: - Extending an Existing Type to Specify an Associated Type
- Adding Constraints to an Associated Type
- Using a Protocol in Its Associated Type’s Constraints: let’s add some more complexity:
Day 118
Generic Where Clauses
Example of a generic where clause:
func allItemsMatch<C1: Container, C2: Container>
    (_ someContainer: C1, _ anotherContainer: C2) -> Bool
    where C1.Item == C2.Item, C1.Item: Equatable {

        // Check that both containers contain the same number of items.
        if someContainer.count != anotherContainer.count {
            return false
        }

        // Check each pair of items to see if they're equivalent.
        for i in 0..<someContainer.count {
            if someContainer[i] != anotherContainer[i] {
                return false
            }
        }

        // All items match, so return true.
        return true
}
Extensions with a Generic Where Clause
Associated Types with a Generic Where Clause
This is a very murky and obscure land… I need to see some examples in practice.
Generic Subscripts
extension Container {
    subscript<Indices: Sequence>(indices: Indices) -> [Item]
        where Indices.Iterator.Element == Int {
            var result = [Item]()
            for index in indices {
                result.append(self[index])
            }
            return result
    }
}
This extension to the Container protocol adds a subscript that takes a sequence of indices and returns an array containing the items at each given index. This generic subscript is constrained as follows:
- The generic parameter
Indicesin angle brackets has to be a type that conforms to theSequenceprotocol from the standard library. - The subscript takes a single parameter,
indices, which is an instance of thatIndicestype. - The generic
whereclause requires that the iterator for the sequence must traverse over elements of typeInt. This ensures that the indices in the sequence are the same type as the indices used for a container.
Taken together, these constraints mean that the value passed for the indices parameter is a sequence of integers.
Opaque Types
A function or method with an opaque return type hides its return value’s type information. Instead of providing a concrete type as the function’s return type, the return value is described in terms of the protocols it supports.
Hiding type information is useful at boundaries between a module and code that calls into the module, because the underlying type of the return value can remain private. Unlike returning a value whose type is a protocol type, opaque types preserve type identity—the compiler has access to the type information, but clients of the module don’t.
The Problem That Opaque Types Solve
Not really clear after reading … there were only two examples about drawing, flipping and joining triangles made of asterisks …
Returning an Opaque Type
We can think of an opaque type like being the reverse of a generic type. Generic types let the code that calls a function pick the type for that function’s parameters and return value in a way that’s abstracted away from the function implementation. An opaque type lets the function implementation pick the type for the value it returns in a way that’s abstracted away from the code that calls the function.
The only thing that is clear to me by now is that we have to write some before the return type… I really need to see this in action to understand why this is useful or powerful.
Difference Between Opaque Types and Protocol Types
Returning an opaque type looks very similar to using a protocol type as the return type of a function, but these two kinds of return type differ in whether they preserve type identity. An opaque type refers to one specific type, although the caller of the function isn’t able to see which type; a protocol type can refer to any type that conforms to the protocol. Generally speaking, protocol types give us more flexibility about the underlying types of the values they store, and opaque types let us make stronger guarantees about those underlying types.
Using a protocol type as the return type for a function gives us the flexibility to return any type that conforms to the protocol. However, the cost of that flexibility is that some operations aren’t possible on the returned values. In contrast, opaque types preserve the identity of the underlying type. Swift can infer associated types, which lets us use an opaque return value in places where a protocol type can’t be used as a return value.
Let’s start from here:
protocol Container {
    associatedtype Item
    var count: Int { get }
    subscript(i: Int) -> Item { get }
}
extension Array: Container { }
We can’t use Container as the return type of a function because that protocol has an associated type. We also can’t use it as constraint a generic return type because there isn’t enough information outside the function body to infer what the generic type needs to be.
Using the opaque type some Container as a return type expresses the desired API contract—the function returns a container, but declines to specify the container’s type:
func makeOpaqueContainer<T>(item: T) -> some Container {
    return [item]
}
let opaqueContainer = makeOpaqueContainer(item: 12)
let twelve = opaqueContainer[0]
print(type(of: twelve))
// Prints "Int"
Automatic Reference Counting (ARC)
Swift uses Automatic Reference Counting (ARC) to track and manage our app’s memory usage. In most cases, this means that memory management “just works” in Swift, and we do not need to think about memory management ourselves. ARC automatically frees up the memory used by class instances when those instances are no longer needed.
However, in a few cases ARC requires more information about the relationships between parts of our code in order to manage memory for us. Reference counting applies only to instances of classes. Structures and enumerations are value types, not reference types, and are not stored and passed by reference.
How ARC Works
Every time we create a new instance of a class, ARC allocates a chunk of memory to store information about that instance. This memory holds information about the type of the instance, together with the values of any stored properties associated with that instance.
Additionally, when an instance is no longer needed, ARC frees up the memory used by that instance so that the memory can be used for other purposes instead. This ensures that class instances do not take up space in memory when they are no longer needed.
However, if ARC were to deallocate an instance that was still in use, it would no longer be possible to access that instance’s properties, or call that instance’s methods. Indeed, if we tried to access the instance, our app would most likely crash.
To make sure that instances don’t disappear while they are still needed, ARC tracks how many properties, constants, and variables are currently referring to each class instance. ARC will not deallocate an instance as long as at least one active reference to that instance still exists.
To make this possible, whenever we assign a class instance to a property, constant, or variable, that property, constant, or variable makes a strong reference to the instance. The reference is called a “strong” reference because it keeps a firm hold on that instance, and does not allow it to be deallocated for as long as that strong reference remains.
ARC in Action
Starting example:
class Person {
    let name: String
    init(name: String) {
        self.name = name
        print("\(name) is being initialized")
    }
    deinit {
        print("\(name) is being deinitialized")
    }
}
We then create three variables of type optional Person and which, therefore, do not currently reference a Person instance.
var reference1: Person?
var reference2: Person?
var reference3: Person?
We then create a new Person instance and assign it to one of these variables:
reference1 = Person(name: "John Appleseed")
// Prints "John Appleseed is being initialized"
Because the new Person instance has been assigned to the reference1 variable, there is now a strong reference from reference1 to the new Person instance. Because there is at least one strong reference, ARC makes sure that this Person is kept in memory and is not deallocated.
If we assign the same Person instance to two more variables, two more strong references to that instance are established:
reference2 = reference1
reference3 = reference1
There are now three strong references to this single Person instance.
If we break two of these strong references (including the original reference) by assigning nil to two of the variables, a single strong reference remains, and the Person instance is not deallocated:
reference1 = nil
reference2 = nil
ARC does not deallocate the Person instance until the third and final strong reference is broken, at which point it’s clear that you are no longer using the Person instance:
reference3 = nil
// Prints "John Appleseed is being deinitialized"
Strong Reference Cycles Between Class Instances
It’s possible to write code in which an instance of a class never gets to a point where it has zero strong references. This can happen if two class instances hold a strong reference to each other, such that each instance keeps the other alive. This is known as a strong reference cycle. We resolve strong reference cycles by defining some of the relationships between classes as weak or unowned references instead of as strong references. But how are these cycles created?
By accident, for example:
class Person {
    let name: String
    init(name: String) { self.name = name }
    var apartment: Apartment?
    deinit { print("\(name) is being deinitialized") }
}

class Apartment {
    let unit: String
    init(unit: String) { self.unit = unit }
    var tenant: Person?
    deinit { print("Apartment \(unit) is being deinitialized") }
}
Let’s now create some instances of these classes:
var john: Person?
var unit4A: Apartment?

john = Person(name: "John Appleseed")
unit4A = Apartment(unit: "4A")

john!.apartment = unit4A
unit4A!.tenant = john
Here’s how the reference looks:
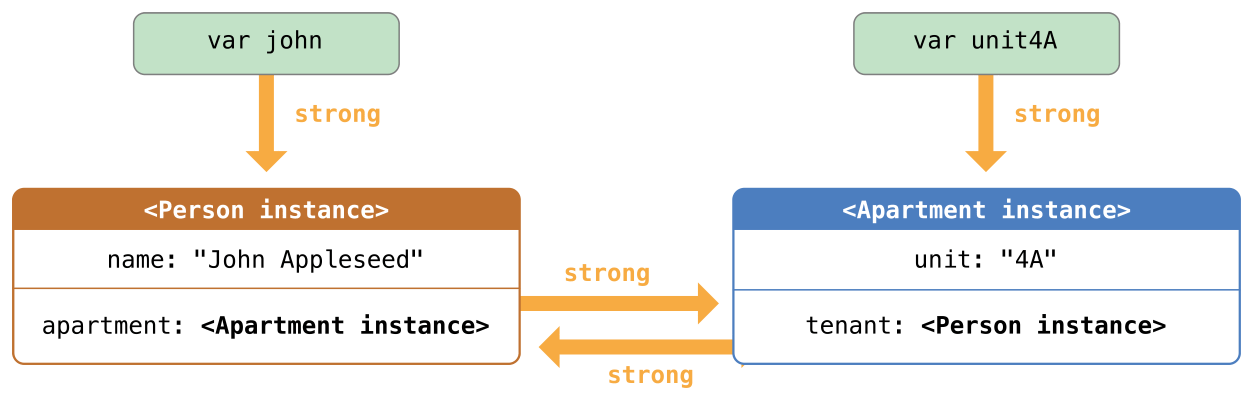
When we break the strong references held by the john and unit4A variables, the reference counts do not drop to zero, and the instances are not deallocated by ARC.
Resolving Strong Reference Cycles Between Class Instances
Swift provides two ways to resolve strong reference cycles when we work with properties of class type: weak references and unowned references.
Weak and unowned references enable one instance in a reference cycle to refer to the other instance without keeping a strong hold on it. The instances can then refer to each other without creating a strong reference cycle.
We should use a weak reference when the other instance has a shorter lifetime—that is, when the other instance can be deallocated first. In the Apartment example above, it’s appropriate for an apartment to be able to have no tenant at some point in its lifetime, and so a weak reference is an appropriate way to break the reference cycle in this case. In contrast, we should use an unowned reference when the other instance has the same lifetime or a longer lifetime.
- Weak References: a weak reference is a reference that does not keep a strong hold on the instance it refers to, and so does not stop ARC from disposing of the referenced instance. This behaviour prevents the reference from becoming part of a strong reference cycle. We indicate a weak reference by placing the
weakkeyword before a property or variable declaration. - Unowned References: like a weak reference, an unowned reference does not keep a strong hold on the instance it refers to. Unlike a weak reference, however, an unowned reference is used when the other instance has the same lifetime or a longer lifetime. We indicate an unowned reference by placing the
unownedkeyword before a property or variable declaration. An unowned reference is expected to always have a value. As a result, ARC never sets an unowned reference’s value tonil, which means that unowned references are defined using non-optional types. In the following example, a customer may or may not have a credit card, but a credit card will always be associated with a customer. ACreditCardinstance never outlives theCustomerthat it refers to. To represent this, theCustomerclass has an optionalcardproperty, but theCreditCardclass has anunowned(and non-optional)customerproperty.
Here’s how the reference looks:
- Unowned References and Implicitly Unwrapped Optional Properties: there is a third scenario, in which both properties should always have a value, and neither property should ever be nil once initialisation is complete. In this scenario, it’s useful to combine an unowned property on one class with an implicitly unwrapped optional property on the other class. This enables both properties to be accessed directly (without optional unwrapping) once initialisation is complete, while still avoiding a reference cycle. The example below defines two classes,
CountryandCity, each of which stores an instance of the other class as a property. In this data model, every country must always have a capital city, and every city must always belong to a country. To represent this, theCountryclass has acapitalCityproperty, and theCityclass has acountryproperty:
To set up the interdependency between the two classes, the initialiser forCitytakes aCountryinstance, and stores this instance in itscountryproperty. All of this means that we can create theCountryandCityinstances in a single statement, without creating a strong reference cycle, and thecapitalCityproperty can be accessed directly, without needing to use an exclamation mark to unwrap its optional value:
Strong Reference Cycles for Closures
A strong reference cycle can also occur if we assign a closure to a property of a class instance, and the body of that closure captures the instance. This strong reference cycle occurs because closures, like classes, are reference types. When we assign a closure to a property, we are assigning a reference to that closure. However, rather than two class instances, this time it’s a class instance and a closure that are keeping each other alive.
Swift provides an elegant solution to this problem, known as a closure capture list. However, before we learn how to break a strong reference cycle with a closure capture list, it’s useful to understand how such a cycle can be caused. The following example creates a strong reference cycle when using a closure that references self:
class HTMLElement {

    let name: String
    let text: String?

    lazy var asHTML: () -> String = {
        if let text = self.text {
            return "<\(self.name)>\(text)</\(self.name)>"
        } else {
            return "<\(self.name) />"
        }
    }

    init(name: String, text: String? = nil) {
        self.name = name
        self.text = text
    }

    deinit {
        print("\(name) is being deinitialized")
    }
}
Unfortunately, the HTMLElement class, as written above, creates a strong reference cycle between an HTMLElement instance and the closure used for its default asHTML value. Here’s how the cycle looks:
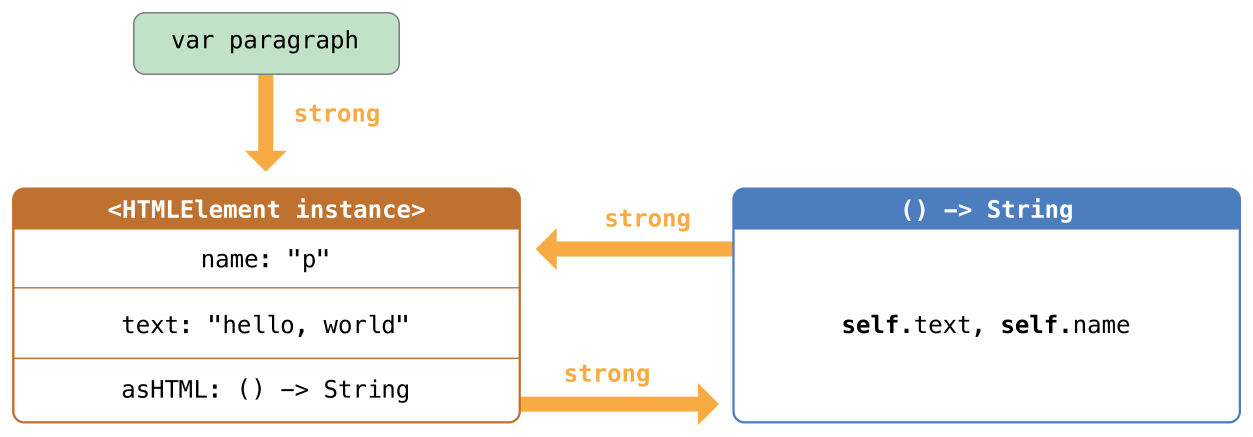
The instance’s asHTML property holds a strong reference to its closure. However, because the closure refers to self within its body (as a way to reference self.name and self.text), the closure captures self, which means that it holds a strong reference back to the HTMLElement instance. A strong reference cycle is created between the two.
Resolving Strong Reference Cycles for Closures
We resolve a strong reference cycle between a closure and a class instance by defining a capture list as part of the closure’s definition. A capture list defines the rules to use when capturing one or more reference types within the closure’s body.
- Defining a Capture List: each item in a capture list is a pairing of the
weakorunownedkeyword with a reference to a class instance (such asself) or a variable initialised with some value (such asdelegate = self.delegate!). These pairings are written within a pair of square braces, separated by commas. - Weak and Unowned References: define a capture in a closure as an unowned reference when the closure and the instance it captures will always refer to each other, and will always be deallocated at the same time. Conversely, define a capture as a weak reference when the captured reference may become nil at some point in the future. Weak references are always of an optional type, and automatically become
nilwhen the instance they reference is deallocated. This enables us to check for their existence within the closure’s body. An unowned reference is the appropriate capture method to use to resolve the strong reference cycle in theHTMLElementexample:
This time, the capture ofselfby the closure is an unowned reference, and does not keep a strong hold on theHTMLElementinstance it has captured. If you set the strong reference from the paragraph variable tonil, theHTMLElementinstance is deallocated.
Day 119
Memory Safety
Understanding Conflicting Access to Memory
The following example finally explains the difference between reading and writing to memory. Throughout the guide there was not a single explanation of what read and write meant, even though one could image it.
// A write access to the memory where one is stored.
var one = 1

// A read access from the memory where one is stored.
print("We're number \(one)!")
- Characteristics of Memory Access: there are three characteristics of memory access to consider in the context of conflicting access: whether the access is a read or a write, the duration of the access, and the location in memory being accessed. Specifically, a conflict occurs if we have two accesses that meet all of the following conditions:
- At least one is a write access.
- They access the same location in memory.
- Their durations overlap.
There are several ways to access memory, called long-term accesses, that span the execution of other code. The difference between instantaneous access and long-term access is that it’s possible for other code to run after a long-term access starts but before it ends, which is called overlap. A long-term access can overlap with other long-term accesses and instantaneous accesses.
Conflicting Access to In-Out Parameters
A function has long-term write access to all of its in-out parameters. The write access for an in-out parameter starts after all of the non-in-out parameters have been evaluated and lasts for the entire duration of that function call. If there are multiple in-out parameters, the write accesses start in the same order as the parameters appear.
Conflicting Access to self in Methods
Conflicting Access to Properties
Types like structures, tuples, and enumerations are made up of individual constituent values, such as the properties of a structure or the elements of a tuple. Because these are value types, mutating any piece of the value mutates the whole value, meaning read or write access to one of the properties requires read or write access to the whole value.
The restriction against overlapping access to properties of a structure isn’t always necessary to preserve memory safety. Memory safety is the desired guarantee, but exclusive access is a stricter requirement than memory safety—which means some code preserves memory safety, even though it violates exclusive access to memory. Swift allows this memory-safe code if the compiler can prove that the nonexclusive access to memory is still safe. Specifically, it can prove that overlapping access to properties of a structure is safe if the following conditions apply:
- We are accessing only stored properties of an instance, not computed properties or class properties.
- The structure is the value of a local variable, not a global variable.
- The structure is either not captured by any closures, or it’s captured only by nonescaping closures.
If the compiler can’t prove the access is safe, it doesn’t allow the access.
Access Control
Access control restricts access to parts of our code from code in other source files and modules. This feature enables us to hide the implementation details of our code, and to specify a preferred interface through which that code can be accessed and used.
Modules and Source Files
Swift’s access control model is based on the concept of modules and source files.
A module is a single unit of code distribution—a framework or application that is built and shipped as a single unit and that can be imported by another module with Swift’s import keyword. Each build target (such as an app bundle or framework) in Xcode is treated as a separate module in Swift.
A source file is a single Swift source code file within a module (in effect, a single file within an app or framework). Although it’s common to define individual types in separate source files, a single source file can contain definitions for multiple types, functions, and so on.
Access Levels
Swift provides five different access levels for entities within our code. These access levels are relative to the source file in which an entity is defined, and also relative to the module that source file belongs to.
- Open access and public access enable entities to be used within any source file from their defining module, and also in a source file from another module that imports the defining module.
- Internal access enables entities to be used within any source file from their defining module, but not in any source file outside of that module.
- File-private access restricts the use of an entity to its own defining source file.
- Private access restricts the use of an entity to the enclosing declaration, and to extensions of that declaration that are in the same file.
Open access is the highest (least restrictive) access level and private access is the lowest (most restrictive) access level.
- Guiding Principle of Access Levels: access levels in Swift follow an overall guiding principle: No entity can be defined in terms of another entity that has a lower (more restrictive) access level.
- Default Access Levels: all entities in our code (with a few specific exceptions) have a default access level of internal if we don’t specify an explicit access level ourselves.
- Access Levels for Single-Target Apps
- Access Levels for Frameworks
- Access Levels for Unit Test Targets
Access Control Syntax
Define the access level for an entity by placing one of the open, public, internal, fileprivate, or private modifiers before the entity’s introducer.
Custom Types
IMPORTANT
A public type defaults to having internal members, not public members. If we want a type member to be public, we must explicitly mark it as such. This requirement ensures that the public-facing API for a type is something we opt in to publishing, and avoids presenting the internal workings of a type as public API by mistake.
- Tuple Types: the access level for a tuple type is the most restrictive access level of all types used in that tuple. NOTE: tuple types don’t have a standalone definition in the way that classes, structures, enumerations, and functions do. A tuple type’s access level is deduced automatically when the tuple type is used, and can’t be specified explicitly.
- Function Types: the access level for a function type is calculated as the most restrictive access level of the function’s parameter types and return type.
- Enumeration Types: the individual cases of an enumeration automatically receive the same access level as the enumeration they belong to. We can’t specify a different access level for individual enumeration cases.
- Raw Values and Associated Values: the types used for any raw values or associated values in an enumeration definition must have an access level at least as high as the enumeration’s access level.
- Nested Types: nested types defined within a private type have an automatic access level of private. Nested types defined within a file-private type have an automatic access level of file private. Nested types defined within a public type or an internal type have an automatic access level of internal. If we want a nested type within a public type to be publicly available, we must explicitly declare the nested type as public.
Subclassing
You can subclass any class that can be accessed in the current access context. A subclass can’t have a higher access level than its superclass.
An override can make an inherited class member more accessible than its superclass version.
It’s even valid for a subclass member to call a superclass member that has lower access permissions than the subclass member, as long as the call to the superclass’s member takes place within an allowed access level context.
Constants, Variables, Properties and Subscripts
A constant, variable, or property can’t be more public than its type. It’s not valid to write a public property with a private type, for example. Similarly, a subscript can’t be more public than either its index type or return type.
- Getters and Setters: getters and setters for constants, variables, properties, and subscripts automatically receive the same access level as the constant, variable, property, or subscript they belong to. We can give a setter a lower access level than its corresponding getter, to restrict the read-write scope of that variable, property, or subscript. We assign a lower access level by writing
fileprivate(set),private(set), orinternal(set)before thevarorsubscriptintroducer. Note that we can assign an explicit access level for both a getter and a setter if required.
Initialisers
Custom initialisers can be assigned an access level less than or equal to the type that they initialise. The only exception is for required initializers . A required initialiser must have the same access level as the class it belongs to.
As with function and method parameters, the types of an initialiser’s parameters can’t be more private than the initialiser’s own access level.
- Default Initialisers: Swift automatically provides a default initialiser without any arguments for any structure or base class that provides default values for all of its properties and doesn’t provide at least one initialiser itself.
- Default Memberwise Initialisers for Structure Types: the default memberwise initialiser has the same access level of the structure’s stored properties.
Protocols
If we want to assign an explicit access level to a protocol type, we need to do so at the point where we define the protocol. This enables us to create protocols that can only be adopted within a certain access context.
The access level of each requirement within a protocol definition is automatically set to the same access level as the protocol. We can’t set a protocol requirement to a different access level than the protocol it supports. This ensures that all of the protocol’s requirements will be visible on any type that adopts the protocol.
NOTE
If we define a public protocol, the protocol’s requirements require a public access level for those requirements when they’re implemented. This behaviour is different from other types, where a public type definition implies an access level of internal for the type’s members.
- Protocol Inheritance: if we define a new protocol that inherits from an existing protocol, the new protocol can have at most the same access level as the protocol it inherits from.
- Protocol Conformance: a type can conform to a protocol with a lower access level than the type itself.
Extensions
You can extend a class, structure, or enumeration in any access context in which the class, structure, or enumeration is available. Any type members added in an extension have the same default access level as type members declared in the original type being extended.
Alternatively, we can mark an extension with an explicit access-level modifier (for example, private extension) to set a new default access level for all members defined within the extension.
We can’t provide an explicit access-level modifier for an extension if we are using that extension to add protocol conformance. Instead, the protocol’s own access level is used to provide the default access level for each protocol requirement implementation within the extension.
- Private Members in Extensions: extensions that are in the same file as the class, structure, or enumeration that they extend behave as if the code in the extension had been written as part of the original type’s declaration.
Generics
The access level for a generic type or generic function is the minimum of the access level of the generic type or function itself and the access level of any type constraints on its type parameters.
Type Aliases
Any type aliases we define are treated as distinct types for the purposes of access control. A type alias can have an access level less than or equal to the access level of the type it aliases.
Advanced Operators
Unlike arithmetic operators in C, arithmetic operators in Swift do not overflow by default. To opt in to overflow behaviour, use Swift’s second set of arithmetic operators that overflow by default, such as the overflow addition operator (&+). All of these overflow operators begin with an ampersand (&).
Bitwise Operators
Bitwise operators enable us to manipulate the individual raw data bits within a data structure.
- Bitwise NOT Operator: the bitwise NOT operator (
~) inverts all bits in a number. Zeros become ones and viceversa. - Bitwise AND Operator: the bitwise AND operator (
&) combines the bits of two numbers. It returns a new number whose bits are set to 1 only if the bits were equal to 1 in both input numbers. - Bitwise OR Operator: the bitwise OR operator (
|) compares the bits of two numbers. The operator returns a new number whose bits are set to 1 if the bits are equal to 1 in either input number. - Bitwise XOR Operator: the bitwise XOR operator, or “exclusive OR operator” (
^), compares the bits of two numbers. The operator returns a new number whose bits are set to 1 where the input bits are different and are set to 0 where the input bits are the same. - Bitwise Left and Right Shift Operators: the bitwise left shift operator (
<<) and bitwise right shift operator (>>) move all bits in a number to the left or the right by a certain number of places, according to the rules defined below. Bitwise left and right shifts have the effect of multiplying or dividing an integer by a factor of two. Shifting an integer’s bits to the left by one position doubles its value, whereas shifting it to the right by one position halves its value.- Shifting Behaviour for Unsigned Integers: the bit-shifting behavior for unsigned integers is as follows:
- Existing bits are moved to the left or right by the requested number of places.
- Any bits that are moved beyond the bounds of the integer’s storage are discarded.
- Zeros are inserted in the spaces left behind after the original bits are moved to the left or right.
- Shifting Behaviour for Signed Integers: the shifting behaviour is more complex for signed integers than for unsigned integers, because of the way signed integers are represented in binary. Signed integers use their first bit (known as the sign bit) to indicate whether the integer is positive or negative. A sign bit of
0means positive, and a sign bit of1means negative. The remaining bits (known as the value bits) store the actual value. Positive numbers are stored in exactly the same way as for unsigned integers, counting upwards from 0
Negative numbers, however, are stored differently. They are stored by subtracting their absolute value from 2 to the power of n, where n is the number of value bits. An eight-bit number has seven value bits, so this means 2 to the power of 7, or 128.
Here’s how the bits inside an Int8 look for the number -4:
This encoding for negative numbers is known as a two’s complement representation. It may seem an unusual way to represent negative numbers, but it has several advantages.- First, we can add -1 to -4, simply by performing a standard binary addition of all eight bits (including the sign bit), and discarding anything that doesn’t fit in the eight bits once you’re done.
- Second, the two’s complement representation also lets us shift the bits of negative numbers to the left and right like positive numbers, and still end up doubling them for every shift we make to the left, or halving them for every shift we make to the right. To achieve this, an extra rule is used when signed integers are shifted to the right: when we shift signed integers to the right, we have to apply the same rules as for unsigned integers, but fill any empty bits on the left with the sign bit, rather than with a zero. This action ensures that signed integers have the same sign after they are shifted to the right, and is known as an arithmetic shift.
- Shifting Behaviour for Unsigned Integers: the bit-shifting behavior for unsigned integers is as follows:
Day 120 – part 1
Overflow Operators
If we try to insert a number into an integer constant or variable that cannot hold that value, by default Swift reports an error rather than allowing an invalid value to be created. This behaviour gives extra safety when we work with numbers that are too large or too small.
However, when we specifically want an overflow condition to truncate the number of available bits, we can opt in to this behaviour rather than triggering an error. Swift provides three arithmetic overflow operators that opt in to the overflow behaviour for integer calculations. These operators all begin with an ampersand (&):
- Overflow addition (
&+) - Overflow subtraction (
&-) - Overflow multiplication (
&*)
- Value Overflow: numbers can overflow in both the positive and negative direction. For example overflowing a
UInt8set at its.maxproperty, that is 255, by&+ 1will give back a value of0. When performing this on signed integers such asInt8value of-128and trying to overflow it with&- 1, we will get127back because the sign bit will be toggled. In summary, for both signed and unsigned integers, overflow in the positive direction wraps around from the maximum valid integer value back to the minimum, and overflow in the negative direction wraps around from the minimum value to the maximum.
Precedente and Associativity
Operator precedence gives some operators higher priority than others; these operators are applied first.
Operator associativity defines how operators of the same precedence are grouped together—either grouped from the left, or grouped from the right. Think of it as meaning “they associate with the expression to their left,” or “they associate with the expression to their right.”
It is important to consider each operator’s precedence and associativity when working out the order in which a compound expression will be calculated.
In Swift, as in C, the remainder operator (%) and the multiplication operator (*) have a higher precedence than the addition operator (+). As a result, they are both evaluated before the addition is considered.
However, remainder and multiplication have the same precedence as each other. To work out the exact evaluation order to use, you also need to consider their associativity. Remainder and multiplication both associate with the expression to their left.
Operator Methods
Classes and structures can provide their own implementations of existing operators. This is known as overloading the existing operators. The example below shows how to implement the arithmetic addition operator (+) for a custom structure. The arithmetic addition operator is a binary operator because it operates on two targets and is said to be infix because it appears in between those two targets.
struct Vector2D {
    var x = 0.0, y = 0.0
}

extension Vector2D {
    static func + (left: Vector2D, right: Vector2D) -> Vector2D {
        return Vector2D(x: left.x + right.x, y: left.y + right.y)
    }
}
- Prefix and Postfix Operators: classes and structures can also provide implementations of the standard unary operators. Unary operators operate on a single target. They are prefix if they precede their target (such as
-a) and postfix operators if they follow their target (such asb!). - Compound Assignment Operators: compound assignment operators combine assignment (
=) with another operation. For example, the addition assignment operator (+=) combines addition and assignment into a single operation. You mark a compound assignment operator’s left input parameter type asinout, because the parameter’s value will be modified directly from within the operator method.
NOTE: It isn’t possible to overload the default assignment operator (=). Only the compound assignment operators can be overloaded. Similarly, the ternary conditional operator (a ? b : c) can’t be overloaded. - Equivalence Operators: by default, custom classes and structures don’t have an implementation of the equivalence operators, known as the equal to operator (
==) and not equal to operator (!=). You usually implement the==operator, and use the standard library’s default implementation of the!=operator that negates the result of the==operator. There are two ways to implement the==operator: we can implement it ourselves, or for many types, we can ask Swift to synthesise an implementation for us. In both cases, we add conformance to the standard library’sEquatableprotocol.
Swift provides synthesised implementations for the following kinds of custom types:- Structures that have only stored properties that conform to the
Equatableprotocol - Enumerations that have only associated types that conform to the
Equatableprotocol - Enumerations that have no associated types
- Structures that have only stored properties that conform to the
Custom Operators
We can declare and implement our own custom operators in addition to the standard operators provided by Swift. New operators are declared at a global level using the operator keyword, and are marked with the prefix, infix or postfix modifiers:
extension Vector2D {
    static prefix func +++ (vector: inout Vector2D) -> Vector2D {
        vector += vector
        return vector
    }
}

var toBeDoubled = Vector2D(x: 1.0, y: 4.0)
let afterDoubling = +++toBeDoubled
// toBeDoubled now has values of (2.0, 8.0)
// afterDoubling also has values of (2.0, 8.0)
- Precedence for Custom Infix Operators: a custom infix operator that is not explicitly placed into a precedence group is given a default precedence group with a precedence immediately higher than the precedence of the ternary conditional operator.
This concludes my first review of the Swift Programming Language.
I now will read the Language Reference before plunging back into building the Cards app.
If you like what I’m doing here please consider liking this article and sharing it with some of your peers. If you are feeling like being really awesome, please consider making a small donation to support my studies and my writing (please appreciate that I am not using advertisement on my articles).
If you are interested in my music engraving and my publications don’t forget visit my Facebook page and the pages where I publish my scores (Gumroad, SheetMusicPlus, ScoreExchange and on Apple Books).
You can also support me by buying Paul Hudson’s books from this Affiliate Link.
Anyways, thank you so much for reading!
Till the next one!
