Hacking with Swift — Day 99 — Consolidation Day X
Applying MVC to the project
An MVC Recap
The Model is the what or our application (but not how it is displayed). The Controller is how our model is presented to the user (and represents the UI logic) and the view is our controller’s minions! MVC is all about managing communication between these three fields of programming.
Controllers can always talk directly to their Model.
Controllers can also talk directly to they View (for example via outlets).
The Model and the View should never speak to each other, because the model is view-independent and because the view-things are generic things.
But can the View speak to its Controller? Sort of, as the communication is “blind” and structured. The generic object has to think a little bit ahead before deciding how to communicate with the controller. The Controller can drop a target on itself, then hand out an action to the View so that the View sends the action when things happen in the UI.
Sometimes the View needs to synchronise with the Controller so the Controller sets itself as the View’s delegate. The delegate is set via a protocol (that is, it is blind to class).
View do not own the data they display!
So, if needed, they have a protocol to acquire it. In summary, Controllers are almost always that data source (not the Model)!
Controllers interpret/format Model information for the View.
Can the Model talk directly to the Controller? No. Again because the Model is (and should be) UI independent! So what if the Model has information to update or something? It uses a “radio station”-like notification system so that the Controllers or other Model can “tune in” to interesting stuff coming’s in from it. This is the Notification system or Key-Value observing.
Could a View “tune in” to a notification radio station? Probably, but not to a Model’s station.
All this story is done to control a single-screen or a set of screen and sub-screens, but MVCs can work together.
Now all of this… in practice!
Create a new Swift file called Concentration.swift to hold our Model. Inside we need to list what the public API (that is the amount of properties and methods inside our class that other files can use) of our game consists of. So, inside of our file we need to create a cards property in this form
var cards: [Card]
…and a method to allow the user to choose a card:
func chooseCard(at index: Int) { }
Of course we have not yet defined the Card type so let’s do that now. Create a new Swift file called Card.swift and fill it with a struct Card structure. Inside it we are going to create two properties of Bool type to render the fact that a card may be face-up or face-down and that it may be matched or not with another card. We also want to give it an identifier, which, for the time being, will be a plain uninitialised Int.
We now go back to our Controller, that is ViewController.swift and try to put all this into practice. Inside we create a property called game of type Concentration and we give it a value of Concentration(), that is we call its free initialiser because all of the Concentration class’s properties have a value. This, though, is a fallace approach because the controller cannot infer how many cards we have so we need to go back to Concentration.swift and create our own initialiser.
Inside our class we crate an init(numberOfPairsOfCards: Int) with a single property let card = Card()… but this is not really working as our card struct is initialising all of its properties thanks to the member wise initialiser and therefore needs some more love. Go back to Card.swift and add a custom initialiser to the Card struct: init(identifier: Int) { self.identifier = identifier }.
Back into our Concentration.swift file we are going to work with the initialiser. Write a for-in loop that loops over integers from 0 up and excluding numberOfPairsOfCards and, for every one of them, stored into the identifier constant, creates a new Card(identifier: identifier). We then append that card object twice into our cards array.
It doesn’t seem right though that the Concentration game itself has to pick the identifier for the card on its own. The game doesn’t care what the identifiers are, just that they are unique. So, let’s go back and refactor all this: inside the Concentration’s class initialiser we are going to get rid of the identifier parameter in the Card initialiser and, in the Card struct, we are going to remove it also from its initialiser, all the while putting self.initialiser = 0 (for the time being). Now we need to figure out how to make unique identifiers.
First we create a new static func called getUniqueIdentifier() which will return an Int. From our recent studies we learned that even though a static method belongs to its structure or class, we cannot send it over to an instance of that object, hence the name “static”. It is a type method! With this in place (even if the method itself is empty), we can set the self.identifier = Card.getUniqueIdentifier().
Next we are going to create static var called identifierFactory = 0 and, inside the just created method, we are going to increment this by 1 and return it.
Inside Concentration.swift replace the identifier in the for-in loop with a wildcard pattern (_).
Back into ViewController.swift we modify our game property like this:
lazy var game = Concentration(numberOfPairsOfCards: (cardButtons.count + 1) / 2)
Next, we are going to change what happens when a user taps a card. We are going to get rid of the call to flipCard and replace it with game.chooseCard(at: cardNumber) and a call to the yet unwritten updateViewFromModel().
Now we are going to write this last method which looks something like this:
func updateViewFromModel() {
        for index in cardButtons.indices {
            let button = cardButtons[index]
            let card = game.cards[index]

            if card.isFaceUp {
                button.setTitle(emoji(for: card), for: .normal)
                button.backgroundColor = #colorLiteral(red: 1, green: 1, blue: 1, alpha: 1)
            } else {
                button.setTitle("", for: .normal)
                button.backgroundColor = card.isMatched ? #colorLiteral(red: 1, green: 0.5781051517, blue: 0, alpha: 0) : #colorLiteral(red: 1, green: 0.5781051517, blue: 0, alpha: 1)
            }
        }
    }
So, we grab a card button and a card from the respective arrays and then, if the cart is face-up we set its title via a method we are going to write soon called emoji(for: card) and leave the background colour to white. If it is not face-up we will set the title to an empty string and the background colour to the result of a ternary conditional operator with the same Color Literal (which in Xcode 11 beta 2 was a bit buggy in my experience) but with alpha: 0.
If you wonder why I am saying Color Literal, it is because my code looks like this:
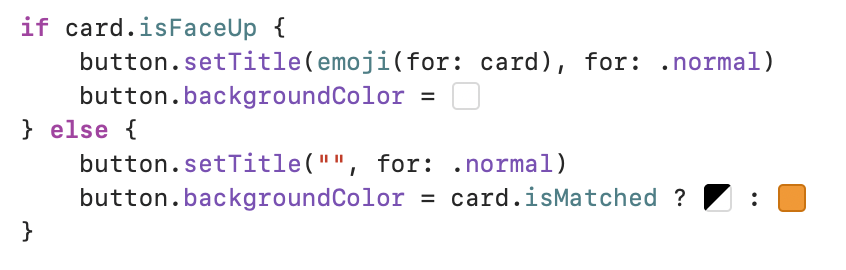
… but the import of the code snippet here in Ulysses solved the initialiser.
So, in short we now do not need the flipCard method anymore. Just add the func emoji(for card: Card) -> String { } method, which we will take care of shortly.
Inside Concentration.swift we are going to fill in the chooseCard method to make the cards flip over.
func chooseCard(at index: Int) {
    if cards[index].isFaceUp {
        cards[index].isFaceUp = false
    } else {
        cards[index].isFaceUp = true
    }
}
Now we need to make these cards actually show something upon their back when flipped. Let’s start with creating an emoji Dictionary of type [Int: String]. Then, inside the emoji(for:) method we are going to write this:
if let chosenEmoji = emoji[card.identifier] {
    return chosenEmoji
} else {
    return "?"
}
…which could also be summarised as this:
return emoji[card.identifier] ?? "?"
We are now going to build up our dictionary on demand, like this (at the beginning of the emoji(for:) method:
if emoji[card.identifier] == nil, !emojiChoices.isEmpty {
    let randomIndex = Int.random(in: 0 ..< emojiChoices.count)
}
emoji[card.identifier] = emojiChoices.remove(at: randomIndex)
The rules of the game
If a card has already been matched we want to ignore it. So, inside chooseCard(at:) in our Concentration.swift file we want to check just that with !cards[index].isMatched. Then, outside, at the top of the class, we are going to create an optional integer variable which will store the index of the one and only face-up card (if there!).
Back inside our chooseCard(at:) method, if that variable has an index and if it is different from the chosen card (so that we do not choose the same card twice) we will check if the two cards match, otherwise, there are either no or there are 2 cards which are face-up.
In the first case, if the card’s identifier at the matchIndex index is equal to the tapped’s one, we set both of their’s isMatched property to true, the chosen one’s face up property to true as well and the optional integer back to nil.
In the second case, we loop over the indices of the cards’ array and “turn them all down”, that is, we set their isFaceUp property to false. Then we set the chosen card’s to face up and set the optional integer to index.
It is quite clear that, at the beginning of the game, the else statement will be executed first!
Last thing before moving on is create a bit more cards, let’s say 12. Go into the storyboard and just do that, not forgetting to hook the new ones up with the cardsButton array.
Day 126
Add a “New Game” button and make it work!
First of all I want to resize the flip button that is so big there in order to make room for the new game one and the score button that will be needed later on. I have now abandoned the Xcode 11 beta because it is too unstable and unreliable. I cannot stand it. Going back to Xcode 10.2. So, now, let’s go…
First I added the extra label and button to the storyboard and connected the first with an outlet and the second with an action to the view controller file. I then added a score variable with a property observer that would update the text of the label each time this last would change.
Then I needed to greatly increase the quality of my model so that it could add more depth to the game and allow for replay-ability. I created a Swift file called CardThemes.swift and added an enumeration inside called CardTheme: Int, CaseIterable. This enumeration has six cases, one for each of the themes I want to add to my game: Halloween, Flags, Faces, Sports, Animals and Fruits.
I then created two UIColor variables, cardColor and backgroundColor and switched on self to determine some different colours for the back of the cards and for the background color of the view. I then set a new typealias Emojis = [String] for practicality and created a new variable called var emojis: Emojis. I switched it on self and made it return arrays of appropriate emojis.
Back into ViewController.swift I modified emojiChoices to be assigned to CardTheme.Halloween.emojis (this will be our default theme when the app launches). I then modified viewDidLoad as I always prefer to have things created in code rather than in the storyboard if I can (thing that makes my app in its current state very, VERY weak UI-wise). I simply set the view’s background color and the card buttons background color to the value of two implicitly unwrapped variables of type UIColor, backgroundColor and cardColor or, using nil-coalescing, to their first value in the storyboard.
A little edit was needed for the button’s background color in the else block of the updateViewFromModel method so that, if the cardColor variable would have had another color at any point in the lifetime of the app, that would be chosen.
Now for the big part, the newGame method: here it is, explained with comments:
@IBAction func newGame(_ sender: UIButton!) {
	// empty the array and dictionaries from any data remaining in there, not forgetting to update the UI
    emojiChoices = []
    emoji = [:]
    updateViewFromModel()

	// reset score, flip-count and game
    flipCount = 0
    score = 0
    game = Concentration(numberOfPairsOfCards: (cardButtons.count + 1) / 2)

	// generate a random theme and apply all the necessary changes to the UI.
    if let randomTheme = CardTheme(rawValue: Int.random(in: 0 ... CardTheme.allCases.count - 1)) {
        emojiChoices = randomTheme.emojis
        backgroundColor = randomTheme.backgroundColor
        view.backgroundColor = backgroundColor

        cardColor = randomTheme.cardColor
        flipCountLabel.textColor = cardColor
        scoreLabel.textColor = cardColor
        newGameButton.setTitleColor(cardColor, for: .normal)

        for cardButton in cardButtons {
            cardButton.backgroundColor = cardColor
            cardButton.setTitle("", for: .normal)
        }
    }
}
Don’t forget to shuffle the cards!
Right now our game was a tad too easy and it was much needed to add a cards.shuffle() inside the Concentration’s init() method.
Award points for playing the game
Inside Concentration.swift I created an enumeration at the top of the class called Points: Int with two cases, mismatchPenalty = 1 and matchFound.
Inside of the Concentration class I moved the flipCount and score properties (removing them from the other file (more on this below) and created a private variable seenCards of type Set<Int> = [] to keep track of the already seen cards.
Inside chooseCard(at:) I added flipCount += 1, then I modified the if statement like this:
if !cards[index].isMatched {
    // if we have a card facing up already, check if it matches the chosen one
    if let matchIndex = indexOfOneAndOnlyFaceUpCard, matchIndex != index {
        // if they match, mark them as matched
        if cards[matchIndex].identifier == cards[index].identifier {
            cards[matchIndex].isMatched = true
            cards[index].isMatched = true

            score += Points.matchFound.rawValue
        } else if seenCards.contains(index) || seenCards.contains(matchIndex) {
            // cards didn't match, penalise the player
            score -= Points.mismatchPenalty.rawValue
        }
        // Both cards have been seen, add them to the set.
        seenCards.insert(index)
        seenCards.insert(matchIndex)

        // Turn the chosen card face-up
        cards[index].isFaceUp = true

        // Since there was a card face-up already (and we selected a new one), we no longer have only 1 card face-up
        indexOfOneAndOnlyFaceUpCard = nil
    } else {
        // either no cards or 2 cards are face up
        for flipDownIndex in cards.indices {
            cards[flipDownIndex].isFaceUp = false
        }

        cards[index].isFaceUp = true
        indexOfOneAndOnlyFaceUpCard = index
    }
}
Back into ViewController.swift I removed the two properties for flip counts and score and added these two lines to updateViewFromModel:
flipCountLabel.text = "Flips: \(game.flipCount)"
scoreLabel.text = "Score: \(game.score)"
I then updated the following for-in loop to have a better looking code via the usage of the .enumerated() method. At the end of the loop I added a check for the button’s background color’s alpha to be zero and, in that case, I disabled the button.
Inside newGame() I changed the call to flip count and score to be game.flipCount = 0 and game.score = 0 and moved the updating of the view model to after the creation of the new game as this would have caused small glitches otherwise. Finally in the closing loop of the method I added a call to re-enable the buttons.
I tried it and it works just … there is a bug that I yet cannot solve: when I remain with only two cards (which are correct of course) I cannot disable them nor make them disappear. Generally speaking the game until now is programmed so that cards do not disappear when matched but when you press a new one but I would really like to create an animation of sort for this so that, if they are matched, they would slowly fade-out anyway. Finally, I would like to have an alert pop-up when the game is over and this is a great handicap of the game in its present state.
About an hour or so later I think I have solved this.
First of all I refactored the code so that newGame() is a method on its own and the @IBAction newGamePressed (aptly renamed) contains just a call to newGame(). Yes, I could still improve this having just a bar button item but interface improvement is coming tomorrow.
Then, in viewDidLoad() I called newGame() to randomise the games (which means that I could also remove the forced assignment at the beginning.
Inside updateViewFromModel() I performed two additions: an animation of the button’s alpha if the card is matched and an alert controller pop-up if the game is over because of a victory!
Inside Concentration.swift I simply added a property var matchCount = 0 to keep track of the correct matches and, inside chooseCard(at:), after increasing the score, I increased matchCount as well.
That’s it, actually, but it required so much more thinking than I would have expected!
Day 127
Fix that UI!
I hope you will forgive me if I do not jot down every single mistake I have made but I only share the end result as it took me about 90 minutes to put all the constraints in place. Anyway, I am happy to say that EVERY single device is supported in EVERY orientation! The only thing that may give you problems is if you try to use it in a 1/3 split on an iPad in portrait mode but … seriously … why would you ever try to do that?
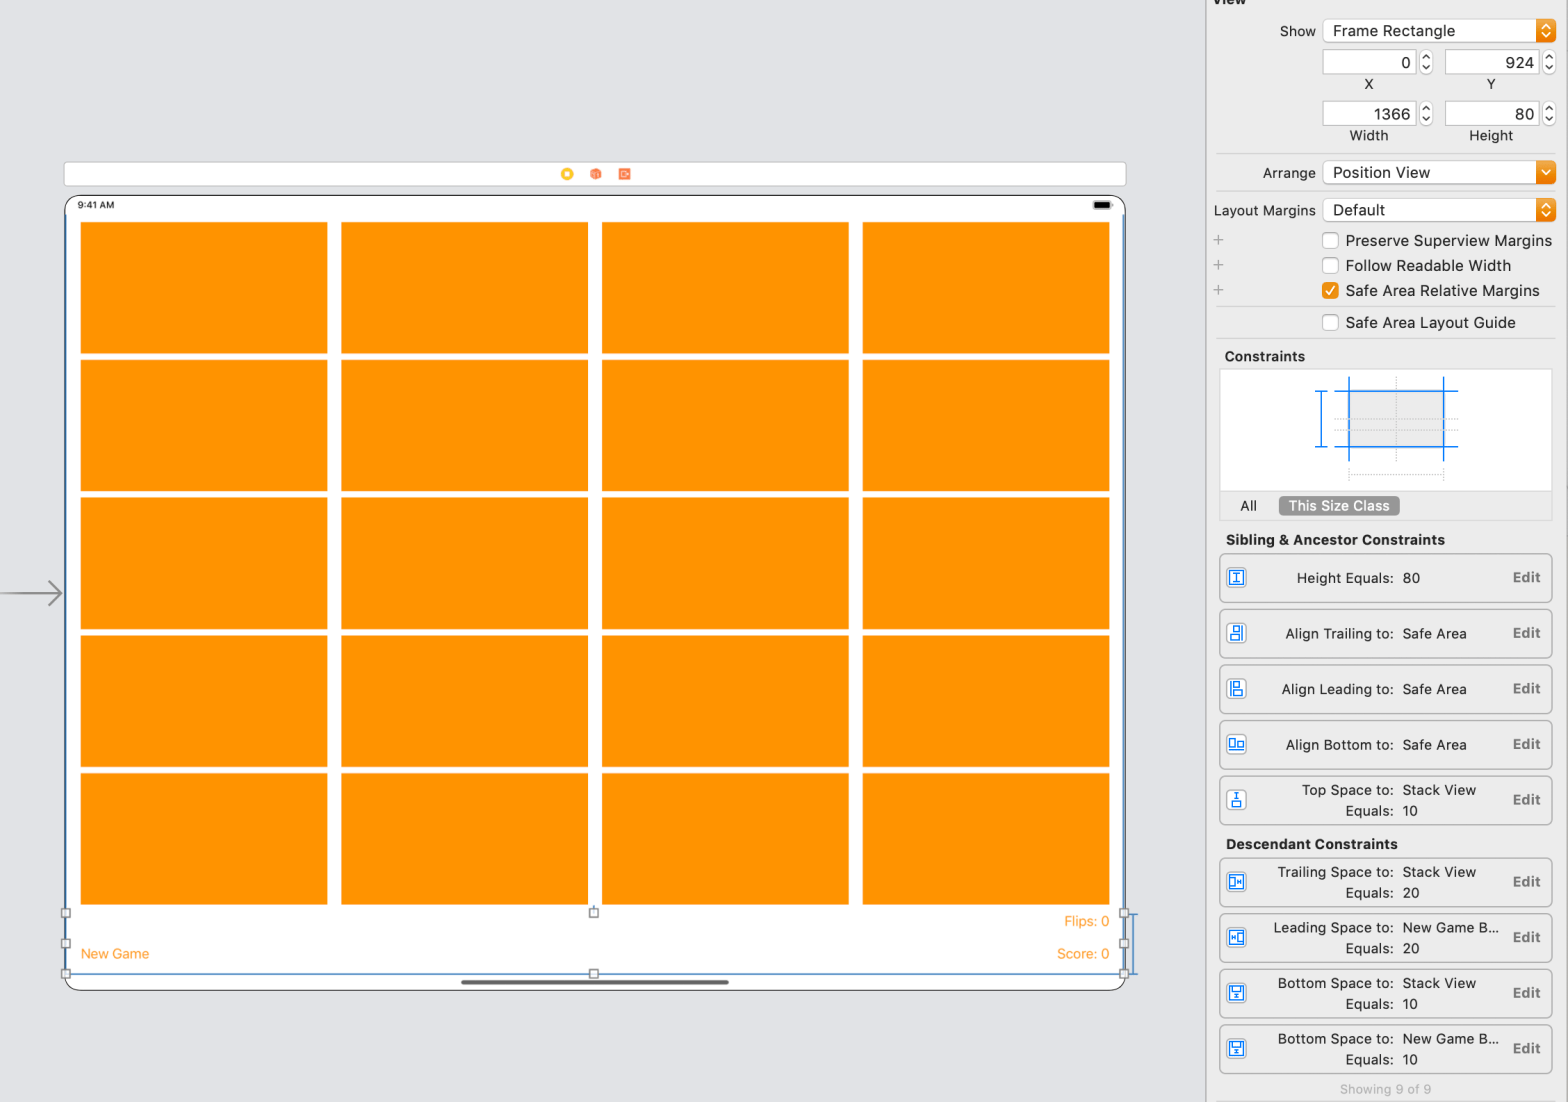
So, in short: I created a view to contain the two labels and button at the bottom and gave it these constraints (image includes also the result):
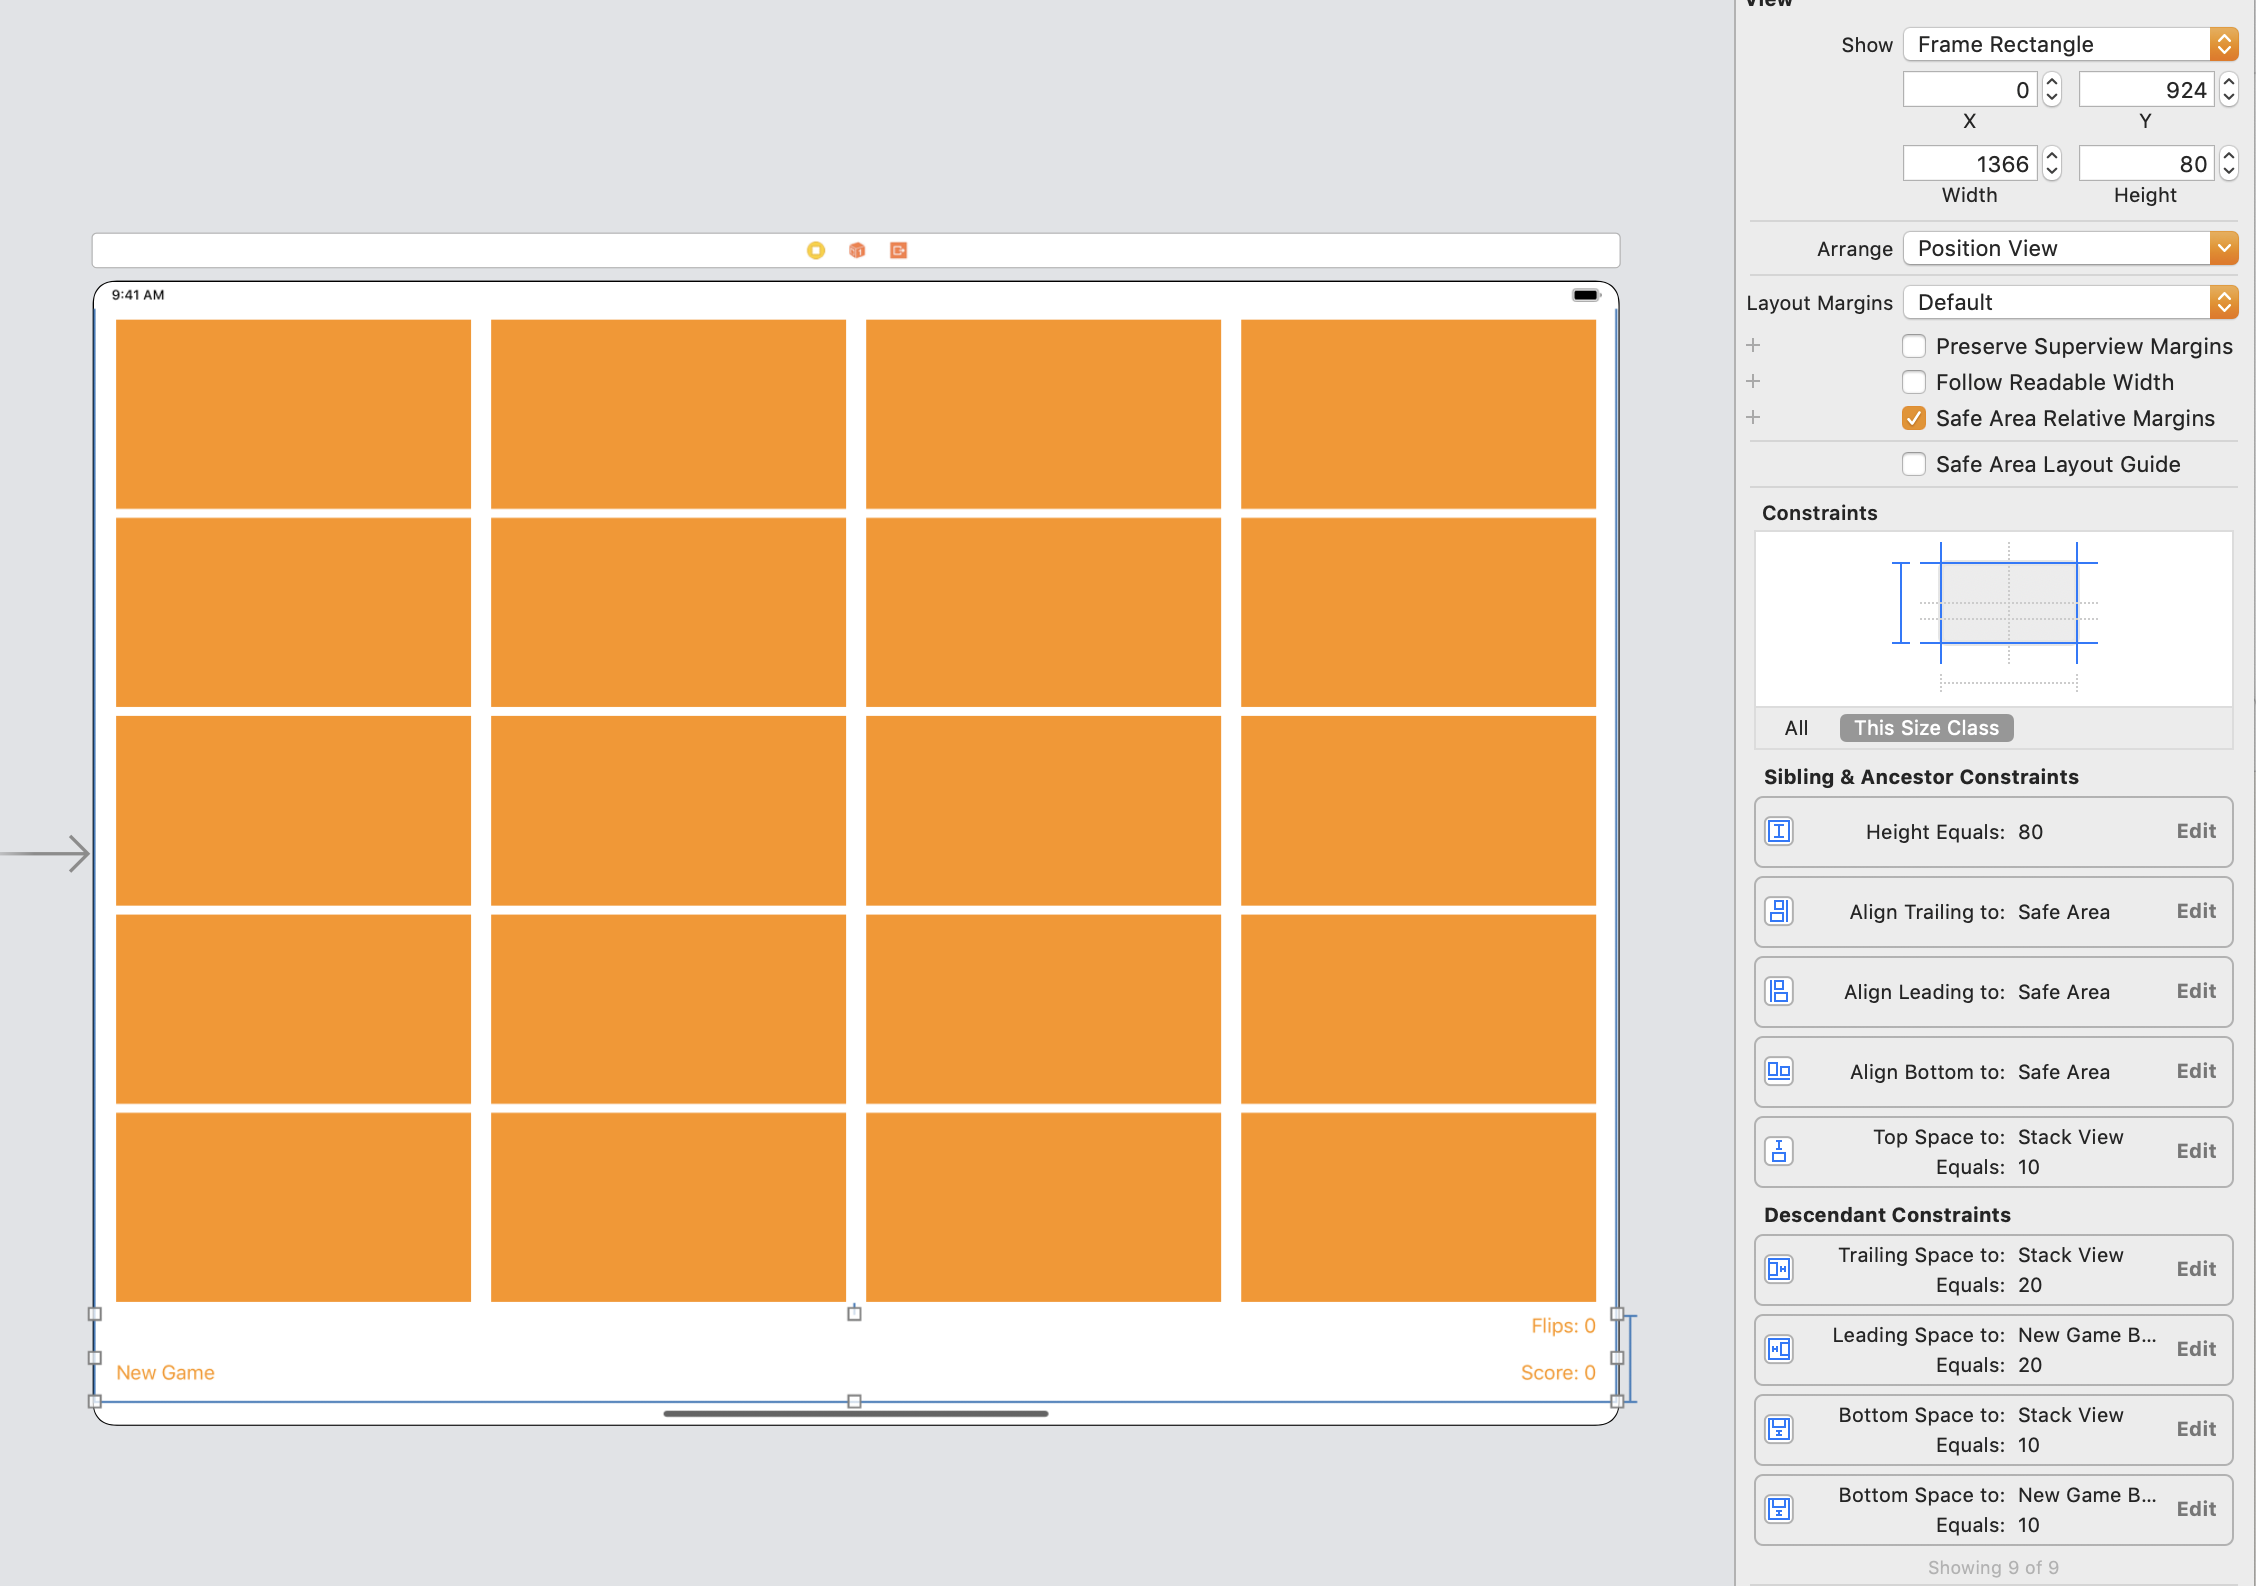
Then, inside it I created a vertical stack view for the two labels and simply pinned everything to the bottom left (or right) corner. This view is the only one to have forced sizes, that is a height of 80. Without this the stack of buttons would have never listened to me!
The upper part is composed of five horizontal stack view inside a vertical stack view. The constraints for this one were crazy because everything was going amiss at every attempt but, eventually, with A LOT of patience, I managed to do it. The master stack view has simple 20 by 10 by 20 by 10 pins (starting from leading and moving clockwise) while the inner stack views have a more complex hierarchy. In theory it was simple but to get there it wasn’t as sometimes I was doing the same thing twice and once it wasn’t working and the next one it was.
I think I will just let you browse the constraints to see if you would have done something differently.
So, for now, I would say that Consolidation Day X is over but I will take a few more days to refine this because I saw some examples, especially the one by Rob Baldwin… ouff… that is some serious stuff… I don’t know if I will ever reach that level of proficiency!
Anyway, please find the project in its current state here on GitHub.
I have just checked now and I really do not feel able to integrate the next bonus points on this challenge, even if I know I could. I really feel like going back to learning.
I will let you know of any improvement to this game I make.
Thank you for reading!
Please don’t forget to drop a hello and a thank you to Paul for all his great work (you can find him on Twitter) and be sure to visit the 100 Days Of Swift initiative page. We are learning so much thanks to him and he deserves to know of our gratitude.
He has written about 20 great books on Swift, all of which you can check about here.
The 100 Days of Swift initiative is based on the Hacking with Swift book, which you should definitely check out.
If you like what I’m doing here please consider liking this article and sharing it with some of your peers. If you are feeling like being really awesome, please consider making a small donation to support my studies and my writing (please appreciate that I am not using advertisement on my articles).
If you are interested in my music engraving and my publications don’t forget visit my Facebook page and the pages where I publish my scores (Gumroad, SheetMusicPlus, ScoreExchange and on Apple Books).
You can also support me by buying Paul Hudson’s books from this Affiliate Link.
Anyways, thank you so much for reading!
Till the next one!
