Hacking with Swift — Learning Project 33
Still at the airport, checking starting in about one hour and a half so I still have some time to practice some coding.
Project 33 is about building a crowd-sourced song recognition app using Apple’s free platform as a service: CloudKit. Is this something like … Shazam?!
So, let’s get started by creating a new project based on the Single View App template, let’s call it “What’s that whistle?” and save it somewhere sensible.
Recording from the microphone with AVAudioRecorder
The only action we need to perform in the storyboard is embedding the view controller into a navigation controller. The rest of the UI will be created in code.
Switch to ViewController.swift and, inside the viewDidLoad() method, change the title of the view controller to be “What’s that Whistle?” and add two bar button item: the first will be a right bar button item with a system item of .add, a target of self and an action calling the yet unwritten method addWhistle. The second will simply customise the title of the navigation bar’s back button so that it shows “Home” instead of the title of the view controller. Curiously, writing nil for target and action doesn’t change what that button is already doing, just doesn’t add anything else on top of that.
Now, write the addWhistle() method which simply instantiates a new object of the not yet created type RecordWhistleViewController and pushes it onto the view controller stack.
Create a new Cocoa Touch Class file, make it subclass UIViewController and name it RecordWhistleViewController. At its top, declare a new implicitly unwrapped UIStackView variable property. Just before viewDidLoad, override the loadView method: inside, set the existing view property to a new empty UIView() and set its background color to grey. Below, instantiate our stackView property, give it a spacing of 30 points, make it not translate auto-resizing mask into constraints, set its distribution to fill equally, its alignment to center, its axis to vertical and, finally, add it as a subview of our view. Then, set its leading, trailing and center-Y anchor’s constraints to be equal to the view’s respective anchors and activate them.
Import AVFoundation at the top of the class and read this:
Framework
AVFoundation
Work with audiovisual assets, control device cameras, process audio, and configure system audio interactions.
Overview
The
AVFoundationframework combines four major technology areas that together encompass a wide range of tasks for capturing, processing, synthesizing, controlling, importing and exporting audiovisual media on Apple platforms.
Add these three properties now: a record button of type UIButton, a recording session of type AVAudioSession and a whistle recorder of type AVAudioRecorder, all of them implicitly unwrapped. The description of the AVAudioSession class is very interesting, here it is:
Summary
An intermediary object that communicates to the system how you intend to use audio in your app.
Declaration
class AVAudioSession : NSObject
Discussion
An audio session acts as an intermediary between your app and the operating system—and, in turn, the underlying audio hardware. You use an audio session to communicate to the operating system the nature of your app’s audio without detailing the specific behavior or required interactions with the audio hardware. This behavior delegates the management of those details to the audio session, which ensures that the operating system can best manage the user’s audio experience.
All iOS and tvOS apps have a default audio session that comes preconfigured as follows:
Although the default audio session provides useful behavior, it doesn’t provide the general audio behavior you need when building a media playback app. To change the default behavior, you configure your app’s audio session category.
There are seven possible categories you can use (see Audio Session Categories and Modes), but the one most playback apps need is called playback. This category indicates that audio playback is a central feature of your app. When you specify this category, your app’s audio continues with the Ring/Silent switch set to silent mode (iOS only). With this category, your app can also play background audio if you’re using the Audio, AirPlay, and Picture in Picture background mode. For more information, see Enabling Background Audio.
You use an
AVAudioSessionobject to configure your app’s audio session.AVAudioSessionis a singleton object used to set the audio session category and perform other configurations. You can interact with the audio session throughout your app’s life cycle, but it’s often useful to perform this configuration at app launch, as shown in the following example.This category is used when you activate the audio session using the
setActive(_:)orsetActive(_:options:)method.Note
You can activate the audio session at any time after setting its category, but it’s generally preferable to defer this call until your app begins audio playback. Deferring the call ensures that you won’t prematurely interrupt any other background audio that may be in progress.
And here is the AVAudioRecorder class:
Summary
A class that provides audio recording capability in your application.
Declaration
Discussion
Using an audio recorder, you can:
In iOS, the audio being recorded comes from the device connected by the user—built-in microphone or headset microphone, for example. In macOS, the audio comes from the system’s default audio input device as set by a user in System Preferences.
You can implement a delegate object for an audio recorder to respond to audio interruptions and audio decoding errors, and to the completion of a recording.
To configure a recording, including options such as bit depth, bit rate, and sample rate conversion quality, configure the audio recorder’s settings dictionary. Use the settings keys described in Settings.
To configure an appropriate audio session for recording, refer to
AVAudioSessionandAVAudioSessionDelegate.The
AVAudioRecorderclass is intended to allow you to make audio recordings with very little programming overhead. Other classes that can be used for recording audio in iOS and macOS includeAVCaptureAudioDataOutputand the Audio Queue services described in the Audio Queue Services Programming Guide.In macOS, you can also use the
AVCaptureAudioFileOutputclass to record audio.
Inside viewDidLoad, change the title of the view controller to be “Record your whistle”, then set the title of the navigation item’s back bar button item to “Record”. After this, set the recordingSession property to the shared instance of the AVAudioSession and open a do-catch block. Inside the do part try to set the category of the recording session to .playAndRecord with a default mode, and try to set it to be active. Then request record permission via a closure which will capture self unownedly, declare a Boolean allowed parameter and launch a DispatchQueue.main.async session. If the Boolean will be true, the loadRecordingUI method will be called, otherwise the loadFailUI will. In the catch part simply call the loadFailUI method. Add two method stubs for these two methods by now.
Go into Info.plist and add a new line with the key name “Privacy – Microphone Usage Description” and give it a value of “We need to record your whistle!”. Now go back to the RecordWhistleViewController.swift file.
Let’s now complete the loadRecordingUI method: instantiate a new UIButton and store it into our recordButton property, set its “tamic” (you should know what that is, right?!) to false, set its title to “Tap to Record” for the .normal state and its font to the preferred UIFont for the .title1 text style. After this, add self as a target to the record button, with an action of recordTapped (not written yet) for the touch event .touchUpInside (that is when a user taps and then releases the pressure while the finger is still inside the button’s area). Finally, add the record button as an arranged subview of the stack view.
Now complete the loadFailUI method as well by creating a new constant failLabel as a new UILabel(), setting its font to the preferred font for the headline text style, its text to “Recording failed: please ensure the app has access to your microphone” and its number of lines to 0. Finally, add it as an arranged subview of the stack view.
Now it’s time to get a place where to save the recording. We are taking a method that was introduced to us back in Project 10 and which I had not understood so much back then and I will try to understand more now. This method, getDocumentsDirectory() will accept no parameter and return a URL. Inside, it will declare a paths constant of type [URL] equal to the urls for the document directory in the user domain mask of the default file manager. Here is a shortened description of the method:
Summary
Returns an array of URLs for the specified common directory in the requested domains.
Declaration
Discussion
This method is intended to locate known and common directories in the system.
So far, so good. We will then get the first element of that array and return it.
We then write a new method called getWhistleURL which will return a simple URL. The only line inside this method will return a call to getDocumentsDirectory and call the .appendingPathComponent() method with argument “whistle.m4a”. So, taking a deep breath… it seems that this will return an URL composed of the first element of the documents directory array with a /whistle.m4a appended at the end. Saving files is a fascinating subject but I find it so complex!
Just a little thing: both of these methods have the class keyword in front of the func one which means we can find the whistle URL from anywhere in our app and not just if we make an instance of this class.
We now need to actually start recording something, which is why we need to write a startRecording() method. This method will mainly perform 5 actions but some of them need a bit more of explaining. First, this method will change the background color of the view to be red so that the user knows he is recording. Second, the button’s title will be changed to “Tap to Stop”. Third, we will call the getWhistleURL() method on the class and store the resulting unique URL into a constant (this is where we will save it). Fourth, we will create a dictionary to store the settings for the recording. It will be of type [String : Int] and it will contain the following keys: 1) AVFormatIDKey will want the Integer version of the kAudioFormatMPEG4AAC key, which is a key that specifies an MPEG-4 AAC codec. The flags field contains the MPEG-4 audio object type constant listed in MPEG-4 Audio Object Type Constants indicating the specific kind of data. That is of type AudioFormatID, which is a type alias of UInt32; 2) AVSampleRateKey, which expresses a sample rate, in hertz, expressed as an NSNumber floating point value; 3) AVNumberOfChannelsKey, which is the number of channels expressed as an NSNumber integer value; 4) AVEncoderAudioQualityKey, which will result in a key from the AVAudioQuality enumeration, from which we will choose the raw value of the high case. Fifth and last, we will try to make the whistleRecorder equal to the return result of the AVAudioRecorder(url:settings:) method with the just created audioURL and settings constant and dictionary as arguments. We will then make ourselves the delegate of the whistleRecorder (which will trigger an error) and call the record() method on it. Here is the record() method:
Summary
Starts or resumes recording.
Declaration
Discussion
Calling this method implicitly calls
prepareToRecord(), which creates (or erases) an audio file and prepares the system for recording.Returns
trueif successful, otherwisefalse.
…and here, just for completeness, the prepareToRecord() one:
Instance Method
prepareToRecord()Creates an audio file and prepares the system for recording.
Declaration
Return Value
trueif successful, otherwisefalse.Discussion
Creates an audio file at the location specified by the url parameter in the
init(url:settings:)method. If a file already exists at that location, this method overwrites it.The preparation invoked by this method takes place automatically when you call
record(). UseprepareToRecordwhen you want recording to start as quickly as possible upon callingrecord().
Now make the class conform AVAudioRecorderDelegate protocol to make one of the errors go away. This is the definition:
Summary
The delegate of an audio recorder object.
Declaration
Discussion
All of the methods in this protocol are optional. They allow a delegate to respond to audio interruptions and audio decoding errors, and to the completion of a recording.
Now we need to write the a method to end the recording either when we are happy with it or we want to re-record it. Let’s call it finishRecording and make it accept a Boolean parameter called success. Restore the color of the background to green and call the stop() method on the whistleRecorder before making it equal to nil. The stop() method is very simple: it halts the audio recording and closes the file. I recall when studying the first days of the C programming language when each file had to be manually opened, read, written to and closed for each operation. If the success parameter if true we need to set the title of the record button to “Tap to Re-record”, create a new right bar button item with a title of “Next”, a plain style, a target of self and an action of #selector(nextTapped) (please write an empty stub for this before Xcode starts complaining); otherwise simply set the title to “Tap to Record”, create a new alert controller with the title “Record failed”, the message “There was a problem recording your whistle; please try again.” and a preferred style of .alert, add an OK action to it and present it with animation.
So now it’s time to finally write the recordTapped() so that if the whistle recorder is equal to nil it will call the startRecording() otherwise it will call finishRecording(success: true).
To handle the one case we didn’t handle, which is when the recording wasn’t a success: let’s implement the AVAudioRecorder delegate method audioRecorderDidFinishRecording, checking that, if the flag parameter is false, it will call the finishRecording method with false as its only argument.
Animating UIStackView subview layout
Add a property at the top of the class, next to the others, calling it playButton and giving it a type of an implicitly unwrapped UIButton. Inside the loadRecordingUI(), add code to bring this button to life, very similarly to what was done before for the record button. Initialise it (1), set its translating auto-resizing mask into constraints to false (2), set its title to “Tap to Play” for the normal state (3), hide it (4), set its alpha to be totally transparent (5), set the font for the title label to be the preferred UIFont for the .title1 text style (6), add self as the target of the button, with an action of #selector(playTapped) for the .touchUpInside touch-event (7) before finally adding it as a subview of our stack view.
Now to handle the animation of this button we need to put an animation code inside finishRecording() before setting the right bar button item and inside recordTapped(), after the call to startRecording(). The code is exactly the same in both case, just once the button is shown instead of being hidden and the alpha is brought to 1 instead of 0. So, in the first case, if the play button is hidden, animate the view with a duration of 0.35 seconds and, in the following closure, capture self as unowned and show the button with full opacity. In the second case, if the button is NOT hidden, we just hide the button and set the alpha to 0. All this, in conjunction with the power of stack views, make the button slide in very nicely!
Now create a new property of type AVAudioPlayer! and write the playTapped() method. This gets the shared whistle url and, inside the do/try/catch block tries to set the whistle player to be an instance of the AVAudioPlayer with the contents of the audio url and to call the play() method. Inside the catch side just create a new alert controller that shows that the playback has failed and that the user should try to re-record, add an OK action and present it with an animation.
As it is now the app should be running pretty nicely!
Now a bit of pause to study the Documentation of this part, starting with AVAudioPlayer:
Summary
An audio player that provides playback of audio data from a file or memory.
Declaration
Discussion
Use this class for audio playback unless you are playing audio captured from a network stream or require very low I/O latency.
Using an audio player you can:
The
AVAudioPlayerclass lets you play sound in any audio format available in iOS and macOS. You implement adelegateto handle interruptions (such as an incoming phone call on iOS) and to update the user interface when a sound has finished playing. The delegate methods are described inAVAudioPlayerDelegate.To play, pause, or stop an audio player, call one of its playback control methods, described in Configuring and Controlling Playback.
This class uses the Objective-C declared properties feature for managing information about a sound, such as the playback point within the sound’s timeline, and for accessing playback options, such as volume and looping.
To configure an appropriate audio session for playback on iOS, see
AVAudioSessionandAVAudioSessionDelegate.
Now it’s time for the AVAudioPlayerDelegate entry:
Protocol
AVAudioPlayerDelegate
A protocol that allows a delegate to respond to audio interruptions and audio decoding errors, and to the completion of a sound’s playback.
Declaration
Overview
The delegate of an
AVAudioPlayerobject must adopt theAVAudioPlayerDelegateprotocol. All of the methods in this protocol are optional.
Here are some of the things we can do with an audio player:
Configuring and Controlling Playback
func play() -> Bool: Plays a sound asynchronously.
func play(atTime: TimeInterval) -> Bool: Plays a sound asynchronously, starting at a specified point in the audio output device’s timeline.
func pause(): Pauses playback; sound remains ready to resume playback from where it left off.
func stop(): Stops playback and undoes the setup needed for playback.
func prepareToPlay() -> Bool: Prepares the audio player for playback by preloading its buffers.
func setVolume(Float, fadeDuration: TimeInterval): Fades to a new volume over a specific duration.
var isPlaying: Bool: A Boolean value that indicates whether the audio player is playing (true) or not (false).
var volume: Float: The playback volume for the audio player, ranging from 0.0 through 1.0 on a linear scale.
var pan: Float: The audio player’s stereo pan position.
var rate: Float: The audio player’s playback rate.
var enableRate: Bool: A Boolean value that specifies whether playback rate adjustment is enabled for an audio player.
var numberOfLoops: Int: The number of times a sound will return to the beginning, upon reaching the end, to repeat playback.
var delegate: AVAudioPlayerDelegate?: The delegate object for the audio player.
protocol AVAudioPlayerDelegate: A protocol that allows a delegate to respond to audio interruptions and audio decoding errors, and to the completion of a sound’s playback.
var settings: [String : Any]: The audio player’s settings dictionary, containing information about the sound associated with the player.
Create a new CocoaTouchClass subclassing UITableViewController and name it “SelectGenreViewController”. Inside, add a property to it to list, in a static array of strings, a few music genres. This is marked as static so that it can be used in a lot of other places.
Inside the file’s viewDidLoad() method, change the view controller’s title to “Select Genre”, the back bar button item’s title to “Genre” and register the table view’s cell for the reuse identifier of “Cell”. We have never seen the register method in previous projects so let’s give it a quick look.
Summary
Registers a class for use in creating new table cells.
Declaration
Discussion
Prior to dequeueing any cells, call this method or the
register(_:forCellReuseIdentifier:)method to tell the table view how to create new cells. If a cell of the specified type is not currently in a reuse queue, the table view uses the provided information to create a new cell object automatically.If you previously registered a class or nib file with the same reuse identifier, the class you specify in the
cellClassparameter replaces the old entry. You may specifynilforcellClassif you want to unregister the class from the specified reuse identifier.Parameters
cellClass: The class of a cell that you want to use in the table (must be aUITableViewCellsubclass).
identifier: The reuse identifier for the cell. This parameter must not be nil and must not be an empty string.
Now implement the following table view data source methods: numberOfSections, return 1; numberOfRowsInSection, return SelectGenreViewController.genres.count; cellForRowAt, which dequeues a reusable cell with identifier “Cell”, sets its text to the indexPath.row index of the genres static array, sets the cell’s accessory type to disclosure indicator and returns the cell.
Then implement the didSelectRowAt delegate method: if a cell for the row of the tapped index path can be found, store it via conditional binding and set its text label’s text (or, if not present) the first element of the genres array, stored into a constant. Declare a new instance of the not yet created AddCommentsViewController() class and set the previously created string constant to be that view controller’s genre property, before pushing the view controller onto the stack.
Go back to RecordWhistleViewController.swift and complete the nextTapped() method: simply declare a new instance of SelectGenreViewController and push it onto the navigation stack.
Create a new Cocoa Touch Class, subclass of UIViewController and call it “AddCommentsViewController”. Give it three properties: a genre implicitly unwrapped String, a comments implicitly unwrapped UITextView and a hard-typed placeholder String (because UITextViews cannot have placeholders).
Now override the loadView() method, very similarly to what was done earlier: instantiate the view property with an empty new UIView() and set its background color to white. Instantiate the UITextView(), set its tamic to false, set the class itself to be its delegate (and conform to the protocol, please!), set the font to be the preferred font the the .body text style and add it to the view as a subview. Finally set the four constraints so that they are equal to the view’s leading and trailing anchors and to the view’s safe area layout guide’s top and bottom anchors, and set them active.
Now fill in the viewDidLoad() method so that it sets the view controller’s title to “Comments” and create a right bar button item with a title of “Submit”, a plain style, a target of self and an action of #selector(submitTapped). Finally, makes the comments text field’s text property be assigned the placeholder’s property value. Write now the submitTapped @objc method, declaring and instantiating a new instance of the SubmitViewController() class (not written yet), setting its genre property to be equal to the genre property of our present class and, if the text view’s text is equal to the placeholder, set the new controller’s comments property to an empty string, otherwise set it to the text view’s text. Finally push this on the navigation stack.
I find all this abstraction very hard to keep up with but I will just keep breathing!
Last of this part, implement the textViewDidBeginEditing delegate method with, inside, a check that if the text view’s text is equal to the placeholder, it should be put back to an empty string whenever the user starts editing it.
Before moving on, a little pause to read about the UITextViewDelegate protocol:
Summary
The
UITextViewDelegateprotocol defines a set of optional methods you can use to receive editing-related messages forUITextViewobjects. All of the methods in this protocol are optional. You can use them in situations where you might want to adjust the text being edited (such as in the case of a spell checker program) or modify the intended insertion point.Declaration
Writing to iCloud with CloudKit: CKRecord and CKAsset
Create a new subclass of UIViewController, call it “SubmitViewController” and add five implicitly unwrapped properties to it: a genre string, a comments string, a stack view, a status label and a spinner of type UIActivityIndicatorView. This last class is new so let’s look at it:
Summary
A view that shows that a task is in progress.
Declaration
Discussion
You control when an activity indicator animates by calling the
startAnimating()andstopAnimating()methods. To automatically hide the activity indicator when animation stops, set thehidesWhenStoppedproperty totrue.You can set the color of the activity indicator by using the
colorproperty.
The loadView() method we are going to override here is very similar to the other ones so I want to take the time to analyse a few aspects I had left behind before. As usual, reset the view property to be an empty UIView() and set its background color to grey. I had not noticed this before but Swift’s autocompletion feature is so good that you can just write .gray instead of UIColor.gray, as it already knows that the .backgroundColor property of a UIView is of type UIColor!.
Now instantiate the stackView property with a new stack view and set its spacing to 10; set its tamic to false and set its distribution property to fill equally. I have always found this terminology to be pretty daunting to understand so here are the cases of the UIStackView.Distribution enumeration:
A layout where the stack view resizes its arranged views so that they fill the available space along the stack view’s axis. When the arranged views do not fit within the stack view, it shrinks the views according to their compression resistance priority. If the arranged views do not fill the stack view, it stretches the views according to their hugging priority. If there is any ambiguity, the stack view resizes the arranged views based on their index in the
arrangedSubviewsarray.A layout where the stack view resizes its arranged views so that they fill the available space along the stack view’s axis. The views are resized so that they are all the same size along the stack view’s axis.
A layout where the stack view resizes its arranged views so that they fill the available space along the stack view’s axis. Views are resized proportionally based on their intrinsic content size along the stack view’s axis.
A layout where the stack view positions its arranged views so that they fill the available space along the stack view’s axis. When the arranged views do not fill the stack view, it pads the spacing between the views evenly. If the arranged views do not fit within the stack view, it shrinks the views according to their compression resistance priority. If there is any ambiguity, the stack view shrinks the views based on their index in the
arrangedSubviewsarray.A layout that attempts to position the arranged views so that they have an equal center-to-center spacing along the stack view’s axis, while maintaining the
spacingproperty’s distance between views. If the arranged views do not fit within the stack view, it shrinks the spacing until it reaches the minimum spacing defined by itsspacingproperty. If the views still do not fit, the stack view shrinks the arranged views according to their compression resistance priority. If there is any ambiguity, the stack view shrinks the views based on their index in thearrangedSubviewsarray.
Now set the stack view’s alignment to .center and give a look at this list of UIStackView.alignment enumeration cases:
A layout where the stack view resizes its arranged views so that they fill the available space perpendicular to the stack view’s axis.
A layout for vertical stacks where the stack view aligns the leading edge of its arranged views along its leading edge. This is equivalent to the top alignment for horizontal stacks.
A layout for horizontal stacks where the stack view aligns the top edge of its arranged views along its top edge. This is equivalent to the
UIStackView.Alignment.leadingalignment for vertical stacks.A layout where the stack view aligns its arranged views based on their first baseline. This alignment is only valid for horizontal stacks.
A layout where the stack view aligns the center of its arranged views with its center along its axis.
A layout for vertical stacks where the stack view aligns the trailing edge of its arranged views along its trailing edge. This is equivalent to the bottom alignment for horizontal stacks.
A layout for horizontal stacks where the stack view aligns the bottom edge of its arranged views along its bottom edge. This is equivalent to the
UIStackView.Alignment.trailingalignment for vertical stacks.A layout where the stack view aligns its arranged views based on their last baseline. This alignment is only valid for horizontal stacks.
Finally, set the stack view’s axis to be vertical and add it as a subview of our view, before setting its leading, trailing and ceneterY anchors’ constraints to the relative anchors of the view.
Instantiate the status label, deactivate its tamic, set its text to “Submitting…” and its text color property to white. I know we have used this countless times but here is its definition:
Summary
The color of the text.
Declaration
Discussion
If you are using styled text, assigning a new value to this property causes the color to be applied to the entirety of the string in the
attributedTextproperty. If you want to apply the color to only a portion of the text, create a new attributed string with the desired style information and associate it with the label. If you are not using styled text, this property applies to the entire text string in the text property.The default value for this property is a black color (set through the black class property of
UIColor). Setting this property tonilcauses it to be reset to the default value.
Set the label’s .font property to be the preferred font for the .title1 text style which now, after the 4th time we are using it, we need to investigate a bit more.
Summary
Returns an instance of the system font for the specified text style and scaled appropriately for the user’s selected content size category.
Declaration
Discussion
To create a styled font based on a custom font, use a
UIFontMetricsobject.Parameters
style: The text style for which to return a font. See “Text Styles” inUIFontDescriptorfor recognized values.Returns
The system font associated with the specified text style.
Finally set its .textAlignment property to .center, which is a case of the NSTextAlignment enumeration:
Enumeration
These constants specify text alignment.
Declaration
iOS, tvOS, watchOS
macOS
Topics
Constants
case left: Text is visually left aligned.
case right: Text is visually right aligned.
case center: Text is visually center aligned.
case justified: Text is justified.
case natural: Use the default alignment associated with the current localization of the app. The default alignment for left-to-right scripts isNSTextAlignment.left, and the default alignment for right-to-left scripts isNSTextAlignment.right.Initializers
Converts a Core Text alignment constant value to the matching constant value used by UIKit.
Now instantiate a new UIActivityIndicatorView with the (style:) initialiser and passing in the .whiteLarge case. Here is a description of the initialiser:
Summary
Initializes and returns an activity-indicator object.
Declaration
Discussion
UIActivityIndicatorViewsizes the returned instance according to the specified style. You can set and retrieve the style of a activity indicator through the style property.Parameters
style: a constant that specifies the style of the object to be created. SeeUIActivityIndicatorView.Stylefor descriptions of the style constants.Returns
An initialized
UIActivityIndicatorViewobject ornilif the object couldn’t be created.
Set its tamic to false, its .hidesWhenStopped to true before calling its startAnimating() method and adding both label and activity indicator view as subviews to the stack view.
Inside viewDidLoad(), set the view controller’s title to “You’re all set!” and hide the back button by setting the .hidesBackButton of the navigation controller to true.
Override the viewDidAppear(_:) method by calling its super-method initialiser and calling the not yet written doSubmission() method. Create a stub for this one and write an @objc method called doneTapped() to which a button will be connected containing an assignment of the result of the .popToRootViewController method to _, which is Swift’s way of saying “ignore this thing”.
Now import CloudKit and … if you do not have an Apple Developer Membership you will need to purchase it now for € 99,00, which I just did and am waiting for its elaboration. Until then I am stuck here … I really hope by the new year this time I will have not regretted this purchase …
Now, go to the top level of the app, the blue icon, and select the Capabilities category. There, turn on iCloud and check the CloudKit box. Paul didn’t mention this but I had to uncheck key-value storage to match his picture. I wonder if this was the correct thing to do. I guess I will be able to correct it later. If you are testing on a device be sure to be logged into iCloud and to have iCloudDrive enabled.
Start now to complete the doSubmission() method: create a new constant to contain an instance of the CKRecord class with an initialiser of (recordType: "Whistle"). This argument is of type CKRecord.RecordType which is a type alias for String, very simply. Here is the description of the CKRecord class, which we absolutely need to understand how things work.
Summary
A dictionary of key-value pairs that you use to fetch and save your app’s data.
Declaration
Discussion
Records are the fundamental objects you use to manage data in CloudKit. You may define any number of record types for your app, with each record type corresponding to a different type of information you need. Within a given record type, you then define one or more fields, each of which has a name and a data value. Records can contain simple data types such as strings and numbers or more complex types such as geographic locations or pointers to other records.
An important step in using CloudKit is defining the record types your app supports. Each new record object contains no keys or values initially. During development, you can add new keys and values at any time. The first time you set a value for a key and save the record, the server associates that type with the key for all records of the same type. (The
CKRecordclass does not enforce these type constraints or do any local validation of a record’s contents; those constraints are enforced by the server when you save records.)Note
The ability to add new keys is only possible during development. When you deploy to a production environment, the server returns an error when you try to specify an unknown record type or try to save a record containing unknown keys.
Although records act like dictionaries, there are still limitations to the types of values you can assign to keys. The following are the object types that the
CKRecordclass supports. Attempting to specify objects of any other type is a programmer error and will fail. Fields of all types are searchable unless otherwise noted.Supported Data Types
The following data types are supported in
CKRecordfields.Important
To ensure the speed of fetching and saving records, the data stored by a record must not exceed 1 MB. Assets do not count against this limit but all other data types do.
Interacting with Records
You interact with records as follows:
The process for defining your record types depends entirely on your app and the data you are trying to represent. It is best to design records that encapsulate data for one unit of information. For example, you might use one record type to store an employee’s name, job title, and date of hire, and use a separate record type to store address information. Using different record types lets you manage, manipulate, and validate the two types of information separately. Use fields containing
CKRecord.Referenceobjects to establish relationships between different types of records. After you define your record types, use the iCloud Dashboard to set up your record types. During development, you can also create new record types programmatically.Indexing the Fields of a Record
Indexes make it possible to search the contents of your records efficiently. During development, the server indexes all fields whose data types can be used in the predicate of a query. This automatic indexing makes it easier to experiment with queries during development, but these indexes take up space in a database and take time to generate and maintain. So when migrating to a production environment, remove the indexes for any fields that you do not actually use in queries.
To manage the indexing behavior of your records in the production environment, use CloudKit Dashboard. When migrating your schema from the development environment to the production environment, enable indexing only for the fields that your app uses in queries and disable it for all other fields.
Customizing Records
The
CKRecordclass does not support any special customizations and should not be subclassed. Use this class as-is to manage data coming from or going to the server.Storing Records Locally
If you store records in a local database, use the
encodeSystemFields(with:)method to encode and store the record’s metadata. The metadata contains the record ID and change tag which is needed later to sync records in a local database with those stored by CloudKit.
That was long, right? But I found it very helpful! Paul was so kind to give us a shortened version of the important things we needed to know but, well, I always prefer to read the Documentation if available.
Now we have a sort of dictionary so let’s assign the genre downcast as CKRecordValue to the “genre” key of our whistleRecord CKRecord instance. The only reference to the CKRecordValue type we can find is this:

Now repeat the same procedure for the comments, then declare an audioURL URL constant to store the return value of our .getWhistleURL() method and, finally, declare a whistleAsset of type CKAsset(fileURL:) passing in the just created constant. The CKAsset class is once more very important and here it is:
Summary
An object representing a large file associated with a record.
Declaration
Discussion
Use asset objects to incorporate external files—such as image, sound, video, text, and binary data files—into your app’s records. You can also use assets in places where the data you want to assign to a field is more than a few kilobytes in size. To associate an asset with a record, assign it as the value of one of the record’s fields.
The content of an asset is stored separately from the record that references it but is tied closely to that record. When you save a record that has an asset, CloudKit saves both the record and the asset data to the server. Similarly, when you fetch the record, the server returns both the record data and any assets. If multiple records refer to the same asset, however, CloudKit saves or fetches only one copy of the asset data. CloudKit saves only the asset data; it does not save the filename or any other metadata associated with the initial file you provide.
When you download a record containing an asset, CloudKit keeps the asset data around for a little while but may delete it at any point in the future to free up disk space. After fetching a record containing an asset, you can retrieve the asset data with the URL in the
fileURLproperty. If you want to ensure that the asset’s data remains local to the device, write the data to a file in your app’s local container directory and reference the data from the new file.You cannot delete asset data directly from the server. When you no longer want the data associated with an asset, remove all asset objects that point to that data from your records. For example, for a record that contains an asset as a field, set the value of the field to
nil. When no asset objects refer to the data, the server lazily deletes the asset data at some point in the future. (Exactly when is not specified, but assume at least several days.)
Last thing to do is to set the “audio” key of our Cloud-dictionary to this new whistleAsset constant.
Now, for the second part of this method, we need to access the default encapsulation of content of our app, which is represented by CKContainer.default(), then access the database of data shared between all users and call the save() method on it. This will accept one parameter of type SKRecord (our whistleRecord) and then a closure that will capture self unownedly, accept itself two parameters (an optional SKRecord? and an Error?). Inside we will move execution to the main thread and dispatch the queue asynchronously; if we find an error we will change the label text so that it shows the error’s localised description and stop the spinner’s animation. If no error is found, we will change the background color of the view back to green, set the label’s text to “Done!” and stop the spinner’s animation, before setting the .isDirty property of the ViewController to true (we have not written it yet and there is not a real explanation about that yet). Finally, regardless of whether we have an error or not, we will create a right bar button item with a “Done” title, a plain style, a target of self and an action of #selector(self.doneTapped).
Now, to make the code compile, go to the ViewController.swift file and add the static property isDirty and set it to be true. What will that mean? Who knows!?!
Here is what there is to know about the CKContainer class:
Summary
An encapsulation of content associated with an app.
Declaration
Discussion
A container object manages all explicit and implicit attempts to access the contents of the container.
Every app has a default container object that manages its own native content. If you develop a suite of apps, you can also access any container objects for which you have the appropriate entitlements. Each new container distinguishes between publicly available data and data that is private to the current user. Private data is always stored in the appropriate container directory in the user’s iCloud account.
Note
Interactions with
CKContainerobjects occur at a quality of service level ofNSQualityOfServiceUserInitiatedby default.
The default() method is instead thus described:
Summary
Returns the default container object for managing the current app’s content.
Declaration
Discussion
Use this method to retrieve the container for your app’s native content. This container is the one your app typically uses to store its data. If you want the container for a different app, create and initialize that container using the
init(identifier:)method.During development, the returned container object points to a development version of your app’s container. When you ship your app, the returned object points to the live production environment.
Returns
The container object associated with the current app’s content. This method always returns a valid container object.
And here is the publicCloudDatabase property:
Summary
The database containing the data shared by all users.
Declaration
Discussion
The database in this property is available regardless of whether the user’s device has an active iCloud account. The contents of the public database are readable by all users of the app, and users have write access to the records (and other data objects) they create. Data in the public database is also visible in the developer portal, where you can assign roles to users and restrict access as needed.
Data stored in the public database counts against your app’s iCloud storage quota and not against the quota of any single user.
The save(_:completionHandler:) method is instead thus described:
Summary
Saves one record asynchronously, with a low priority, to the current database, if the record has never been saved or if it is newer than the version on the server.
Declaration
Discussion
This method saves the record only if it has never been saved before or if it is newer than the version on the server. You cannot use this method to overwrite newer versions of a record on the server.
This method saves the record with a low priority, which may cause the task to execute after higher-priority tasks. To save records more urgently, create a
CKModifyRecordsOperationobject with the desired priority. You can also use that operation object to save multiple records simultaneously.Parameters
Finally, before signing off for today, here is the Documentation for the CKDatabase class, quite important I would say:
Class
CKDatabase
A conduit for accessing and performing operations on the data of an app container.
Declaration
Overview
An app container has a public database whose data is accessible to all users and a private database whose data is accessible only to the current user. A database object takes requests for data and applies them to the appropriate part of the container.
You do not create database objects yourself, nor should you subclass
CKDatabase. Your app’sCKContainerobjects provide theCKDatabaseobjects you use to access the associated data. Use database objects as-is to perform operations on data.The public database is always available, regardless of whether the device has an an active iCloud account. When no iCloud account is available, your app may fetch records and perform queries on the public database, but it may not save changes. (Saving records to the public database requires an active iCloud account to identify the owner of those records.) Access to the private database always requires an active iCloud account on the device.
Note
Interactions with
CKDatabaseobjects occur at a quality of service level ofNSQualityOfServiceUserInitiatedby default. For information about quality of service, see Prioritize Work with Quality of Service Classes in Energy Efficiency Guide for iOS Apps and Prioritize Work at the Task Level in Energy Efficiency Guide for Mac Apps.Interacting with Database Objects
You interact with database objects as follows:
Using Databases with Operation Objects
For operation objects that descend from the
CKDatabaseOperationclass, specify the database object to use when executing the operation.If you execute operations on your own custom queue, specify the database explicitly by assigning the appropriate
CKDatabaseobject to the operation object’s database property.If you do not have your own queue, execute the operation object against a database implicitly by calling its
add(_:)method.Executing Tasks Against a Database Directly
The
CKDatabaseclass offers convenience methods for accessing records, record zones, and subscriptions without an operation object. The convenience methods allow you to fetch, save, or delete a single item asynchronously and process the results on a background thread. There is also a convenience method to search for records in the database.
A hands-on guide to the CloudKit dashboard
Fine … here is where frustration starts to ramp up once more … I am following this chapter on the CloudKit dashboard and… Good Lord … nothing is as it is shown on the book… NOTHING! No option, no tab, no interface element is the same! What on Earth should I do? …
So far no one has come to my aid so I will just move on to the next chapter and then go back, hoping that everything has gone as it should have.
So, I think I may have gotten my head around this. It seems that Apple changed the UI for the iCloud Dashboard completely and I may have been able to find my way into it now… let’s see.
This is how the dashboard look right now, instead of what Paul shows in the book.
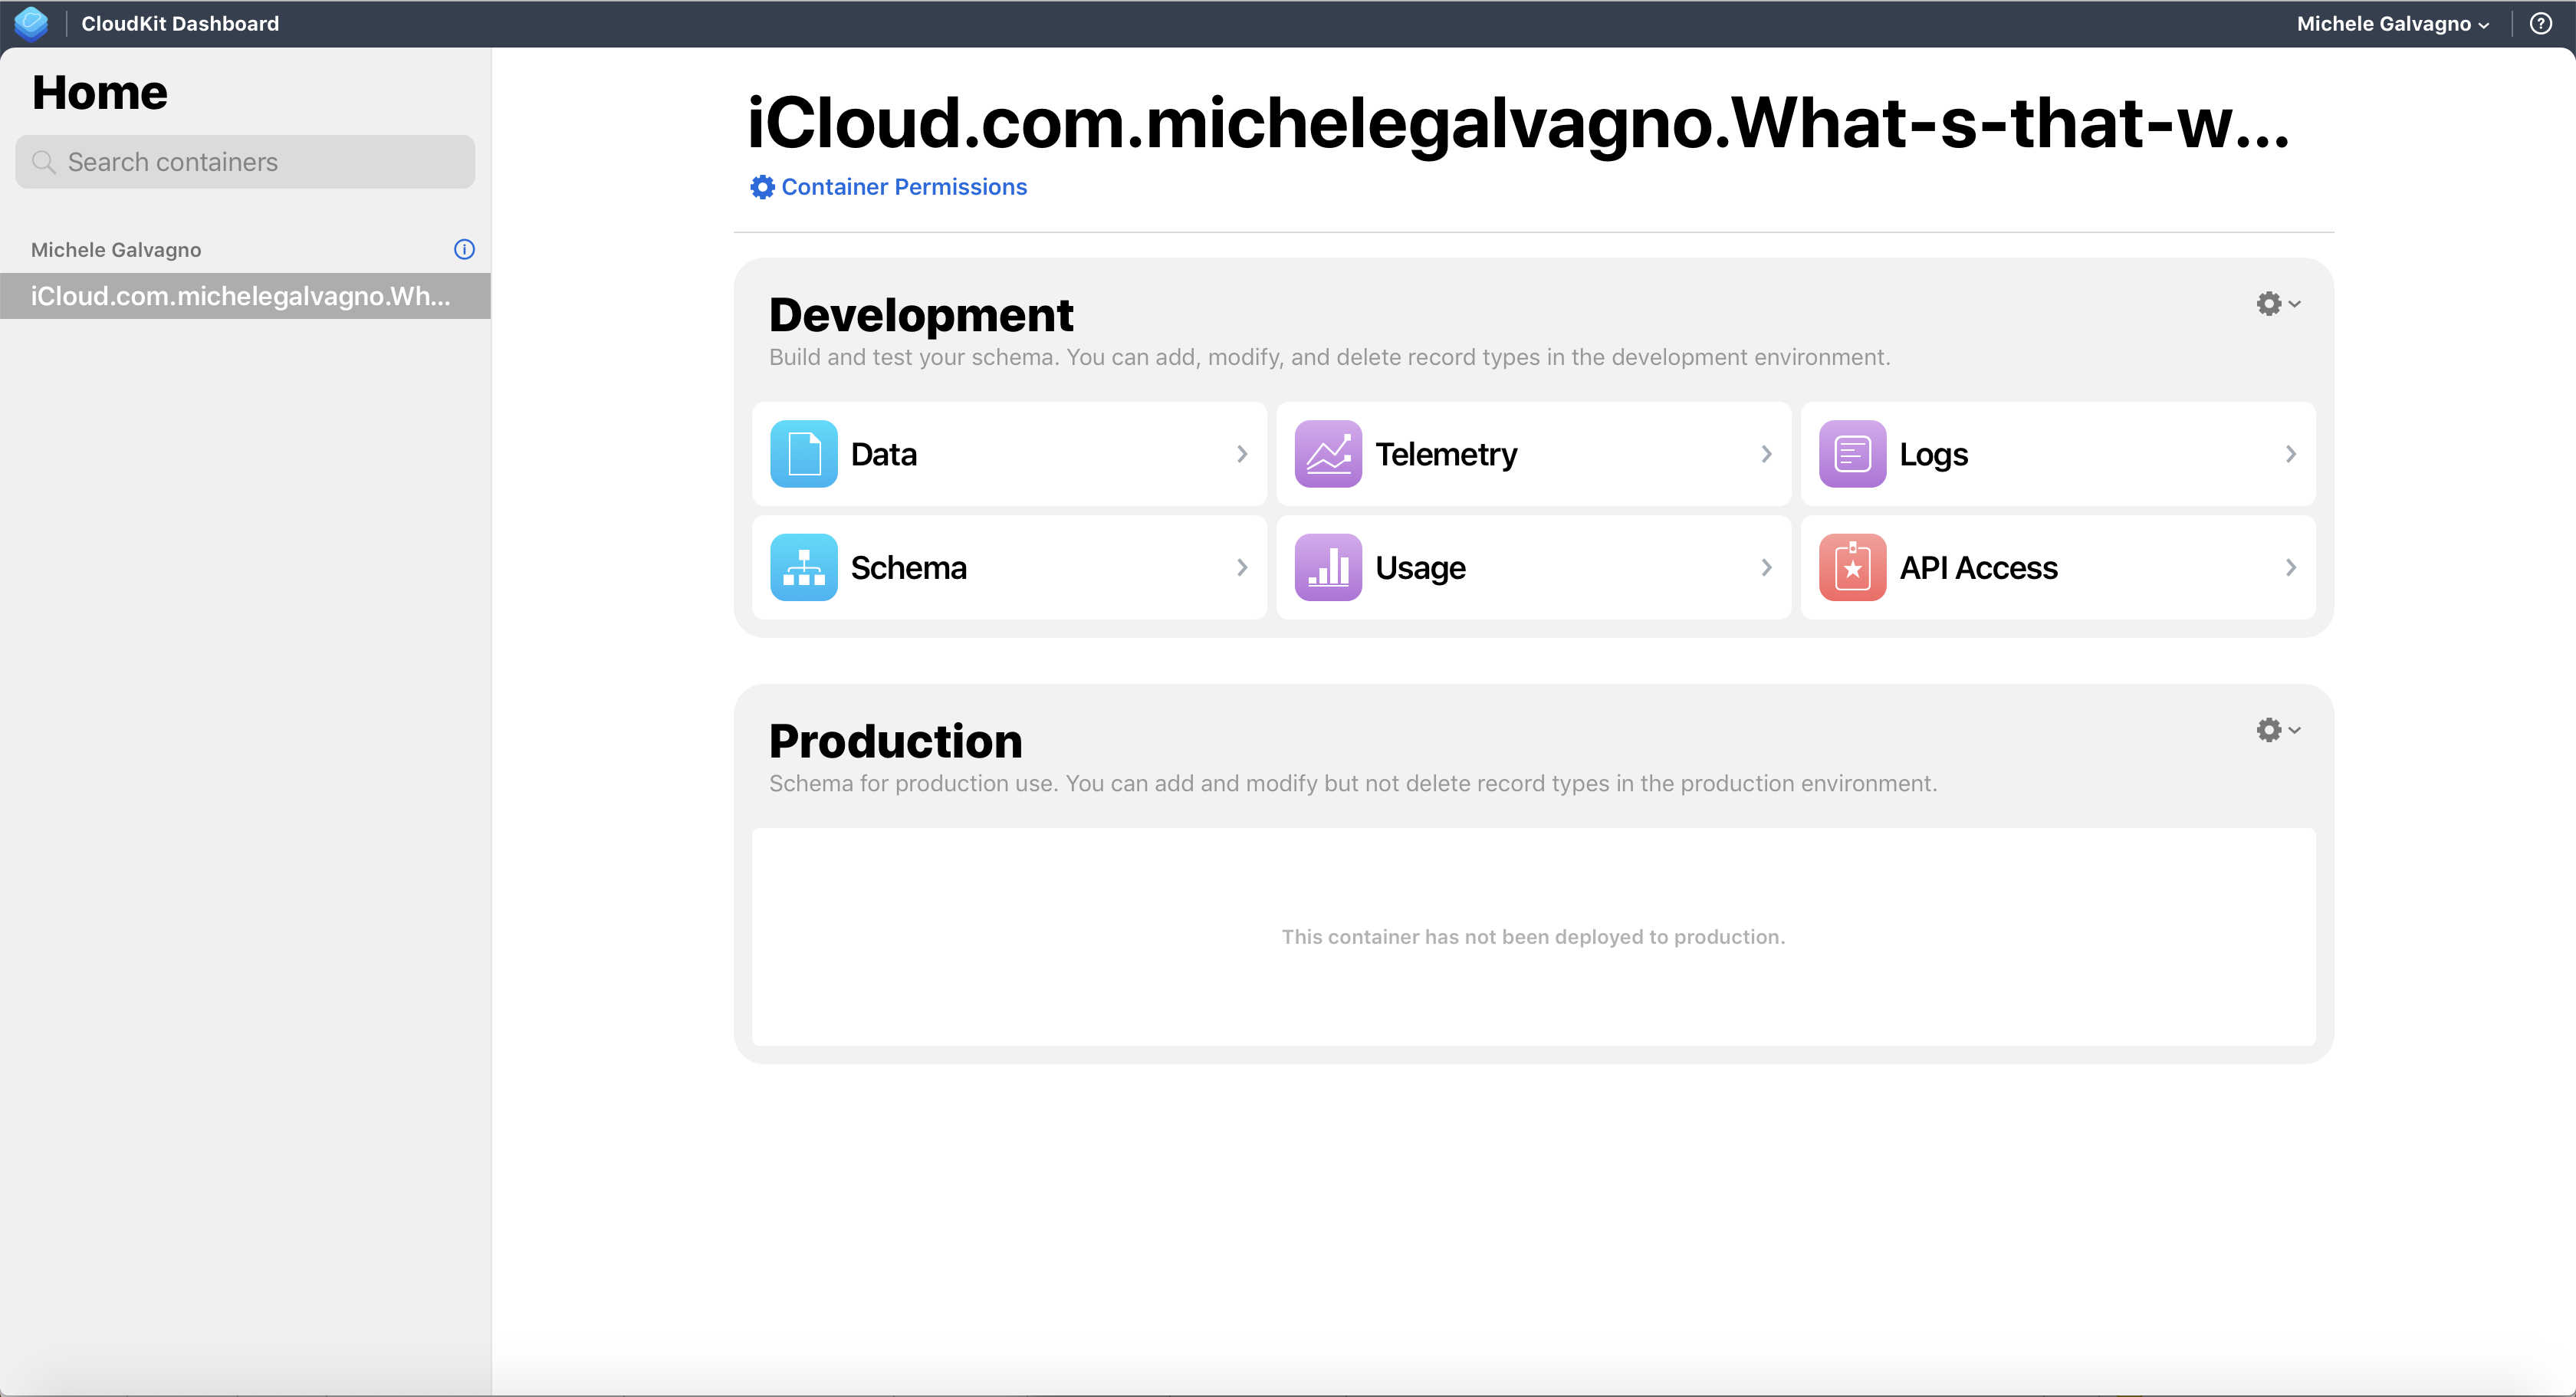
Now, very important, do not choose Data but choose Schema instead! This brings us to a new page where we can choose what was in the upper tabs (which sincerely were clearler). Here we will find what Paul says are our Record Types: Users and Whistles, just that Users will not be in a category called “Default Types” but “System Types”.
If we now select the “Whistles” inside “Custom Types” we get, to the right, a list of the “System Fields” and “Custom Fields”, among which we find our “audio”, “comments” and “genre”. This division is instead better looking and better ordered than the previous version.
Now do not click on the indexes tab… simply because you don’t have one, instead pull down the menu from Record Types and select Indexes (hurrah!). Then click “+ Add Index”, set the first dropdown menu to “createdAt” and the second one to “SORTABLE”. Then simply click once more on “+ Add Index” and it should automatically create a “recordName – QUERYABLE” index for you. Now click “Save changes”, which has been changed from “Save Record Type”…
Back in the “Record Type” page, we should notice that the deletion of our custom fields is not done by hovering over the field but clicking on the red minus button to the right. Fortunately, it is possible to click a blue Undo button just after that.
Finally, now, if we go back to the “Records” page of the “Data” category and select “Query Records”, we can now browse all our recordings. By expanding the little arrow we see many details and we can download the asset by clicking on the size of the file (not very intuitive but it is the only thing that is selectable). To remove an asset, select it and press the big “Delete Record” in the lower left panel.
If we want to see the usage of our app there is no longer the option to choose “Public Database Usage” but we should go to Development > Usage and we will see a yellow message to the top saying “These graphs apply only to usage of the public database. All times are shown in UTC”.
Now back to coding!
Reading from iCloud with CloudKit: CKQueryOperation and NSPredicate
Go to ViewController.swift, import CloudKit and change the subclass of this class to be UITableViewController.
Go to Main.storyboard and erase the current view controller, replacing it with a table view controller, making it inherit from the ViewController class in the Identity Inspector and ctrl-dragging from the navigation controller to the new table view controller and selecting, under Relationship Segue the Root View Controller entry. Now select the table view, go to the Attributes Inspector and change the number of prototype cells from 1 to 0.
Create a new Cocoa Touch Class that subclasses NSObject, call it “Whistles” and import CloudKit inside. Inside the class declare four properties as implicitly unwrapped instances of a CKRecord.ID, two Strings and an URL.
Inside ViewController.swift add a property called whistles of type [Whistle](). Below viewDidLoad add and override the viewWillAppear method calling super.viewWillAppear(animated), then checking whether there was a selected table view cell and, in that case, deselecting it) and, finally, if the isDirty property (which we have not yet understood what is there for) is true, call the loadWhistles() method, for which we will create a stub now.
Now create a method for making attributed strings, very similar to what was created in project 32. This method will accept two parameters of type String (a title and a subtitle) and return an NSAttributedString. Inside it will create attributes for the title and the subtitle, create a mutable attributed string for the title and, if the subtitle.count is greater than 0 (???), it will create a subtitle attributed string and append it to the title string before returning this last one. I wonder why, in this instance, we didn’t write if !subtitle.isEmpty.
Now, implement the cellForRowAt table view data source method. Dequeue a reusable cell with identifier “Cell” for the index path parameter, set its accessory type to .disclosureIndicator, set its text label’s attributed text to the return result of the makeAttributedString() method passing in the whistles[indexPath.row].genre and .comments as arguments. Set the text label’s number of lines to 0 and return the cell. Before this is going to work we need to register the “Cell” reuse identifier in viewDidLoad and implement the numberOfRowsInSection table view data source method to return whistle.count. Paul suggests self.whistle.count but I do not understand why this is needed, there is, by now, no way for the system to be confused.
Start writing the loadWhistles method, which is damn full of new things to learn and to document. Inside, declare and initialise a new constant called predicate equal to NSPredicate(value: true). Here’s what this class is about:
Summary
A definition of logical conditions used to constrain a search either for a fetch or for in-memory filtering.
Declaration
Discussion
Predicates represent logical conditions, which you can use to filter collections of objects. Although it’s common to create predicates directly from instances of
NSComparisonPredicate,NSCompoundPredicate, andNSExpression, you often create predicates from a format string which is parsed by the class methods onNSPredicate. Examples of predicate format strings include:For a complete syntax reference, refer to the Predicate Programming Guide.
You can also create predicates that include variables using the
evaluate(with:substitutionVariables:)method, so that the predicate can be predefined before substituting concrete values at runtime.
Next, create an instance of NSSortDescriptor(key:ascending:) with “creationDate” as first parameter and “false” as second. Here is what that class is about:
Summary
An immutable description of how to order a collection of objects based on a property common to all the objects.
Declaration
Discussion
You construct instances of
NSSortDescriptorby specifying the key path of the property to be compared and the order of the sort (ascending or descending). Optionally, you can also specify a selector to use to perform the comparison, which allows you to specify other comparison selectors such aslocalizedStandardCompare(_:)andlocalizedCaseInsensitiveCompare(_:). Sorting raises an exception if the objects to be sorted do not respond to the sort descriptor’s comparison selector.You can use sort descriptors to, for example:
After this, instantiate a new CKQuery(recordType:predicate:) object with “Whistle” as first argument and our just created predicate as second argument. Here is what this class reads in the Documentation:
Summary
A query that describes the criteria to apply when searching for records in a database.
Declaration
Discussion
You create a query object as the first step in the search process. The query object stores the search parameters, including the type of records to search, the match criteria (predicate) to apply, and the sort parameters to apply to the results. The second step is to use the query object to initialize a
CKQueryOperationobject, which you then execute to generate the results.Always designate a record type and predicate when you create a query object. The record type narrows the scope of the search to one type of record, and the predicate defines the conditions for which records of that type are considered a match. Predicates usually compare one or more fields of a record to constant values, but you can create predicates that return all records of a given type or perform more nuanced searches.
Because the record type and predicate cannot be changed later, you can use the same
CKQueryobject to initialize multipleCKQueryOperationobjects, each of which targets a different database or zone.
Finally for this first part, set the .sortDescriptor property of our query to be equal to an array containing our sort descriptor. Just for pure sake of completeness I want to profit from this part of Apple Documentation being very thorough and to note down everything I find:
Summary
The sort descriptors to use when organizing the query results.
Declaration
Discussion
This property contains an array of
NSSortDescriptorobjects. You can add sort descriptors to a query object and change them later as needed. Each sort descriptor contains a field name of the intended record type and information about whether to sort values in that field in ascending or descending order. The default value of this property isnil, which means that records are returned in an indeterminate order.The order of the items in the array matches the order in which the sort descriptors are applied to the results. In other words, the first sort descriptor in the array is applied first, followed by the second sort descriptor if needed, and the third, and so on.
Now, in the second part of the method, we declare a new CKQueryOperation(query:) object passing in our query as the only parameter. Now just look at this massive Documentation entry!
Summary
An operation used to execute queries against a database.
Declaration
Discussion
A
CKQueryOperationobject is a concrete operation that you can use to execute queries against a database. A query operation takes the query parameters you provide and applies those parameters to the specified database and zone, delivering any matching records asynchronously to the blocks that you provide.To perform a new search:
Queries are restricted to the records in a single zone. For new queries, you specify the zone when you initialize the query operation object. For cursor-based queries, the cursor contains the zone information. To search for records in multiple zones, you must create a separate
CKQueryOperationobject for each zone you want to search, although you can initialize each of them with the sameCKQueryobject.If you assign a completion block to the
completionBlockproperty of the operation object, the completion block is called after the operation executes and returns its results to you. You can use a completion block to perform housekeeping chores related to the operation, but do not use it to process the results of the operation itself. Any completion block you specify should be prepared to handle the failure of the operation to complete its task, whether due to an error or an explicit cancellation.
Finally for this second part, set the .desiredKeys property of our operation to be an array of Strings containing “genre” and “comments” and set the .resultLimit property to 50. Now create a new empty array of type [Whistle].
The third part requires to execute a closure called recordFetchedBlock on our CKQueryOperation object. It will accept a parameter of type CKRecord and, inside, will declare a new Whistle object, set its .recordID property to the record’s record ID, its .genre property to the “genre” entry in the record dictionary and its .comments property to the “comments” entry in the dictionary. Finally it will append the found Whistle to the newWhistles array.
The fourth part calls for another closure called queryCompletionBlock which, as the name implies, is called when the query is completed. This captures self unownedly (I understand the difference but I wonder why this is not weak self…), accepts two parameters (a cursor to allow paging and an error if a problem occurred), pushes the work on the main thread to allow for interface work execution then introduces an if-else block. If there is no error, set the .isDirty property of the view controller to false (which still we have not received an explanation for why it is there…), set the whistles array to the newWhistles’ value and reload the table view’s data. Otherwise, if an error was found, present an alert controller with a sensible message about the failure of the fetching and a useful message, and an OK action.
Last thing, invoke the CKContainer.default().publicCloudDatabase and call the .add(operation) method onto it. Now run the app to see if things are working properly.
Working with CloudKit records: CKRecord.Reference, fetch(withRecordID:), and save()
Create a new UITableViewController subclass called ResultsViewController and import AVFoundation and CloudKit into it. Add three properties to it, an implicitly unwrapped Whistle object, an empty array of Strings and an implicitly unwrapped AVAudioPlayer.
Now for the UI: return 2 from the numberOfSections method, then set the title for header in section to “Suggested songs” if it is the second section, otherwise don’t set it, then return 1 row if it is the first section and suggestions.count + 1 otherwise.
Dequeue a reusable cell with identifier “Cell”, set its selection style to .none and its label’s number of lines to 0 to allow the text to wrap. If the section is the first one set the text label’s font to be the preferred font the the title1 text style then, if the whistle’s comment’s letter count is equal to zero (again, why not .isEmpty?), set the text label’s text to be “Comments: None” otherwise to the whistle’s comments. If it is another section set its font to be the preferred font for the body text style and, if the row is equal to the count of the suggestions array’s elements, set the text label’s text to “Add suggestion” and the selection style to .gray, otherwise set it to suggestions[indexPath.row]. At the end of the method, return the cell.
Implement the didSelectRowAt table view delegate method. Check that the section is == 1 and that the row is equal to the count of suggestions otherwise return from the method. Deselect the row at the index path with animation and declare a new alert controller. Give it a “Suggest a song…” title, a nil message and an alert preferred style. Add a text field to it and start configuring an action. Give it a title of “Submit” and a default style. For the handler, capture weakly self and the alertController, set the action parameter and then use this code instead of what Paul provided as it is not completely updated nor coherent with what was taught in the first 30 projects:
guard let suggestion = suggestSongAC?.textFields?[0].text else { return }

if !suggestion.isEmpty {
    self.add(suggestion: suggestion)
}
Then add a “Cancel” action and present the controller.
Now start to write the add(suggestion: String) method. Inside, declare a new CKRecord(recordType:) object, passing it the string “Suggestions” and storing it in the whistleRecord constant. Declare then a reference constant equal to an instance of the CKRecord.Reference class. Its initialiser takes two parameters, a recordID, which will have whistle.recordID passed as argument, and an action, which will be .deleteSelf. Now that we have a CKRecord “dictionary” we can set two entries for it, “text” as suggestion (the method’s parameter) and “owningWhistle” as the reference we have just created. Here is the Documentation entry for the CKRecord.Reference class:
Summary
A reference used to create a many-to-one relationship between records in a database.
Declaration
Discussion
A
CKReferenceobject creates a many-to-one relationship between records in your database. Each reference object stores information about the one record that is the target of the reference. You then save the reference object in the fields of one or more records to create a link from those records to the target. Both records must be located in the same zone of the same database.References create a stronger relationship between records than just saving the ID of a record as a string. Specifically, you can use references to create an ownership model between two records. When the reference object’s action is set to
CKRecord_Reference_Action.deleteSelf, the target of the reference—that is, the record stored in the reference’srecordIDproperty—becomes the owner of the source record. Deleting the target (owner) record deletes all its source records. (The deletion of any owned records can trigger further deletions, if those records are themselves the owners of other records). If a record contains two or moreCKReferenceobjects whose actions are set toCKRecord_Reference_Action.deleteSelf, the record is deleted when any one of its referenced objects is deleted.Note
It is permissible to create circular owning references for a set of records. To save multiple records containing references between them, save the target records first or save all the records in one operation using the same
CKModifyRecordsOperationobject.
Now access the CloudKit default container’s public database and call the save() method on it. Pass whistleRecord as first argument and then invoke the closure. Capture self weakly, declare record, error as the two parameters of the closure and dispatch the queue batch to the main thread. Inside the closure if there is no error append the suggestion to the suggestions array and reload the table view’s data, otherwise create an error alert controller, add an OK action to it and present it with animation.
Go into the viewDidLoad() method and start writing inside it. Set the view controller’s title to “Genre: \(whistle.genre!)”, then create a new right bar button item with the title “Download”, a plain style, a target of self and an action of the yet unwritten method downloadTapped. Register the table view cell for the reuse identifier “Cell”, create a new CKRecord.Reference object with the whistle’s recordID as the initialiser’s first argument and .deleteSelf as second. Create then a new NSPredicate with the format: "owningWhistle == %@" as first argument and our reference as the second. The type of this second parameter seems to be of any type conforming to a protocol used for interoperability with the C programming language. Declare a new NSSortDescriptor object with a key of “creationDate” and ascending order, then a new CKQuery object with “Suggestions” as record type and our predicate as predicate. Finally, set the query’s sortDescriptors property to be an array with our sort descriptor inside.
Just below that call once more the public cloud database of the default CloudKit container and launch the perform method on it. Pass query as its first argument and nil as its second one, then launch the closure and capture self weakly, plus declare the two parameters of this closure as being results and error. If there is an error print it, otherwise if there are some results, call the yet unwritten parseResults method, passing results as its only argument.
Now it’s time for the parseResults(records:) method, which will return no value and accept only one parameter of type [CKRecord]. Declare inside it a new empty array of strings (to avoid working with the original item) then loop over each entry of the parameter array and append the value found at the “text” key of the record dictionary forcedly downcasting it as String to our new empty array. Then dispatch the queue to the main thread, capture self weakly and set the value of the suggestions array to our internal one and reload the table view data.
Paul suggests to capture self as unowned but since all his videos seem to be updated and his book only partially (he is human, after all!) I will keep with what I learned before.
Write now the @objc func downloadTapped() method. Declare a new UIActivityIndicatorView(style:) object, set its .tintColor to .black and call .startAnimating() on it. Then set the right bar button item to the spinner custom view. Now access the public cloud database of the default CloudKit container and call the fetch(withRecordID) method on it. Pass it the whistle.recordID as first argument and expand the closure. Capture self weakly, declare the two needed parameters record, error and set up an if-else block. In the first part, if we find an error and can capture it, dispatch execution to the main thread and present a meaningful alert controller before setting back the right bar button item to the Download button and to recursively call the downloadTapped method itself. Else, if an error is not found, conditionally bind the record parameter and the value found for the “audio” key conditionally downcast as a CKAsset. If this succeeds store the asset’s file URL inside the audio property of the whistle object, then dispatch work back to the main thread and set the right bar button item to be a “Listen” button calling a yet unwritten listenTapped method.
I wrote a very lazy method for creating a very basic alert controller, here it is:
func presentAlertController(title: String, message: String, preferredStyle: UIAlertController.Style, actionTitle: String, actionStyle: UIAlertAction.Style) {
    let alertController = UIAlertController(title: title, message: message, preferredStyle: preferredStyle)
    alertController.addAction(UIAlertAction(title: actionTitle, style: actionStyle))

    present(alertController, animated: true)
}
Nice, right?!
Write now the listenTapped() action method, with a do-catch block inside which will try to set the whistlePlayer object to the return value of the AVAudioPlayer(contentsOf:) call with the audio property of our whistle object as argument. If an error is caught, declare a new alert controller for the failed playback.
Go back to ViewController.swift and implement the didSelectRowAt table view delegate method. Inside, instantiate a new ResultsViewController(), set its whistle property to the tapped row index in the view controller’s whistles array then push it onto the navigation stack. Run the app now to test it.
Side-note … what a pain in the nose is to set all these things in the CloudKit Dashboard in place … I want a user manual!
Delivering notifications with CloudKit push messages: CKQuerySubscription.
Create a new UITableViewController subclass, call it “MyGenresViewController”, import CloudKit and add an implicitly unwrapped array of strings to it as a property.
Go to ViewController.swift and, in viewDidLoad() create a new left bar button item with a title of “Genres”, a plain style, a target of self and an action of #selector(selectGenre).
Write the selectGenre method, which simply instantiates a new instance of MyGenresViewController() and then pushes it to the navigation stack with an animation. Go back to MyGenresViewController.swift.
Inside viewDidLoad() declare a constant to store the standard user defaults database then, if we can find an object for the key “myGenres” optionally downcast as an array of strings, set its value inside the myGenres array, otherwise set it to an empty array of strings (which should already be). Then set the view controller’s title to be “Notify me about…” then create a new right bar button item with the title of “Save”, a plain style, a target of self and an action of the yet unwritten saveTapped method. Finally, register the table view cell for the reuse identifier “Cell”.
Paul now advises to override the numberOfSections method to return 1 but we know that the default implementation will return 1 so there is no need for that. What you should implement, instead, is the numberOfRowsInSection method which should return the count of the genres array inside of the SelectGenreViewController file.
Implement now the cellForRowAt method, by dequeuing a reusable cell with the “Cell” identifier for the indexPath parameter, extracting the indexPath.row index of the genres array and setting its result inside the cell’s text label’s text property. Then, if the myGenres array contains the just found string, we will set the cell’s accessory type to .checkmark, instead we will set it to .none. Finally return the cell.
Now it’s the turn of the didSelectRowAt delegate method: check that there is a cell for the index path requested and, if so, extract the element from the genres array that is relevant to that index path. If the cell’s accessory type is equal to none, change it to be the checkmark and append the genre to the myGenres array, otherwise set the accessory type to none and, if you can find the first index of the selected genre, remove it from the array. Finally deselect the row at the index path without animation.
Start implementing the saveTapped() method: access the standard user defaults database and set the myGenres object for an equally named key. Capture the public cloud database of the default CloudKit container in a constant and then call the fetchAllSubscriptions method on it. Here is a description of the method.
Summary
Fetches all subscription objects asynchronously, with a low priority, from the current database.
Declaration
Discussion
Use this method to locate the subscriptions in the current database. Subscriptions represent persistent queries on the server. A subscription can be used to alert the app when records change.
This method fetches the subscription objects with a low priority, which may cause the task to execute after higher-priority tasks. To fetch subscriptions more urgently, create a
CKFetchSubscriptionsOperationobject with the desired priority.Parameters
completionHandler: The block to execute with the results. Your block must be capable of running on any thread of the app and must take the following parameters:
Inside the method, if the error is nil, try to see if there is a subscriptions object that you can capture with conditional binding (more on this type later) and, if so, loop over each element of that array and call on each of them the delete(withSubscriptionID:) method of the CloudKit database, passing in the element’s .subscriptionID property. Then invoke the closure as last parameter, pass in the string and error parameters and, if an error is found, present a sensible alert controller that will print the error’s localised description. If the first error we had looked for is not nil, i.e., if there is an error, present another sensible alert controller.
Here is the Documentation for the CKSubscription class:
Class
CKSubscription
Use a
CKSubscriptionobject to track changes occurring on the server.Declaration
Overview
A subscription acts like a persistent query on the server that can track the creation, deletion, and modification of records. When changes occur, they trigger the delivery of push notifications so that your app can respond appropriately.
Subscription objects do not become active until you save them to the server and the server has time to index them. To save a subscription object, use a
CKModifySubscriptionsOperationobject or thesave(_:completionHandler:)method ofCKDatabase. To cancel a subscription, delete the corresponding subscription object from the server.Note
You don’t need to enable push notifications for the app’s explicit App ID in your developer account at developer.apple.com to receive subscription notifications. Xcode automatically adds the APNs entitlement to your entitlement file when you enable CloudKit. To learn about enabling CloudKit, read Enabling CloudKit in Your App.
Most of the configuration for subscription objects happens at initialization time. The only other piece of configuration to perform is to specify how to deliver push notifications to the user’s device. Use the
notificationInfoproperty of this object to configure the push notification delivery options. You must save the subscription object to the database before your changes take effect.Note
Subscriptions must be created in the Development environment first and then promoted to Production. Attempting to create a subscription directly in the Production environment will result in an error.
Handling the Resulting Push Notifications
When a record modification causes a subscription to fire, the server sends push notifications to all devices with that subscription except for the one that made the original change to the record. For subscription-generated push notifications, the server can add data to the notification payload that indicates the condition that triggered the notification. In the
application(_:didReceiveRemoteNotification:fetchCompletionHandler:)method of your app delegate, create aCKNotificationobject from the the provideduserInfodictionary. You can query theCKNotificationobject for the information relevant to the notification.In addition to sending a record ID with a push notification, you can ask the server to send a limited amount of data from the record that triggered the notification. In the
CKSubscription.NotificationInfoobject you assign to your subscription’snotificationInfoproperty, you can use thedesiredKeysproperty to specify one or more keys to include in the notification.Because push notifications have a limited payload size, the server may omit keys and other pieces of data to keep the payload under the maximum limit. If that happens, you can fetch the entire data payload from the server with a
CKFetchNotificationChangesOperationobject. That operation object returns instances of theCKQueryNotificationorCKRecordZoneNotificationclasses that provide information about the push notifications that were delivered to your app.
Now it’s time to finish the saveTapped() method, starting from where we wrote “more code to come”. Loop over each element in the myGenres array. Inside the loop, declare a new NSPredicate with a format of “genre = %@“ (???) and a second parameter of genre for that strange interoperability protocol type. Declare a new CKQuerySubscription object, passing “Whistles” as record type, our predicate and .firesOnRecordCreation as options, which is an option for generating a push notification when a record that matches the search criteria in the predicate property is created. Create a new NotificationInfo object, which is a class thus described:
Summary
An object that specifies the push notification data that the server sends to your app when a subscription finds a match.
Declaration
Discussion
When configuring a
CKSubscriptionobject, create one of these objects and use it to specify the type of push notifications you want generated when the subscription’s trigger condition is met. You can provide a message for an alert panel, information about the sounds to play, and information about whether the app should be badged. You can also ask the server to provide information about the record that triggered the notification.When you receive a push notification generated by a subscription, use the
init(fromRemoteNotificationDictionary:)method ofCKNotificationto create a notification object from the payload data. That object contains the data you specified using this class when configuring the subscription.For more information about push notification alerts and how they are displayed to the user, see Apple Push Notification Service in Local and Remote Notification Programming Guide.
Note
If you don’t set any of the
alertBody,soundName, orshouldBadgeproperties, the push notification is sent at a lower priority that doesn’t cause the system to alert the user.
Set the notification’s alert body to “There’s a new whistle in the \(genre) genre” and its sound name to “default”. Set the notificationInfo property of the subscription object to the just configured notification and call the save() method on the database object, printing the error’s localised description if there was an error performing the notification.
Now, to make notifications actually work, go to AppDelegate.swift, import the UserNotifications framework and complete the didFinishLaunchingWithOptions method, just before the return true line. There, call the requestAuthorization() method on the current user Notification Center, passing in three options in an array [.alert, .sound, .badge] and, in the closure, accepting the two parameters granted, error and printing a meaningful error if an error is found and registering the application for remote notifications otherwise.
Set the AppDelegate class to conform to the UNUserNotificationCenterDelegate protocol and, always inside the same method as before, set it to be the delegate of the current user Notification Center. Then implement the userNotification(_:willPresent:withCompletionHandler:) method with, inside, simply this line: completionHandler([.alert, .sound, .badge]).
So … the project is now finished but, unfortunately, it doesn’t work as Paul said and I have no way to know what to do nor what should have happened instead of what I am seeing. It is a bit frustrating to spend 8 days of something just to see it not work in the end… there is no error in my code, I have double and triple checked it… there is no error… still… I get this when I try this on the Simulator.

Nice, right?… to the hell with this, sincerely… I spent all the best of what I could spare in these days, I will probably remember nothing of all this… and what? It doesn’t work… To the hell really…
Btw … on the device everything works … so … who knows?
Anyway… I have a good news for the end of this article.
I was awarded a scholarship for the Pragma Conference in Bologna for the two conference days so, yeah … you can all stop fighting about who should donate something, right?!
Now, seriously… I will be attending the two days of conference and have also purchased a ticket for Daniel Steinberg’s workshop on SwiftUI. It was the soundest choice to me because:
- Paul’s live coding, even if of the highest quality, is really too fast and we are not guaranteed of having any written material to bring home
- Michael Flarup’s workshop is very interesting but there is nothing saying that we will be actually be taught about designing our own icon, just theoretical principles and evaluations of each other’s works… ehm… theory and forum? For 175€? No thank you!
- Thobias Du Münck was the runner-up for me because I really wanted to try and understand more about CoreImage and filters but, in the end, it is very unlikely that, with my little knowledge of high-level photography, I will develop my own photography app anytime soon.
So, SwiftUI workshop is what will give me a clear lead for the next years. Also, Daniel said that we will get incremental projects so that we can remake all what was done in class at home at a later stage. This was what made me choose!
If you plan to come to Bologna to the conference, look for me anywhere there and let me know you read something from my blog!
Thank you very much for reading! I will go over the challenges for this project in another article! I need a break now!
If you like what I’m doing here please consider liking this article and sharing it with some of your peers. If you are feeling like being really awesome, please consider making a small donation to support my studies and my writing (please appreciate that I am not using advertisement on my articles).
If you are interested in my music engraving and my publications don’t forget visit my Facebook page and the pages where I publish my scores (Gumroad, SheetMusicPlus, ScoreExchange and on Apple Books).
You can also support me by buying Paul Hudson’s books from this Affiliate Link.
Anyways, thank you so much for reading!
Till the next one!
