Hacking with Swift — Learning Project 38 GitHub Commits
Introduction
I apologise, this is the second to last project of Hacking with Swift. I still cannot believe I am slowly reaching the end of the first part of this great journey into the wonderful world of Swift.
I have so many things in mind for the suite and I have already written about it in the past but now I think I have a clearer picture.
For sure I want to interlace every future project I study with a WWDC session from this year (2019) and, before venturing into something big again, I would like to finish the Ray Wenderlich tutorials I had started in the first days of the 100 Days of Swift.
After this, there is a nice course in Italian language I would like to start. It is a bit on the expensive side but I will see, it should be worth it. For sure that will be the last big investment in a course I will do. After that point I will keep my RW subscription, buy a book when I want and build my own projects.
I start to have some ideas about projects I would like to bring forward on my own but my main concern is not related to developing them but about publishing them! The legal part is so complex and everyone seems to dribble on that subject: they teach you the skills and then you have to plunge into piles of excrements and swim out of them completely alone. Well, thank you!
I am sure I will find a way, just I cannot say I am really enthusiast about it!
Setting up
Create a new iOS Single View application project, name it “Git Commits”, make sure “Core Data” is unchecked and save it somewhere sensible.
From the assets for this project, drag the SwiftyJSON.swift file into the project, this is a huge Swift file with 1453 lines of code! This will be the JSON parsing library we will be using.
In ViewController.swift make it conform to UITableViewController.
In Main.storyboard, delete the view controller and drag a new table view controller out in its place, setting its class to be ViewController. Make it the initial view controller. Embed it in a navigation controller, then set its prototype cell to have a Subtitle style, a “Commit” identifier and a disclosure indicator accessory.
Now drag out a new view controller and, in the Identity Inspector, give it the storyboard ID “Detail”. Drag a label out onto the new view controller, make it stretch so that it fills the whole view controller (I interpreted this as also going beyond the safe area, but future will tell me if I have been correct), set its constraints so that it always occupies all that space, center its text and set its Lines property to 0.
Create a new Cocoa Touch Class called “DetailViewController” that subclasses UIViewController and add it to the project. Back in the storyboard, assign this class to control the detail view controller we dragged out.
Using the Assistant Editor, create an outlet from the label to the DetailViewController.swift file called “detailLabel”.
Designing a Core Data model
Create a new File from the iOS > Core Data > Data Model, call it “GitCommits” and save it in the yellow folder group.
Open said file and click once on the Add Entity button (pressing long will reveal some options). In the Data Model Inspector change the name of the entity to be “Commit”.
With the new Commit entity selected click the “Add Attribute” button four times, then change their names to be “date”, “message”, “sha” and “url” and their type to String (except for date which should be of type Date).
The interface is quite messy and unresponsive but fine, let’s move on! Select another file in the Project Navigator, then go back to the data model, select all of the four properties together and uncheck the Optional checkbox in the Data Model Inspector.
Adding Core Data to our project: NSPersistentContainer
In ViewController.swift import CoreData. Create then a new property of type NSPersistentContainer called container. This class describes a container that encapsulates the Core Data stack in our application. It handles the creation of the managed object model, the persistent store coordinator and the managed object context. All clear, right? Right!
Inside viewDidLoad(), initialise the container with an instance of the persistent container class with the name of our Core Data model “GitCommits”. Call the loadPersistentStores on the container and, in the closure, capture the two parameters as storeDescription and error and check if there was an error and print it.
Create the new saveContext() method:
- Check if the container’s view context has some changes and, if so…
- Create a
do-catchblock that will try to save the container’s view context or print an error if it can’t.
Creating an NSManagedObject subclass with Xcode
Select the GitCommits.xcdatamodeld file, then the Commit entity inside it and, in the Data Model Inspector, change the Codegen property to “Class Definition”. Save and build the project.
Open ViewController.swift and, at the end of viewDidLoad(), create a new Commit() object, set its message property to “Woo” and its url property to “http://www.example.com”.
Then set its date property to Date(). Here Paul says that this should not work but that if Xcode has been updated it instead should. Here for me, using Xcode 10.3 with Swift 5, date seems to be an optional Date? instead of an NSDate? so I wonder if I should get on with this tutorial as it is or wait for it to be updated.
Whatever, I will follow, go back to the .xcdatamodeld file and change the Codegen to be “Manual/None”, save and build to get greeted by a nice error. Then go to Editor > Create NSManagedObject Subclass, select all the relevant options and click Next twice. Save the file into the main yellow group and hit Create.
In the Commit+CoreDataProperties.swift file remove all the question marks you see. Also change the type of the date property to Date. Then change the name of the first method here to createFetchRequest().
In ViewController.swift, delete the example code we wrote just before.
Time for some useful code
Before the end of viewDidLoad() call a performSelector(inBackground:with:) using #selector(fetchCommits) and nil as its arguments.
Create now the new fetchCommits() method:
- Optionally try to conditionally bind the String version of the contents of the URL of Apple’s Swift repos to the constant
data. - If this succeeds, use the SwiftyJSON method
JSON(parseJSON:)ondatato store the result, then extract its array value from it, printing the count result. - Dispatch the work back on the main thread, capture
selfas unowned and initialise afor-inloop for each commit in thejsonCommitArray, without writing anything inside yet. Then save the context. - Inside the loop declare a new
Commitobject with, as its only parameter, a context of the container’s view context. Then call the yet unwrittenconfigure(commit:usingJSON:)method, passingcommitandjsonCommitas arguments.
To make the code compile add the new configure method below.
- Access the
.shaproperty of thecommitparameter and set it equal to the string value of the “sea” key of thejsondictionary (I am not totally sure this is a dictionary but it certainly looks and behaves like one). - Repeat the process with the
messageproperty but this time it looks like we need to access a dictionary into another dictionary. We first read the value in the “commit” key of thejsondictionary then, of that one, we access the value in the “message” key and extract its string value. - Then we repeat the process for the
.urlproperty and set it equal to the string value of the “html_url” key of thejsondictionary. - Finally, we create a new
ISO8601DateFormatterobject and set the commit’sdateproperty to be the return value of that formatter’sdate(from:)method. This method should take a String as its only parameter and so we pass it the value stored in the “date” key of the “committer” key of the “commit” key of thejsondictionary! Did you say it in one breath like me?! Ah yes, then use its string value! If this fails use nil coalescing and set it to a newDate()object.
Loading Core Data objects using NSFetchRequest and NSSortDescriptor
Add an empty array of Commit objects to the ViewController class.
Now implement three table view data source methods: return 1 from numberOfSections, return the count of the elements in the commits array from the numberOfRowsInSection then dequeue a reusable cell with the identifier “Commit” for the indexPath parameter of the cellForRowAt method, then declare a new commit constant equal to the element found at the indexPath.row index of the commits array and set the text of the cell’s text label to be the commit’s message and the text of the cell’s detail text label to the description property of the date property of the commit constant, before returning the cell.
I am not sure why Paul puts exclamation marks instead of question marks here but I will write a note in my code to change it to its version should something go wrong during testing.
Anyway, write now the loadSavedData() method:
- Create a new
requestobject equal to the return value of theCommittype’screateFetchRequest()method. - Create a new
NSSortDescriptor(key:ascending:)object with “date” andfalseas arguments. Did we meet this method in the CloudKit project? My head is burning with trying to remember! - Set the
request.sortDescriptorproperty to an array containing thesortobject just created. - Open a
do-catchblock setting thecommitsarray equal to the result of trying to fetch the request of the container’s view context. Print to the console how many commits we got and reload the table view data. If any error is caught, print “Fetch failed”.
Call this method at the end of viewDidLoad() and in the fetchCommits() one, after the save context call.
How to make a Core Data attribute unique using constraints
Go to the GitCommits.xcdatamodeld file and select the Commit entity. In the Data Model Inspector add a constraint with the + button, select the line that appears, hit Enter, write “sha” and hit Enter again. Save and build.
At the beginning of the container.loadPersistentStores block in viewDidLoad() add a line to set the merge policy of the container’s view context to NSMergeByPropertyObjectTrumpMergePolicy.
Mmm … now I get a crash … Let’s try to see why. Everything was working up until the latest changes… Let’s rewind! I corrected a typo due to autocompletion but the crash remains… The line where I see the issue is the try container.viewContext.save() one, inside the saveContext() method.
I will change those question marks into exclamation marks just because but even trying this doesn’t change the crash.
Uh? … taking away the Exception Breakpoints made the crash go away??? Well … let’s move on I would say …
Examples of using NSPredicate to filter NSFetchRequest.
Create an optional NSPredicate property in the view controller class.
Inside the loadSavedData method, after the .sortDescriptor call, set the predicate property of the request to the just created commitPredicate.
Inside viewDidLoad() add a new right bar button item with a “Filter” title, a plain style, self as target and, as action, the yet unwritten changeFilter method.
Write the changeFilter method, with the @objc modifier before:
- Create a new alert controller with a title of “Filter commits…”, no message and a preferred style of
.actionSheet. - Add an alert action with a title of “Show only fixes”, a default style and a handler that capture
selfas unowned, gives a wildcard as parameter and set the commit predicate to an instance ofNSPredicatewith the format of “message CONTAINS[c] ‘fix’” before callingloadSavedData(). The [c] part means “case insensitive”. - Add another action with a title of “Ignore Pull requests”, a default style and repeat what done before, changing the format of the predicate to “NOT message BEGINSWITH ‘Merge pull request'”
- Repeat the same thing with a “Show only recent” action which creates a
twelveHoursAgoconstant equal toDate().addingTimeInterval(-43200)and set the format of the predicate to “date > %@“ and the argument after that totwelveHoursAgo as NSDate. Thanks to David J. Malan of CS50 for teaching me how to read C code … - Repeat the same with a “Show all commits” action which sets the commit predicate to
nil. - Add a final alert action to the controller with a title of “Cancel” and a
.cancelstyle. - Present the alert controller with animation.
The app now works but I got this in the console: “<NSLayoutConstraint:0x283f819a0 UIView:0x131d1a670.width == – 16 (active)>”. But there is no width constraint to the UIView. I will see about this tomorrow…
Adding Core Data entity relationships: lightweight vs heavyweight migration
In GitCommits.xcdatamodeld add a new entity called “Author”, give it two String attributes called “email” and “name” and mark both of them as non-optional in the Data Model Inspector.
With “Author” selected, long press on Add Entity and select Add Fetch Index (beware, now the button has changed to that so you will need to long press again to revert the change). Call this “byNameIndex” and add a property to idd called “name”.
Always with “Author” selected, add a Relationship, call it “commits” and set its Destination to Commit. In the Data Model Inspector change its type to be “To Many”.
Select now the “Commit” entity and add an “author” relationship to it, set “Author” as its Destination and “commits” to be its Inverse (of which I have no idea what that means!). In the Data Model Inspector, be sure that the Type is “To One”.
Go to Editor > Create NSManagedObject Subclass and select both Author and Commit.
Inside Commit+CoreDataProperties.swift remove optionality from all five properties, change NSDate to Date and change fetchRequest() to createFetchRequest(). Repeat the same for Author+CoreDataProperties.swift (except the date change which is not possible).
In ViewController.swift, before the end of the configure(commit:usingJSON:) method, add the following:
var commitAuthor: Author!

// see if this author exists already
let authorRequest = Author.createFetchRequest()
authorRequest.predicate = NSPredicate(format: "name == %@", json["commit"]["committer"]["name"].stringValue)

if let authors = try? container.viewContext.fetch(authorRequest) {
    if authors.count > 0 {
        // we have this author already
        commitAuthor = authors[0]
    }
}

if commitAuthor == nil {
    // we didn't find a saved author - create a new one!
    let author = Author(context: container.viewContext)
    author.name = json["commit"]["committer"]["name"].stringValue
    author.email = json["commit"]["committer"]["email"].stringValue
    commitAuthor = author
}

// use the author, either saved or new
commit.author = commitAuthor
Replace also the text of the detail text label to be: "By \(commit.author.name) on \(commit.date.description)". As soon as I added the new files, making sure that the folder was the yellow one, I got a bad error:
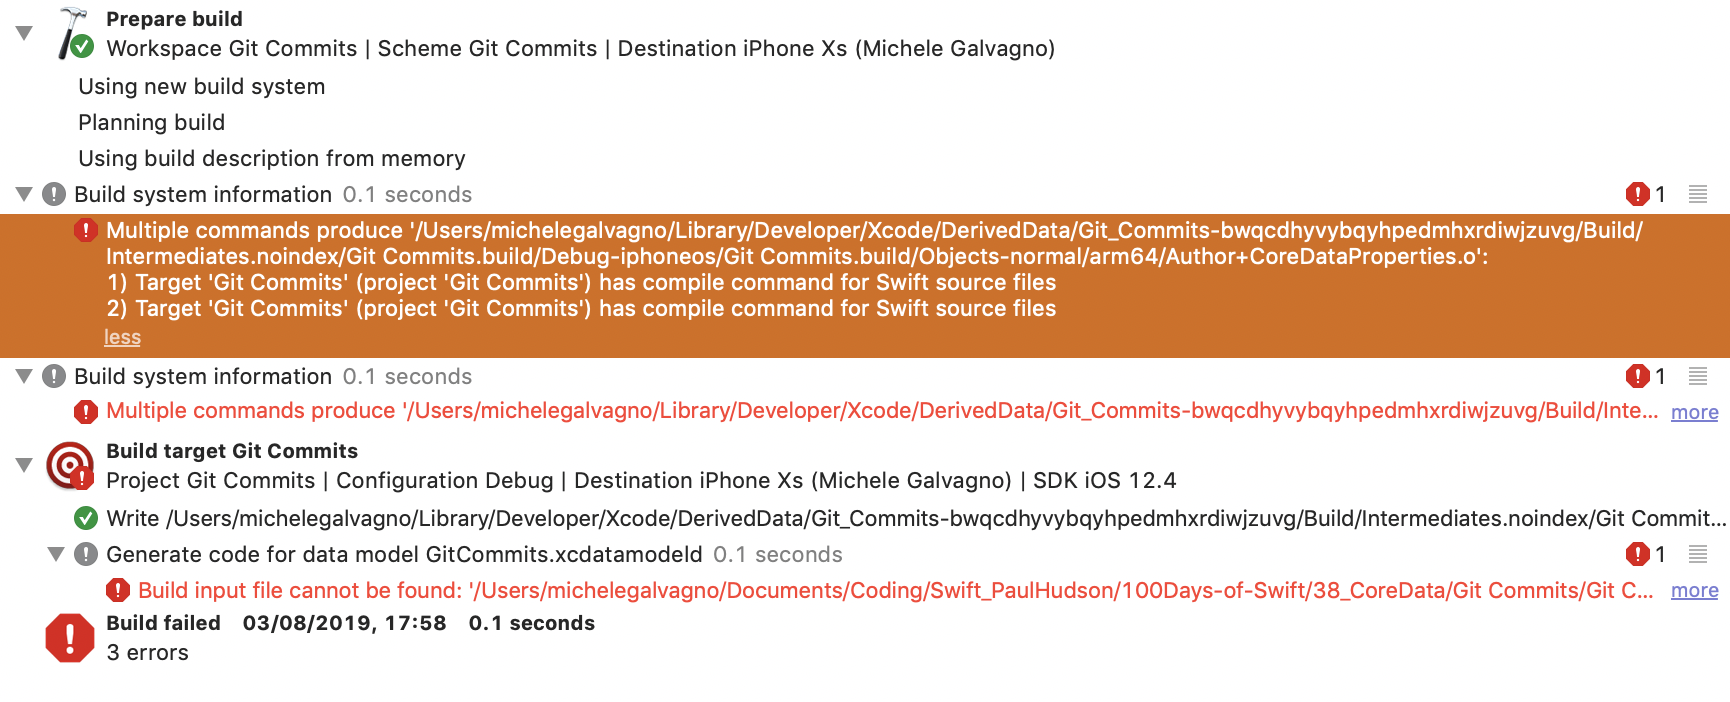
What does that mean? I got this after I added the new files!
Nothing … I repeated the process three times and I always get the same error. I think I will keep it until someone takes the time to explain why is this.
Solution (to which I got by myself …): in the Author entity, I had forgotten to put the Codegen property to “Manual/None”. Good ol’ Paul had not said this again … but fine!
In DetailViewController.swift add a new property called detailItem of type Commit?. Inside its viewDidLoad() conditionally bind that property to a constant and, if that succeeds, set the detail label’s text to be the detail’s message property.
In ViewController.swift add a new action to the changeFilter method, which just looks like this:
filterAC.addAction(UIAlertAction(title: "Show only Durian commits", style: .default) { [unowned self] (_) in
self.commitPredicate = NSPredicate(format: "author.name == 'Joe Groff'")
self.loadSavedData()
})
Again, out of tremendous tiredness, please accept my apologies and add this code to the class, somewhere next to the other table view methods…
override func tableView(_ tableView: UITableView, didSelectRowAt indexPath: IndexPath) {
    if let vc = storyboard?.instantiateViewController(withIdentifier: "Detail") as? DetailViewController {
        vc.detailItem = commits[indexPath.row]
        navigationController?.pushViewController(vc, animated: true)
    }
}
How to delete a Core Data object.
Implement the commit editingStyle table view delegate method:
- If the table view is in
.deleteediting style - Extract the commit from the
commitsarray at the row for the index path. - Call the delete method of the container’s view context passing in the extracted commit as the only argument.
- Remove the element at the
indexPath.rowindex of thecommitsarray. - Delete the row at the index path with a fading animation.
- Save the context.
At the beginning of the fetchCommits() method add a new line that says that the return value of the yet unwritten getNewestCommitDate() should be stored in a constant.
Now write this new getNewestCommitDatE() method:
- Declare a new
ISO8601DateFormatter()object. - Declare a new constant with the result of the
Commit.createFetchRequest()call. - Declare a new
NSSortDescriptorwith a key of “date” and not ascending. - Set the constant in point 2 (
newest).sortDescriptorsproperty to an array containing the sort descriptor of point 3 and set its.fetchLimitto 1. - If we can conditionally bind via an optional try the result of the
fetchmethod on the container’s view context passing it thenewestargument into acommitsconstant, we check if it contains at least one element and, if so, we return the date formatter’s string from that element’s date by adding 1 as a time interval. - Otherwise we simply return the formatter’s string of the
Dateobject containing time Interval Since 19070.
Optimising Core Data Performance using NSFetchedResultsController
In ViewController.swift add a new property: varfetchedResultsController: NSFetchedResultsController<Commit>!.
Modify the loadSavedData() method:
- As new first line check if the fetched results controller is equal to
nil. If so, cut-paste inside the first three lines of code, erase the fourth one and add an initialisation to the fetched result controller so that it is anNSFetchedResultsControllerwith our request asfetchRequest, our container’s view context asmanagedObjectContextandnilfor bothsectionNameKeyPathandcacheName. - After this set the delegate of the fetched results controller to be
self. To make this compile, add a conformance to theNSFetchedResultsControllerDelegateto the class. - Just below the closing brace of the
ifstatement, set the predicate of the fetch request property of the fetched results controller to be the commit predicate. - Modify the
do-catchblock so that it tries to perform the fetch on the fetched results controller before reloading the table view data (the catch block stays the same).
Here is the description for the fetched view controller class in the Documentation:
Summary
A controller that you use to manage the results of a Core Data fetch request and to display data to the user.
Declaration
Discussion
While table views can be used in several ways, fetched results controllers primarily assist you with a master list view.
UITableViewexpects its data source to provide cells as an array of sections made up of rows. You configure a fetch results controller using a fetch request that specifies the entity, an array containing at least one sort ordering, and optionally a filter predicate. The fetched results controller efficiently analyses the result of the fetch request and computes all the information about sections in the result set. It also computes all the information for the index based on the result set.In addition, fetched results controllers:
A controller thus effectively has three modes of operation, determined by whether it has a delegate and whether the cache file name is set.
Important
A delegate must implement at least one of the change tracking delegate methods in order for change tracking to be enabled. Providing an empty implementation of
controllerDidChangeContent(_:)is sufficient.
And here is the Documentation for the initialiser we utilised:
Summary
Returns a fetch request controller initialized using the given arguments.
Declaration
Parameters
Important
You must not modify
fetchRequestafter invoking this method. For example, you must not change its predicate or the sort orderings.The section name is used to pre-compute the section information.
If this key path is not the same as that specified by the first sort descriptor in
fetchRequest, they must generate the same relative orderings. For example, the first sort descriptor infetchRequestmight specify the key for a persistent property;sectionNameKeyPathmight specify a key for a transient property derived from the persistent property.Pre-computed section info is cached to a private directory under this name. If Core Data finds a cache stored with this name, it is checked to see if it matches the
fetchRequest. If it does, the cache is loaded directly—this avoids the overhead of computing the section and index information. If the cached information doesn’t match the request, the cache is deleted and recomputed when the fetch happens.Returns
The receiver initialized with the specified fetch request, context, key path, and cache name.
Delete the commits property.
Change the return value of the numberOfSections method with fetchedResultsController.sections?.count ?? 0.
Erase everything from numberOfRowsInSection, declare a new constant equal to fetchedResultsController.sections![section] and return its numberOfObjects property.
Inside cellForRowAt change the commit constant to be equal to fetchedResultsController.object(at: indexPath).
Use the same value to substitute the value of vc.detailItem in the didSelectRowAt method.
Repeat the same process with the commit constant of the commit editingStyle method and delete the two lines before saveContext(), we don’t need them anymore.
Somewhere around where we wrote the Core Data methods add this one:
func controller(_ controller: NSFetchedResultsController<NSFetchRequestResult>, didChange anObject: Any, at indexPath: IndexPath?, for type: NSFetchedResultsChangeType, newIndexPath: IndexPath?) {
    switch type {
    case .delete:
        tableView.deleteRows(at: [indexPath!], with: .automatic)
    default:
        break
    }
}
Change the third parameter of the fetched results controller initialiser in the loadSavedData() method to “author.name”.
After the table view data source methods add an override to the titleForHeaderInSection method, making it return fetchedResultsController.sections![section].name.
Inside loadSavedData() change the key of the sort descriptor to be “author.name” and set it to be ascending.
So the app is now finished and only the challenges remain. I have one warning in the fetchCommits method: the first constant is never used. Have I forgotten something?
Yes! In the string I had forgotten to edit the line to this:
"https://api.github.com/repos/apple/swift/commits?per_page=100&since=\(newestCommitDate)"
Now it should be working, let’s try it!
It does! Yes!
Wrap up!
Go to Product > Scheme > Edit Scheme. Choose the Run target and the Arguments tab. Click + in the Arguments Passed On Launch section and write -com.apple.CoreData.SQLDebug 1.
Now let’s try some of the challenges at least:
Challenge 1: create a new Xcode project using the Master-Detail Application template, enabling the Core Data checkbox. Try to understand how the code works.
Here are some of the most interesting things I found:
- The fetched results controller is a huge computer property here. Look!
Done! ✅
Challenge 2: Use the “url” attribute of Commit in the detail view controller to show the GitHub page in a WKWebView rather than just a label.
I think I may have been able to do this…
In the Storyboard I erased the label and put a new WBWebView in its place.
Then, in ViewController.swift I changed this method like this:
// MARK: - Table view delegate methods
override func tableView(_ tableView: UITableView, didSelectRowAt indexPath: IndexPath) {
    if let webViewController = storyboard?.instantiateViewController(withIdentifier: "Detail") as? DetailViewController {
        webViewController.detailItem = fetchedResultsController.object(at: indexPath)
        navigationController?.pushViewController(webViewController, animated: true)
    }
}
Inside DetailViewController.swift I imported WebKit, changed the outlet in an appropriate way, added a property websiteToLoad: String? and progressView: UIProgressView!. Then wrote the loadView() method as in Project 4-bis (when we had to write the simple browser as a table view).
Finally, of course, I had to rewrite all of viewDidLoad(), the important part of which was this:
override func viewDidLoad() {
    super.viewDidLoad()

    if let detail = self.detailItem {
        let url = URL(string: detail.url)!
        print("URL: \(url)")

        detailWebView.load(URLRequest(url: url))
    } else {
        let errorAC = UIAlertController(title: "ERROR", message: "Commit not found!", preferredStyle: .alert)
        errorAC.addAction(UIAlertAction(title: "OK", style: .default))
        present(errorAC, animated: true)
    }
	...
}
A few finishing touches were added but nothing extraordinary!
Still, quite so happy to have been able to complete one of these challenges, it really feels refreshing!
Challenge 3: rewrite the getNewestCommitDate() method so that it uses UserDefaultsrather than a fetch request in order to fix the bug in the current implementation.
Needless to say that, obviously, I had not spotted the bug.
For this challenge, marked as Taxing difficulty, I am not really sure where I should put the UserDefaults part… sure, the loading in the getNewestCommitDate() but the saving? Is this doable with Codable or should it be with NSKeyedArchiver?
I’m quite short on time for today so I will let it boil there with the next two challenges until I feel some ideas churning!
Challenge 4: complete the showAuthorCommits() method in the detail view controller. This should show a new table view controller listing other commits by the same author. To make our life easier we may want to try going to the Author entity, choose its “commits” relationship, then check the “ordered” box and recreating the NSManagedObject subclass.
Challenge 5: what happens when we delete the last row from a particular section? (spoiler: it crashes!) See if you can experiment with using deleteSections() rather than deleteRows() to fix that!
Please don’t forget to drop a hello and a thank you to Paul for all his great work (you can find him on Twitter) and be sure to visit the 100 Days Of Swift initiative page. We are learning so much thanks to him and he deserves to know of our gratitude.
He has written about 20 great books on Swift, all of which you can check about here (affiliate links so please use them if you want to support both his work .
If you like what I’m doing here please consider liking this article and sharing it with some of your peers. If you are feeling like being really awesome, please consider making a small donation to support my studies and my writing (please appreciate that I am not using advertisement on my articles).
If you are interested in my music engraving and my publications don’t forget visit my Facebook page and the pages where I publish my scores (Gumroad, SheetMusicPlus, ScoreExchange and on Apple Books).
You can also support me by buying Paul Hudson’s books from this Affiliate Link.
Anyways, thank you so much for reading!
Till the next one!

I think that everything said made a bunch of sense. However, think
on this, suppose you were to write a killer headline? I mean, I don’t want to
tell you how to run your blog, but suppose you
added something that makes people want more? I mean Learning Swift —
Days 157 to 160 – Artistic Score Engraving is a little plain.
You might peek at Yahoo’s front page and watch how they create news titles to
grab viewers to click. You might try adding a video or a picture or two to get readers excited about everything’ve
written. In my opinion, it could bring your website
a little livelier.
LikeLike
You could definitely see your enthusiasm in the work you write.
The arena hopes for even more passionate writers such as you who are not afraid to say
how they believe. At all times follow your heart.
LikeLike
It’s hard to find educated people about this topic, however, you seem like you know what you’re talking
about! Thanks
LikeLike