Finding Inner Peace
Following the Swift on Sunday event by Paul Hudson, streamed live on February 3rd 2019.
After watching and coding following the video I am now going through the code step by step and seeing what can be learned.
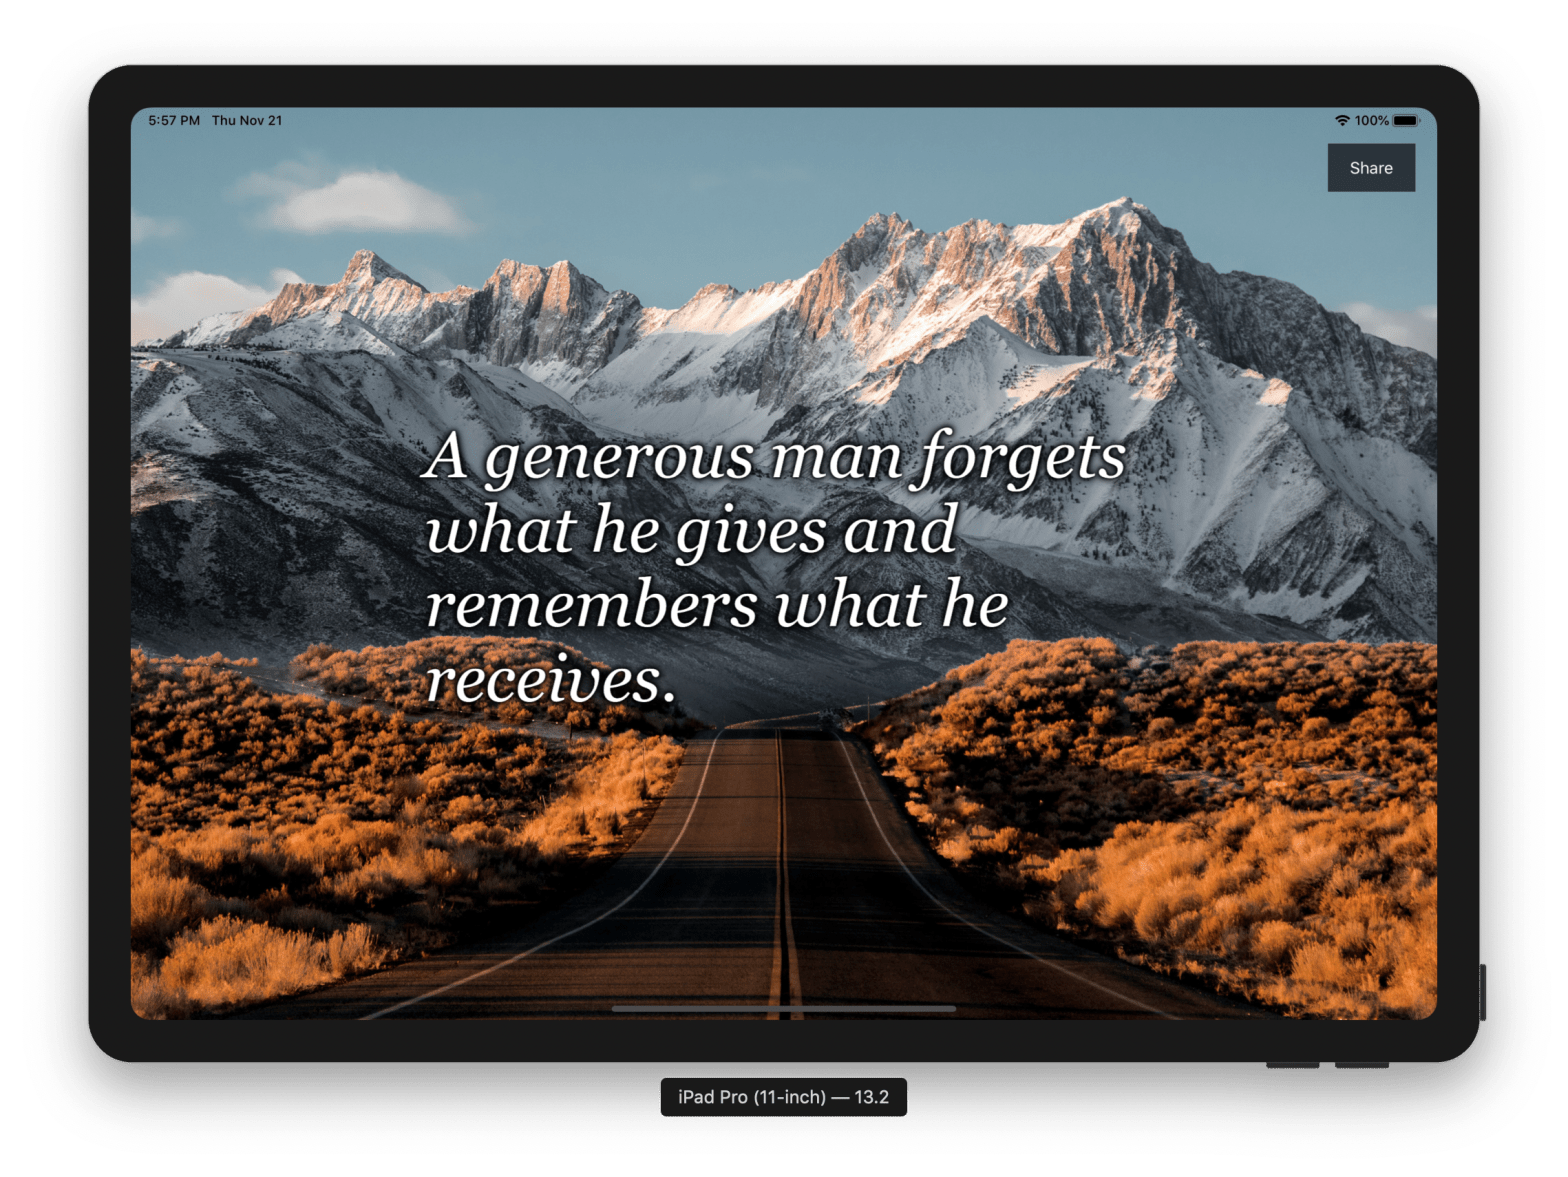
So, we started from the storyboard, adding two image views, one pinned to the superview and called “Background” and one pinned to the safe area called “Quote”. Both were connected to ViewController.swift via an outlet.
After adding the pictures.json and quotes.json files to the project, along with images in the assets catalog, we switched to the view controller to start some proper coding. Remember that this app is iPad only and landscape only.
We actually need now to create an extension on Bundle to make JSON decoding easier. It is a generic function so that we can use it with any kind of data that conforms to the Decodable protocol. Here it is:
extension Bundle {
    func decode<T: Decodable>(_ type: T.Type, from file: String) -> T {
        guard let url = self.url(forResource: file, withExtension: nil) else {
            fatalError("Failed to locate \(file) in app bundle.")
        }

        guard let data = try? Data(contentsOf: url) else {
            fatalError("Failed to load \(file) in app bundle.")
        }

        let decoder = JSONDecoder()

        guard let loaded = try? decoder.decode(T.self, from: data) else {
            fatalError("Failed to decode \(file) from app bundle.")
        }

        return loaded
    }
}
It makes extensive use of the fatalError method because there should absolutely be no error here or, better, any error here would be our complete responsibility.
Now we simply need to create our model, which is a struct called Quote that conforms to Codable with three string properties: text, author and shareMessage. This last one is a computed property which returns "\"\(text)\" — \(author)".
This allows us to go back to the view controller and declare two constants right below our outlets: a quotes constant equal to the return value of our .decode extension method into a type [Quote].self from the "quotes.json" file and a images constant into a [String].self type from the "pictures.json" file. We also add an optional Quote? variable property called shareQuote (we will use it later).
The biggest part of the work is done by a method called updateQuote() which does the following things:
- checks through a
guard letstatement if it is possible to store a random element from theimagesarray into a constant namedbackgroundImageName, throwing a fatal error if that doesn’t work. - sets the image of the
backgroundimage view to aUIImagenamedbackgroundImageName(at this point it should work). - repeats the first step for a random element from the
quotesarray and set theshareQuoteproperty to thatselectedQuote. - At this point it sets the
imageof thequoteimage view to the return result of the yet unwritten methodrender(selectedQuote:)by passingselectedQuoteas argument.
We now write the render(selectedQuote:) -> UIImage method. First of all we want some insets to give us some breathing room in the form of a CGFloat constant equal to 250. We then declare a drawBounds constant equal to the bounds of the quote image view .inset(by:) our inset amount (which, to be used, will need a UIEdgeInsets object).
We then create a CGRect into which to draw our image, attach it to the top left corner of our image view (using x: 0, y: 0) as coordinates and setting its width and height parameter to CGFloat.greatestFiniteMagnitude. Xcode was complaining a lot here until we added CGFloat as this can also be an Int (why? Where? Don’t know…).
Now for another constant, we set the font size to the CGFloat value 120 and we declare an implicitly unwrapped UIFont called font.
Coming to the most interesting part of the tutorial, we declare some attributes for our upcoming attributed string in the form of a dictionary with NSAttributedString.Key and Any as key-value pairs (do not forget to force unwrap it as it will come very soon). Next line is the force unwrapped NSAttributedString.
Now, we create a while true loop (!) which creates a UIFont(name:size:) with "Georgia-Italic and fontSize as arguments but being it optional we want to look into the future at when Georgia Italic won’t be available in iOS and set the nil-coalescing result to UIFont.systemFont(ofSize: 120).
Time to create our attributes, which means passing two entries into our dictionary, namely [.font: font, .foregroundColor: UIColor.white]. Next in the line we initialise the NSAttributedString(string:attributes:) passing in our selectedQuote and our attributes.
We now need a bounding rectangle to draw the string into and we can obtain it from the boundingRect(with:options:context:) method. Here it is from the Documentation:
Summary
Returns the bounding rectangle required to draw the string.
Declaration
Discussion
You can use this method to compute the space required to draw the string. The constraints you specify in the size parameter are a guide for the renderer for how to size the string. However, the actual bounding rectangle returned by this method can be larger than the constraints if additional space is needed to render the entire string. Typically, the renderer preserves the width constraint and adjusts the height constraint as needed.
In iOS 7 and later, this method returns fractional sizes (in the size component of the returned rectangle); to use a returned size to size views, you must use raise its value to the nearest higher integer using the ceil function.
Parameters
size: The width and height constraints to apply when computing the string’s bounding rectangle.
options: Additional drawing options to apply to the string during rendering. For a list of possible values, see NSStringDrawingOptions.
context: A context object with information about how to adjust the font tracking and scaling information. On return, the specified object contains information about the actual values used to render the string. This parameter may benil.Returns
A rectangle whose size component indicates the width and height required to draw the entire contents of the string.
Here now becomes clear why the quoteRect property was a variable as we now have to set it to the return value of this method which is called on the attributed string. As arguments we pass a CGSize with width equal to the width of the drawBounds rectangle and .greatestFiniteMagnitude as height. For options we use .useLineFragmentOrigin, which is a most unclear way to say “break the text in multiple lines if it doesn’t fit!” and nil for context as we will create our context very soon.
But what if the font is too big? We want the text to resize itself automatically depending on the device we are on. So, if the height of the quote rectangle is greater than the height of the drawBounds rectangle, we decrease the font by 4 points, otherwise we break out of the loop. So we intentionally begin very big and go down according to need.
Almost done! We declare a format constant equal to an instance of the UIGraphicsImageRendererFormat class, which I have no idea what it is so let’s go and dive into it.
Summary
A set of drawing attributes that represent the configuration of an image renderer context.
Declaration
Discussion
Use an instance of
UIGraphicsImageRendererFormatto initialize aUIGraphicsImageRendererobject with nondefault attributes.The image renderer format object contains properties that determine the attributes of the underlying Core Graphics contexts that the image renderer creates. Use the
default()class method to create an image renderer format instance optimized for the current device.
Not that this helps me so much but let’s move on…
Set the format’s opaque property to false:
Summary
A Boolean value indicating whether the underlying Core Graphics context has an alpha channel.
Declaration
Discussion
Setting the value of this property to
falsespecifies that the underlying Core Graphics context has an alpha channel, whereastrueindicates it does not. The default value isfalse.A Core Graphics context requires an alpha channel to express transparency. Without an alpha channel a Core Graphics context is said to be opaque, i.e. without transparency.
From the description I wonder why then we set it manually to false but never mind. Go on and create a renderer constant equal to an instance of UIGraphicsImageRenderer(bounds:format:) with bounds equal to our quote rectangle .insetBy(dx:dy:) minus 30 points (so that no letter or their graces get cut) and for format our just declared format. For sake of completeness, here is the UIGraphicsImageRenderer class:
Summary
A graphics renderer for creating Core Graphics-backed images.
Declaration
Discussion
You can use image renderers to accomplish drawing tasks, without having to handle configuration such as color depth and image scale, or manage Core Graphics contexts. You initialize an image renderer with parameters such as image output dimensions and format. You then use one of more of the drawing functions to render images that share these properties.
To render an image:
Once an image renderer is initialized, you can use it to draw multiple images with the same configuration. An image renderer keeps a cache of Core Graphics contexts, so reusing the same renderer can be more efficient than creating new renderers.
Now we return the image method from the renderer object. It has a closure which accepts a ctx context and that, for i in 1...5, we set the shadow of the core graphics context of the context parameter to have zero offset, a bluer of twice the value of i converted into CGFloat and a color of UIColor.black.cgColor. At this point, magical moment, we call str.draw(in: quoteRect), effectively drawing our quote into the image view.
Responding to touches
To be sure that things work we need to override the viewDidLayoutSubviews method, calling its parent and then running updateQuote(). Now that we are at it we should call it also in touchesBegan, which will give us a new quote for every tap on the screen.
Sharing our quotes
Back to the storyboard, we drag a button from the object library to the top right corner of the canvas pin it some points away from the safe area and give it fixed height and width of 44 x 80.
In the Attributes Inspector we give it a title of “Share”, a text color of “White Color” and a background of total black but with 65% opacity to make it look less aggressive.
We then create an action to our view controller called shareTapped where we guard-check that we have a quote stored into the shareQuote property and then create an UIActivityViewController with an array containing quote.shareMessage as its activity items and nil for its application activities. Then we set the source view of the popover presentation controller of our activity view controller to be the sender. If this is still set to Any change it to be a UIButton. Finally, present the view controller with default animation.
Notifying the user!
For the last finishing touch we want to notify the user every morning at 10am with a new positive quote. To do this, in our view controller, import the UserNotifications framework, then, in viewDidLoad(), access the current Notification Center and call requestAuthorization on it, passing it [.alert, .sound] as options and, for the closure, accepting two parameters (allowed, error) so that, if we are allowed, we call the yet unwritten configureAlerts() method on self.
Now for the configureAlerts method. Let’s declare a constant called center for the current user Notification Center then remove all delivered notifications and pending notification requests. Create a shuffled copy of the quotes array then enter a for i in 1...7 loop to loop over the next seven days (of course this will stop if the user will not launch the app for seven days but, fine!).
Inside the loop create a constant called content for the mutable notification content, set its title to “Inner Peace” and its body to the text of the ith indexed element of the shuffled array. Now create an alert date by using the extension showed in the video for adding days to an instance of Date() and create an alertComponents variable on the date components of the current Calendar. Pass day, month and year as elements of the array of the first parameter and alertDate as second argument. Then, on a new line, set the hour of our alert components to be 10 as we want to show this every day at 10am, regardless of where we are in the world.
Now instantiate a trigger to fire the notification in the form of a UNTimeIntervalNotificationTrigger(dateMatching:repeats:) passing in alertComponents and false as arguments. Then create a request UNNotificationRequest with a unique identifier as identifier (UUID().uuidString), and our content and trigger as the last two arguments.
Final touch: add the request to the Notification Center so that if there is an error we print it.
That’s it! App finished!
I have little more time today so I will go give a look at the app I was building for myself, it is way too much since I have been taking care of it!
See you, hopefully, tomorrow!
If you like what I’m doing here please consider liking this article and sharing it with some of your peers. If you are feeling like being really awesome, please consider making a small donation to support my studies and my writing (please appreciate that I am not using advertisement on my articles).
If you are interested in my music engraving and my publications don’t forget visit my Facebook page and the pages where I publish my scores (Gumroad, SheetMusicPlus, ScoreExchange and on Apple Books).
You can also support me by buying Paul Hudson’s books from this Affiliate Link.
Anyways, thank you so much for reading!
Till the next one!
