
In this new series, we will look at how to create and manage tuplets in Steinberg’s Dorico. For this tutorial series I will use version 3.5.12, which is the latest available at the time of writing.
The basics
Assuming you did not read my previous series on how to create tuplets in Sibelius, we will start back from the basics.
What are tuplets
Every time signature is divided in beats, and every beat is divided into subdivisions. There are times, though, when this subdivision is not enough to show what the composer would like to express. In short, a tuplet expresses a certain number of subdivision instead of the usual one. The magic of them is that they can be used both in augmentation and in diminution, that is, to fit more or less notes in the original place.
Given this irregularity, they must be expressed with a clear notation, in this case with a number that shows the new number of subdivisions and with an optional bracket that will show the area influenced by the tuplet.

The example above shows a 4/4 simple bar filled with quarter-notes, followed by a bar which wants to have six notes in the place of 4 grouped in two subgroups of 3. Next we have a 6/8 compound bar filled with eight-notes, followed by a bar which wants 2 notes instead of 3. The first example needs the bracket because quarter notes do not have beams, while the second doesn’t need them thanks to the beams.
Positioning
The secular conventions of music notation tell us that tuplets are normally placed on the stem side of notes and that while tuplet brackets are not needed when a rhythmic beam is present, they can be used if this provides more clarity to the context.
Vocal staves provide an exception because of lyrics being placed always below the staff; this forces tuplets to be positioned always above the staff.
Generally speaking, a tuplet and its bracket should be among the nearest elements to the notes, all the while being careful with them not to collide with other elements. This is handled beautifully by Dorico and you will not need to worry too much about it in most of the cases.
If slurs are present, we have two scenarios: slur shorter than tuplet and slur longer than tuplet. In the first case the slur should go inside the tuplet bracket while if it is longer, the choice is free, but it would be better to have it outside because of the sheer size of the notational element.

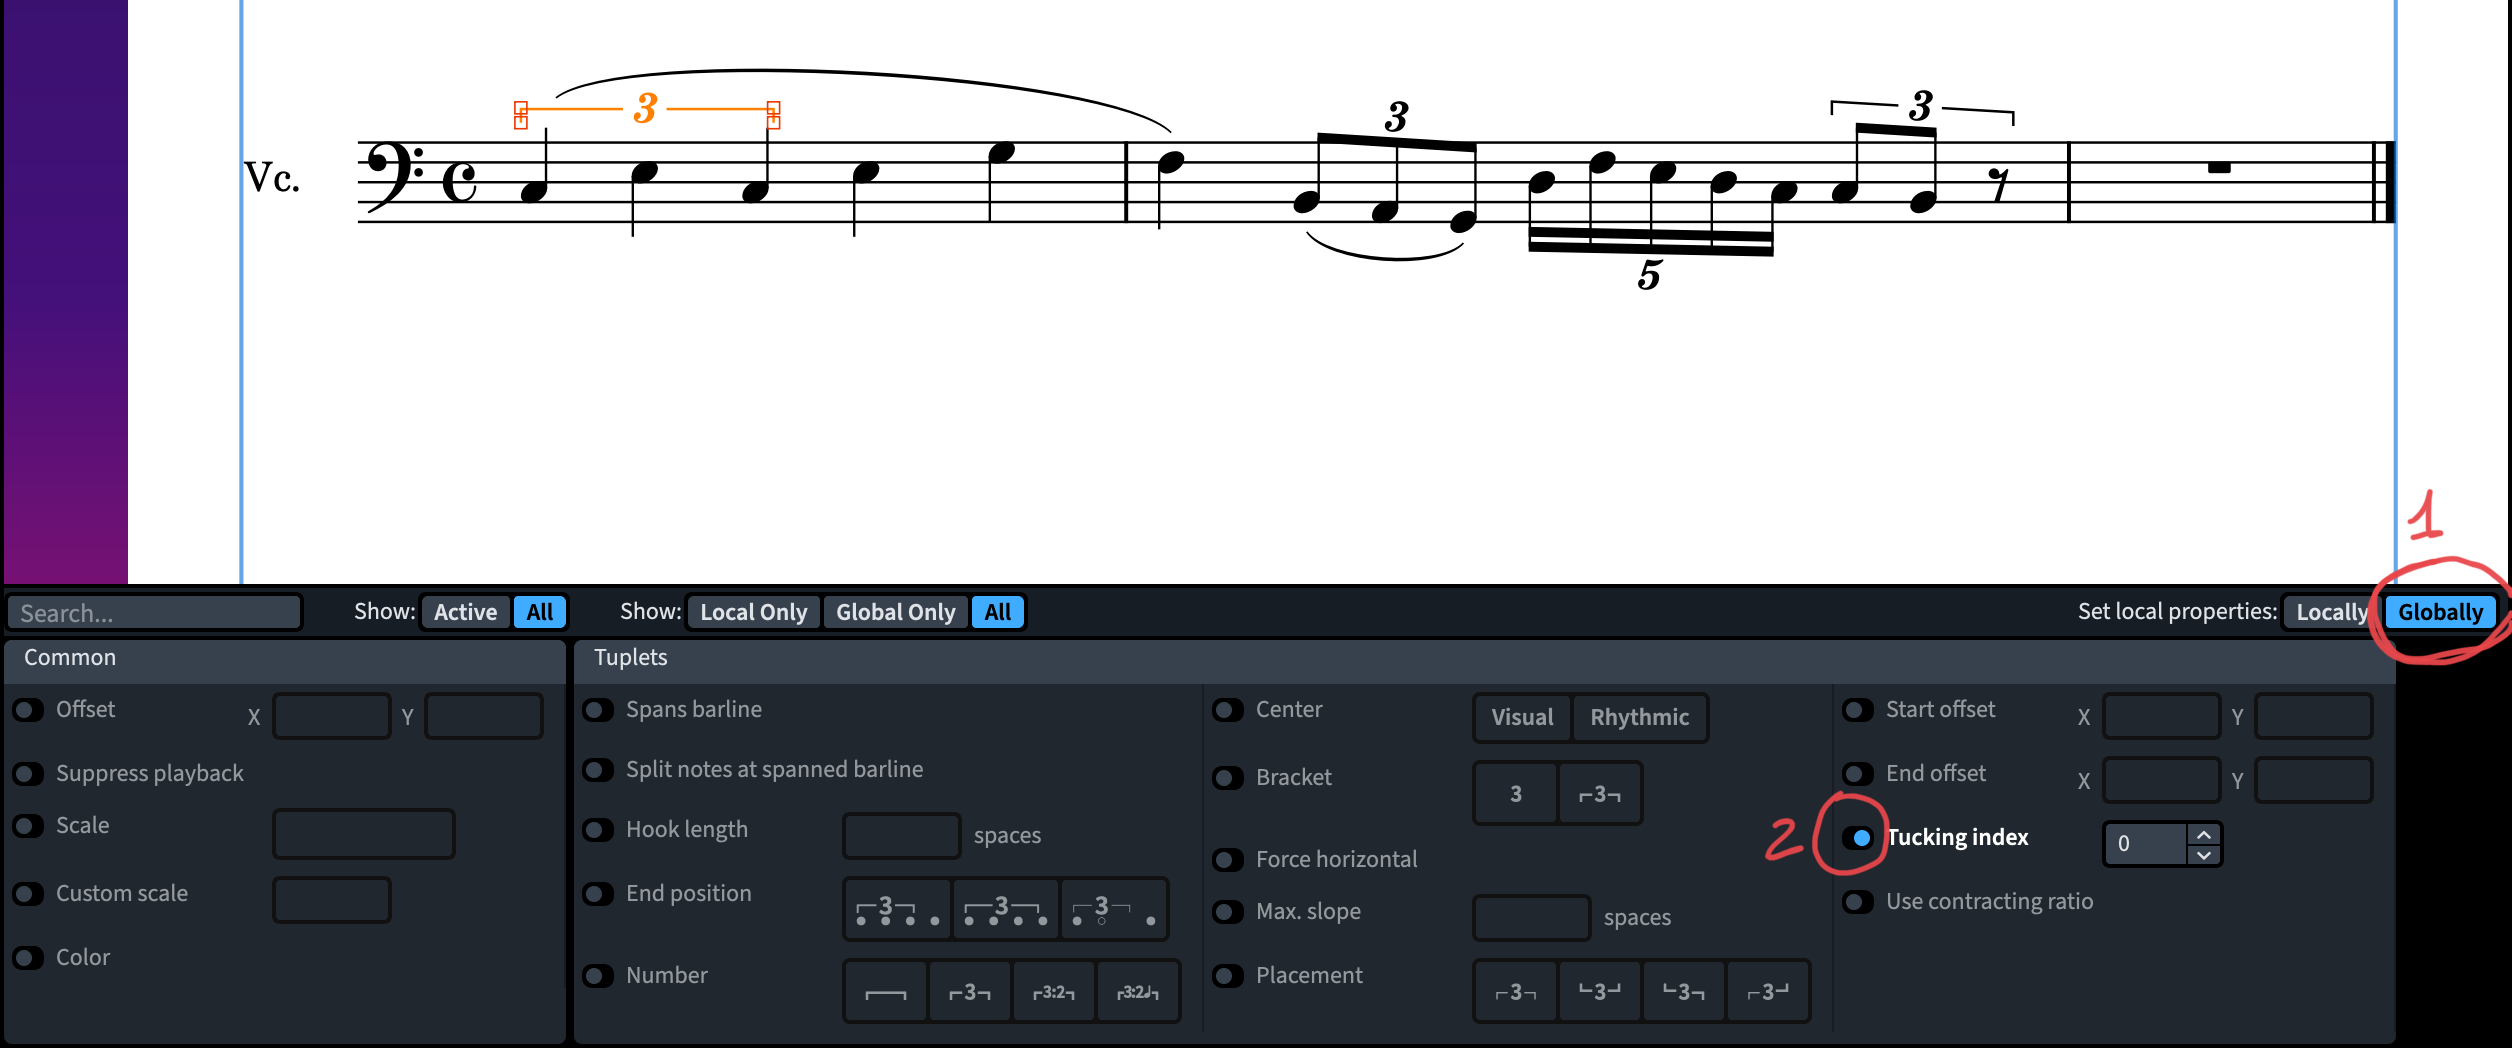
Here you can see Dorico’s defaults, which placesegen the first tuplet outside the slur. If we want to change this we need on a global level, well, you cannot, as Dorico doesn’t let you alter this. To fix this specific entry, activate Engrave Mode by either clicking on the corresponding button in the top left of the interface of by pressing the keyboard shortcut Cmd-3 (that is Ctrl-3 on PC). Then, select the tuplet and open the Properties panel at the bottom center of the screen (there is a little arrow up, or you can hit Cmd/Ctrl-8) and look at the extreme right for something called Tucking Index. Before activating the switch, select Globally on the top right of this panel to make sure that this change is reflected in all layouts (that’s how Dorico calls separate parts) and then do activate it. By default, the text field will be set to 0 which is precisely what we want for the tuplet. While this is not well documented, I assume 0 means “nearest place to the note”. You can try this by changing its value to 1, which will get you back to the previous scenario.
First Level
Inputting basic tuplets
But how do we create tuplets in Dorico? There are several ways, but functioning like normal notes, they can only be created during note input.
The easiest way if you are lost is to click the Tuplets tool in the Notes toolbox to the left of the working area.

Don’t forget to first select a note value (the default is a quarter-note). This system allows you to only insert one triplet at a time, so one click one triplet.
I am confident, though, that you want more from your tuplets.
Let’s be certain we are in Write mode (Cmd/Ctrl-2) or click the corresponding button in the top left of the window. Select an empty bar or the beat where you want your tuplet to begin and start note input (that is, hitting the Return key or the Shift-N shortcut). Now, go on and select a note value by either pressing the corresponding number on your computer keyboard (for example, press 6 for a quarter-note, 5 for an eight-note, and so on) or by clicking its value in the Notes panel. At this point, open the tuplets popover by pressing the ; key (semicolon), making sure this is the proper key for your keyboard language (for mine it is not, as I have to press the ò key). As an alternative, from the application’s menus, choose Write > Create Tuplet, which is a longer trip but useful if you do not remember how something should be done. In the popover that appears, write the tuplet you want as a ratio, for example 3:2 for an ordinary triplet. Here is where I would like Dorico to improve: how many times a triplet is 3:4 compared to 3:2? Probably 1% of the times? So, why writing 3 doesn’t immediately create a triplet? Mystery of programming, I suppose!
Now you are ready to input the desired pitches. Conversely, from Sibelius, where sticky tuplets must be activated and deactivated manually, Dorico does so automatically, which can be a blessing or a chore, but regardless this is what we have. You can stop this by pressing Shift-; (Shift-ò in my case) to exit “tuplet insertion mode” and go back to normal note input. The same is achieved by moving the caret outside the tuplet’s area via the arrow keys. Pressing Escape will bring you out of note input completely.
Bottom Line
And there you have it! Thank you for following this first episode in this series. If you have any question or suggestions, please leave a comment below or contact me using the dedicated contact form.
If you are looking to greatly enhance your Sibelius experience, please take a moment to consider my viewset for Metagrid that I have published back in February. Metagrid is an app for iPad that allows you to control your Mac or PC from your iPad. My viewset is optimised for Mac because that is what I use; it may work on PC, but I have had no way to test it so far.
I hope you found this article helpful, if you did, please like it and share it with your friends and peers. Don’t forget to follow me on this blog and to let me know what you think.
If you are interested in my music engraving services and publications don’t forget to visit my Facebook page and the pages where I publish my scores (Gumroad, SheetMusicPlus, ScoreExchange and on Apple Books).
You can also support me by buying Paul Hudson’s Swift programming books from this Affiliate Link.
Thank you so much for reading!
Until the next one, this is Michele, the Music Designer.

One thought on “How to create tuplets in Dorico (Part 1)”