
Today I will be very brief as this is something I could have covered in the first episode but, in reality, it is not something you cannot live without. I am talking about the Engraving Rules you have for tuplets in Sibelius. Let’s get started.
The Engraving Rules window
Please open the Engraving Rules window by pressing the keyboard shortcut Cmd-Shift-E (that’s Ctrl-Shift-E on PC) or by selecting its button in the Ribbon under Appearance (it’s the first button to the left)

The window that will open will be divided into two columns, to the left the categories and to the right the contextual options for the chosen category. At the bottom of the left column, choose Tuplets.

Let’s now look together at all what can be done in here.
Position on Notes
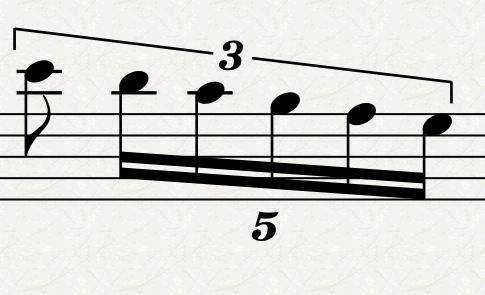
The first category manages the general position of tuplets over notes. Let’s start with this example:

Not really great as a first automatic rendering, but we need to work with the defaults and see if we can make them any better with the provided options. To clarify, the last beat of this 4/4 bar is an 8th-note triplet with a 16th-note quintuplet over the second and third 8th of the triplet. There is an option in Time Signatures to have tuplets beamed separately from adjacent notes which is checked by default. Should you want it different, you need to change it for every single new time signature you create. Frankly, you should not, simply manually beam together examples such as this.

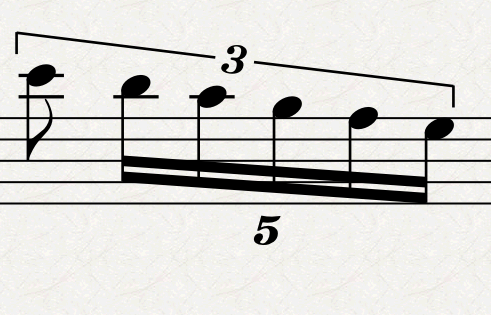
The default is to “Position tuplets as if all notes were beamed together” and “Always above on vocal staves”. Leave this one alone as it is perfectly good as is, but now try to change the first to “Position tuplets relative to first note”. This activates the options below and, by default, they are “Position with bracket: Stem end” and “Position without bracket: Stem end”. What does this mean? Well, it gives you more options to control all the tuplets of your piece in a single go. If you leave the defaults, they correspond to as if you had left the first radio button selected (that is, “Position tuplets as if all notes were beamed together”). The difference between the left and the right column is to control even further the behaviour of tuplets so that you can have one effect when the bracket is shown and another when it is not, if you so desire. Let’s see this visually.
Change both options to “Head End” (why aren’t these two columns equally ordered escapes me!) and see how the tuplet is now at the “note head-end” of the group.

Now change it to “Above”:

And to “Below”:

You can also decide that when you don’t have the bracket you want it to be “Stem-end” and that when you have the bracket you want it “Above”:

Number Angle
The next category is off by default but lets you ask Sibelius to also have single-digit tuplets rotate following the angle of the bracket. I advise against it but if you so wish, just check the “Rotate single digits” box. The difference is very subtle, but it may be just what you are looking for.
Unchecked:
Checked:
Auto Bracket
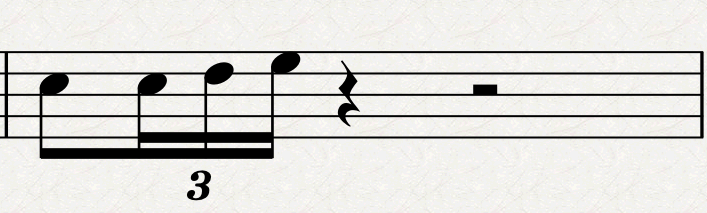
The third category allows you to hide the bracket when notes are joined by a secondary beam. For example, if you have an 8th-note followed by a 16th-note triplet, and you beam the two groups together, you will get this result:

This is not bad per-se, but if you have this kind of notation repeated many times over and over, it can become heavy for the eyes to see all these brackets. Checking that option (something I usually do for my scores) gives you this:
Vertical Distance from Notes
The fourth category, at the top of the right column, lets you manage the vertical distance of the tuplet from the notes.
The first field, set by default to 0.25 spaces (or the equivalent in the measurement unit you have chosen), tells the tuplet to avoid the stem of the note or any articulation present on it and placed on the same side of itself by a quarter space. All these values are normally good but, of course, feel free to play with them and see what they bring.
The second field, set by default to 0.5 spaces, is dedicated to when the tuplet is on the notehead side and needs to avoid it. The distance is set to double the previous one because of the sheer amount of visual space a notehead occupies compared to a single stem.
The third field is a bit more obscure, and it is connected to another page in Engraving Rules called Articulation. There you have some options to decide whether an articulation can go inside a tuplet or not. Assuming it cannot, this field will push that articulation away from the tuplet’s bracket by 0.91 spaces. For example, if I add an upbow sign to a note in the previous tuplet and then flip the tuplet above so that a bracket appears, you will see how the upbow sign has been pushed away:

If you change this option to something else, such as 0, you will see that this has changed (though much less that what I would have expected and, sincerely, I like it more with zero!)

At the end you find an “Avoid Staff” checkbox and I advise you to keep it checked. Sometimes it is good to have the number and/or the bracket inside the staff, but it needs to be a case-by-case decision.
Horizontal Distance from Notes
This last category works like the previous one but manages the horizontal distance. It is not specified but even if you do not see the bracket, it is there, so it will affect your tuplets as well if you have the “No bracket” option selected in the Inspector.
Positive and negative values here are a bit confusing and I will try to explain them:
- “Spaces from stem of first note”: assuming the note is downstem, a default value of
0.5meaning “towards the right” would make no sense, and it would make even less sense if the note were upstem. So, this field means “half a space to the left of the first note’s stem”. - “Spaces from head of first note”: it is good to leave it at
0because it should be flush left with the first notehead. Also in this case a positive number would mean “towards the left”. - “Spaces from stem of last note”: this works as the first field, just meaning “towards the right”.
- “Spaces from head of last note”: same as the second field, also meaning “towards the right”.
The last option is dedicated to when, in the Inspector you select the option to extend the tuplet to the note after it. This -0.38 spaces (that is 3/8 of a space) means that the tuplet will look for the next note, and then retract the end of the tuplet’s bracket by 3/8 of a space.
Bottom Line
And there you have it with this truly final appendix, there is nothing more I can teach you on tuplets in Sibelius. If you have any question or suggestions, please leave a comment below or contact me using the dedicated contact form.
If you are looking to greatly enhance your Sibelius experience, please take a moment to consider my viewset for Metagrid that I have published back in February. Metagrid is an app for iPad that allows you to control your Mac or PC from your iPad. My viewset is optimised for Mac because that is what I use; it may work on PC, but I have had no way to test it so far.
I hope you found this article helpful, if you did, please like it and share it with your friends and peers. Don’t forget to follow me on this blog and to let me know what you think.
If you are interested in my music engraving services and publications don’t forget to visit my Facebook page and the pages where I publish my scores (Gumroad, SheetMusicPlus, ScoreExchange and on Apple Books).
You can also support me by buying Paul Hudson’s Swift programming books from this Affiliate Link.
Thank you so much for reading!
Until the next one, this is Michele, the Music Designer.
