Dorico for iPad
For the last episode of this series, we are going to give a look at how to create and manage tuplets in Dorico for iPad, at the moment of writing in version 1.2.2.1022. I am going to use the subscription version, so it is possible that some tool may not be available to you until you subscribe.
Dorico as a desktop app is a one-off purchase, which made it a preferable choice for the flood of users who blindly migrated from Sibelius driven only by this aspect. For some, many people, this has been enough; not for me, but I certainly appreciate that they are keeping this model, especially after the practically featureless year Sibelius has proposed to its users.
If you followed the Sibelius series as well you will have noticed that I have not created a specific episode for Sibelius for Mobile because I cannot see myself using it for anything by now, it is just too uncomfortable. I am not suggesting you not to give it a try, just I could not like what I saw. While Sibelius for Mobile is included in your Sibelius subscription, Dorico does not come bundled with the desktop app but rather requires you to subscribe at a cost of, in Europe, EUR 3,99 / Month or EUR 39,99 / Year.
The User Interface of Dorico for iPad is just gorgeous, modern, sleek, full of functions and clear to use. It reminds me of the Adobe apps, which just nailed the concept of UI and UX (User Experience). They managed to create something that is similar enough to the desktop experience while introducing concepts that make it a great mobile experience. That said, if you do not have an external keyboard for your iPad you will have a harder time as Apple Pencil is not supported and there is no news on this end.
Let’s get to tuplets
To get to tuplets, you need to activate Note Input first. It is possible that the lower fourth of the screen is not showing the revamped Properties panel, now simply called the Lower zone.

If you are interested in me writing more specific tutorials about Dorico for iPad, please let me know.
Exactly as it happens in the desktop version, if we can see the caret (that funny orange vertical line), then we are in note input mode. In this mode, any other notation we select before adding a note will affect the upcoming note, not the one which may have previously been selected.
A mouse or trackpad is also very useful, even if control by hands only is absolutely possible. In any case, note input in Dorico on iPad is possible via a MIDI keyboard, via a computer keyboard (connected via Bluetooth or USB to the iPad), a mouse/trackpad (Bluetooth or USB), or via the new Keyboard, Fretboard, and Drum Pads panels (which we will not cover in this episode).
Activating Note Input
The caret will change its aspect according to what state of note input we are in, and on what staff or instrument. To activate it to finally enter Note Input, we need to perform one of the following actions:
- Press the keyboard shortcut Shift-N on the keyboard, or
- Double click (or tap) on a rhythmic position within the desired staff (try it, it is quite precise!), or
- Click (or tap) the Start Note Input button in the Notes toolbox, show below:

To get out of Note Input, press again the Start Note Input button, press Shift-N, Return or Escape on your keyboard, or simply switch to another tool or mode.
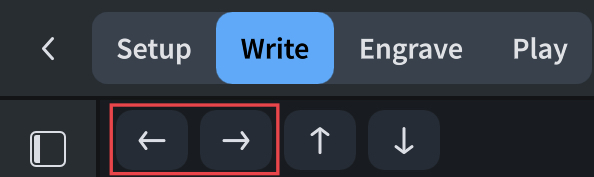
Once the caret is active, and you start inputting notes, it will move along the rhythmic grid following the duration of the inserted notes. You can also move it manually in a few different ways. Assuming you have set your preferred rhythmic grid resolution, and you are using a keyboard to control Dorico for iPad, simply press the Left / Right Arrow. If you want to stay keyboard-less, you can use the Navigate Right or Navigate Left buttons at the top left of the interface.
Another way to advance the caret according to the note value currently selected, is to press Space on your keyboard, or tap the Advance Caret button in one of the panels of the Lower zone.

The downfall of this last method is that there is not a corresponding Retract Caret button to bring back the caret of a note value.
The only way to move the caret to the next or previous bar is, sadly, only possible through the keyboard, via the keyboard shortcuts Cmd-Right Arrow or Cmd-Left Arrow. To move the caret to the staff above or below, use the Up / Down Arrow keys on your keyboard or the Navigate Up and Navigate Down buttons, also visible in the picture above next to the Navigate Left/Right ones. Finally, to move the caret to the bottom or top staff, press Cmd-Up Arrow or Cmd-Down Arrow on your keyboard.
Inserting real notes
By default, Dorico thinks you will select a duration and then specify a pitch, but you can invert this by tapping the Pitch before duration button in the Notes toolbox, just below the Activate Note Input button, or by pressing the K key on your keyboard.
You now have to decide which method of note input you will use among the ones proposed above. I will not cover them here, but instead I will use the onscreen piano keyboard, which is activated in the Lower zone by tapping on the second button from the left.
Double tap on an empty bar to activate the caret and move the caret into position; select a note duration among the ones suggested above the keyboard, or by pressing a key between 1 and 9 on your alphanumerical keyboard. Be mindful that if you want notes shorter than a 32nd or longer than a whole note, Dorico’s interface will not give you any feedback, which is quite odd.
Now tap a key on the piano keyboard, and a note of the appropriate duration will spawn. You may select articulations before tapping on the desired pitch. A truly beautiful addition to Dorico for iPad is the Edit Notes Overlay, which lets you edit notes after they have been input.

My hands are literally itching to spend the entire tutorial digressing into this, but I need to save it for another time.
Inputting tuplets
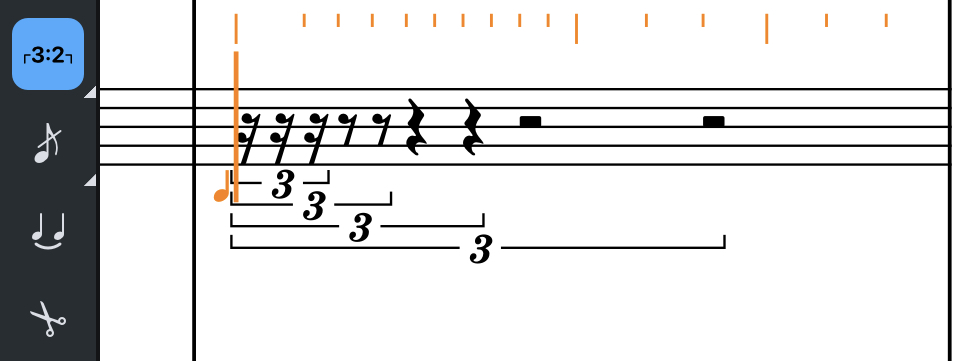
We finally get to the juice: once you’ve activated Note Input, choose the duration of the value of the ratio of your tuplet (e.g., choose a quaver / eight note for a triplet of three 8ths out of two), then several paths open in front of you.
If a triplet is all what you want, simply tap on the fourth to last button in the Notes toolbox, the one that shows a 3:2 and a bracket. This example was created while having a lot of fun!

You will have for sure noticed the little arrow to the bottom-right corner of the button, and I just love Dorico’s team for having brought this out. If you have ever used any Adobe software, for example Photoshop, you will remember that by long pressing on a tool with an expansion arrow you will get extra tools. It would be too good if this also happened here, right? Let’s try it:
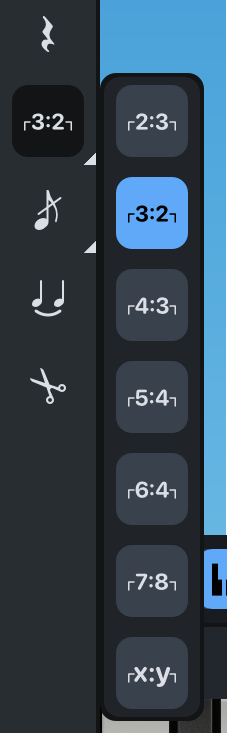
With these tools, you can create any of the following tuplets without ever needing to resort to using the popover: 2:3, 3:2, 4:3, 5:4, 6:4, 7:8. Should these prove not enough, there is the x:y option, which will make the popover appear and let you insert any ratio you may imagine, such as 13:4!

Should you want the popover from the start, simply press the ; key (on my Italian layout keyboard it is ò) and proceed in the same way you did on desktop.
In Dorico for iPad, you can also change the duration of a selected note by tapping on it and then on the new value you want to assign to it. You can advance the caret to a new rhythmic position and keep writing tuplets of the same ratio.
I will not repeat myself with everything that can be done with the popover, as it is the same on desktop and on iPad. Something I had forgotten to mention in the desktop tutorials was that you could specify the duration of the tuplet ratio with a letter. For example, you could write 7:2e to specify that you want seven eight-notes in the place of two. Occasionally, it has happened to me that I needed to create a tuplet that had seven 16ths over 2 8ths, basically a 7:8 tuplet but the composer insisted with that notation. Sibelius let me create it with some clever use of text styles, while with Dorico that would have been impossible. The letters for each value are, from 64th notes to double whole notes: z, y, x, e, q, h, w, 2w, to which you can always add a period.
Editing tuplets
It is indeed possible to get basically the same level of editing capabilities on iPad as you get on desktop. Select a tuplet, then the Properties icon in the Lower zone and, just enjoy:
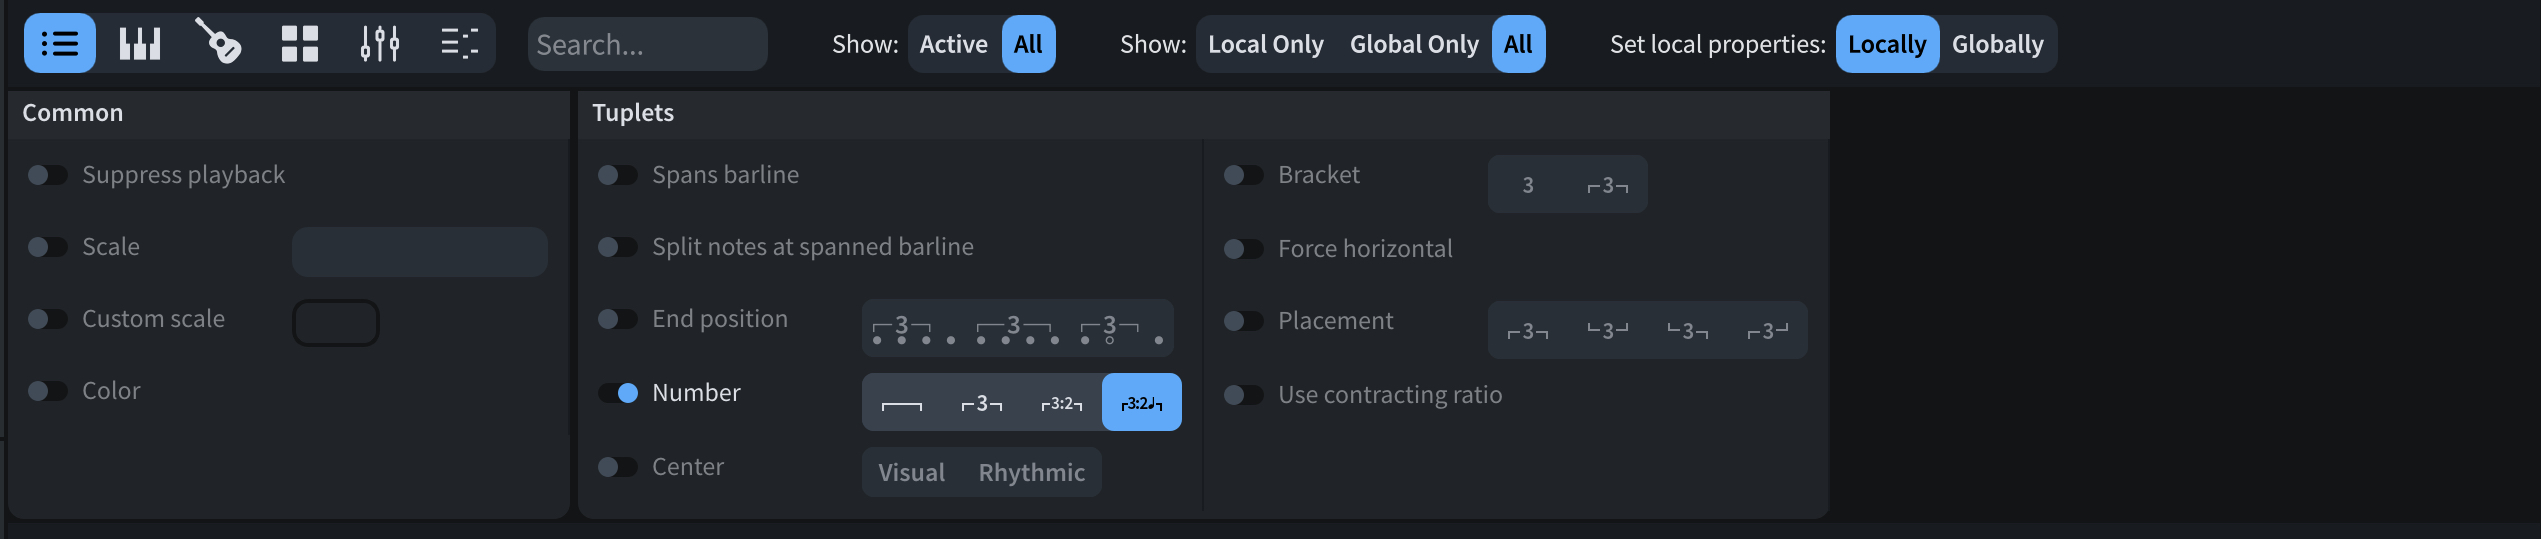
As you can expect, switching to Engrave mode will also alter this panel in the same ways we saw in the previous episode on desktop. The selection, scrolling, and moving experience on iPad needs some refinement for sure, but still, it is such a great experience.

There are no Engraving Options in Dorico for iPad yet, as the goal of the team was to make it a bit more powerful than Dorico Elements when fully subscribed, which is a pity, but I hope it will be changed in the future.
Bottom Line
And that’s it! This brings us to the end of this tutorial series on creating tuplets in Dorico. It was a great journey and I learned a lot with it. This last episode in particular was created on my 12.9in iPad Pro from 2018, connected to the Apple Magic Keyboard for iPad, while the Apple Pencil 2 was used for annotating the screenshots and selecting tools. All these links are affiliated ones so, while changing nothing for you, they may bring a small amount to me, which will surely help to support the creation of future tutorials.
Talking of future tutorials, please let me know what you would like to see covered, either on Sibelius or on Dorico.
If you have any question or suggestion, please leave a comment below or contact me using the dedicated contact form. Assuming you do not already do so, please subscribe to my newsletter on Gumroad, to receive exclusive discounts and free products.
If you are looking to greatly enhance your Sibelius experience, please take a moment to consider my viewset for Metagrid that I have published back in February.
I hope you found this article helpful, if you did, please like it and share it with your friends and peers. Don’t forget to follow me on this blog and to let me know what you think.
If you are interested in my music engraving services and publications don’t forget to visit my Facebook page and the pages where I publish my scores (Gumroad, SheetMusicPlus, ScoreExchange and on Apple Books).
You can also support me by buying Paul Hudson’s Swift programming books from this Affiliate Link.
Thank you so much for reading!
Until the next one, this is Michele, the Music Designer.

Your commitment and enthusiasm radiate in every paragraph you write. It’s infectious!
LikeLike