
Today we are going to look at some of the finest details you can edit in Dorico’s tuplets. As we saw last time, Dorico has a comprehensive set of engraving options to look at that should satisfy every user’s need. There are times, though, when you want or need more and that is where the Properties panel, invoked via the Cmd-8 keyboard shortcut (that’s Ctrl-8 on PC), comes into play. This panel changes its aspect contextually according to the object selected and to the mode you are currently in. As this can be confusing at first, let’s give a look at the panel when at its simplest.
The Properties Panel

The picture above shows the Properties panel when in Write mode and when there is nothing selected or, strangely enough, everything in a bar or more is selected. This behaves quite differently from Sibelius’s Inspector where, if you selected a region, it would show you all the available options. This is personal, but I prefer Sibelius’s way here.
In the top left, there is a nice Search field with a “Search…” placeholder text that invites us to filter among all options available. It may not be evident now, but when you select some notes, this panel suddenly gets very busy and having an option to filter down what is available was definitely a good addition to the software.
Going right, we see a “Show:” label with two buttons next to it: Active and All. This works as a sort of global filter that will show either the properties that are currently affecting your selection, or all properties, active or inactive. This can be useful at times, but in my daily workflow I prefer to keep it set to All.
Next is a new filter that was introduced pretty recently: it will show either Local Only properties, Global Only properties, or All of them. This can once more be slightly confusing because we do not know what “local” and “global” means, even if we could hint at their meaning. “Local Only” properties are those that are currently affecting only this layout, for example fingerings, unless you have set them to show in the Full Score as well. “Global Only” properties are those that are currently affecting every layout, for example a system text object. Be careful that setting this to “Global Only” will hide “Local Only” properties so, once more, I feel like suggesting you to keep this set to All.
Finally, to the far right, we have an important label “Set local properties:” with two buttons Locally and Globally next to it. My current Dorico setup is probably going to be different from yours but, if I recall correctly, a fresh install should have this set to Locally, which is something I do not find easy to advise. In the early days of Dorico, up to version 3.5, setting something in the score required the user to reproduce it on parts manually. This is why I normally keep this set to Globally, being careful to set it otherwise when needed. To give you an example, if you are changing the tuplet’s number to show a ratio in the score, and this property is set to Locally, the connected part layout will NOT show this change. It can be useful at times, but I would not advise it.
With nothing selected, you will see only this to the left of the panel:
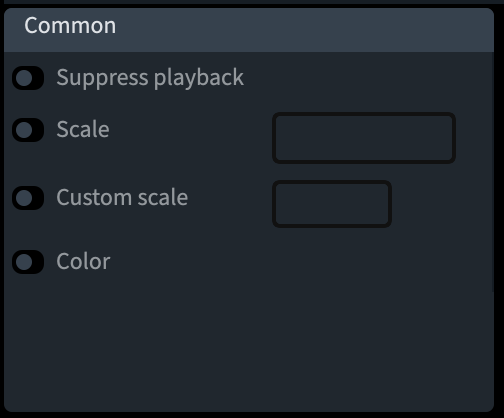
The category is labelled Common, and it has four switches, which would still come into place only when something is selected, so I honestly do not know why they are here when there is nothing selected.
Tuplets in Write Mode
After this introduction, we are ready to give a look at what happens in the Properties panel when we are in Write mode, and we have a tuplet selected:

To the left we have that mysterious Common category which we can try to explore:
- Activating the Suppress playback is possible but, quite obviously, it has no effect because the notes under the triplet still have that same property selected. I would have preferred this option not to be available, as it is just confusing.
- Activating the Scale option gives you a dropdown menu with the following choices: Normal, Cue, Grace, and Cue Grace. This will work and change the size of the tuplet number and bracket according to your specific needs.
- The Custom Scale option allows you to set a percentage of scale you would like to apply to the selected object. Be mindful that the accepted limits of the text field that gets activated are
1-999. - The Color option is perhaps the most useful one because it appears that it can be used to separately colour any of the objects you select. In reality, it has the same limitations of Sibelius, in which you can colour only the notehead and not the stem of a note. Surprisingly similar code.
Once you got your tuplet selected, a dedicated Tuplets category will spawn to the right of the Common one:

Let’s look at the single categories, with as many visual examples as possible.
Spans barline is dedicated to those tuplets that would start in a bar and finish in the following one. Starting from our example above, I created a 5:4 tuplet from the third beat of the bar: this is the default result:

What has actually happened is that Dorico has created two separated tuplets, each made of 5:4 eight notes (this because the tuplet could be exactly divided in two, but it would have dutifully done differently should it have been needed). Let’s now activate the Spans barline property:

This result is brilliant, especially if you know what Sibelius does by default, without the help of the incredible plugin by Robin Walker and Bob Zawalich. If we fill this tuplet with quarter notes, or with any duration that would span the barline, the note that starts before the barline will stay entirely in the first bar:

This will look strange because we would have expected a half-note to be in the first bar, but never mind, this is still wrong, at least with note spacing. Let’s now activate the second option, Split notes at spanned barline:

This is finally correct from a rhythmical and note spacing standpoint. What you need to be careful about is that if you do not activate the Spans barline option, you can still activate the Split notes at spanned barline, even though it will do nothing at all. Again, this should have been prevented at the source.
The third option is called End position and, once activated, it manages where the tuplet’s bracket will end its course:

We already saw these options briefly in a previous episode but here is a quick recap: the first option, normally the default, makes the bracket end just after the right end of the note; the second just before the next note; the third, just after the last subdivision of the tuplet.
Next we have the Number option which, once activated, offers you four options: nothing, number, ratio, and ratio with note.

The default is the second one.
You will have noticed that all these options are the same that we looked at in the Engraving Options, except that now they will influence only the selected tuplet and, according to your previous choices, either the current layout or all of them.
The next option is called Center, and lets you choose between “Visual” center and “Rhythmic” center. Take a look at the previous episode, where this difference is explained in greater details:

The next column starts with the option to choose whether you would like to show the bracket or not. I seldom have to adjust this as Dorico makes an excellent job here, still there are times when you may want to manage this separately.

I love the next option: Force horizontal. By default, Dorico slants the tuplet bracket according to the involved pitches, but it is possible that, for a specific region, one would like to have them perfectly horizontal without having to change the global settings.

The next option shows you the different possibilities for the placement of a tuplet bracket, namely above, below, cross-staff with left hook up and right hook down, and cross-staff with left hook down and right hook up. Here are the options as they appear in the Properties panel:

The last two options will prove very hard to get right, as occasionally, you select the last one and the result is the third one. Besides, they are not optimised visually and will require you to work a lot in Engrave mode to get a good-looking result. For science, I show here what they look like without “human intervention”:

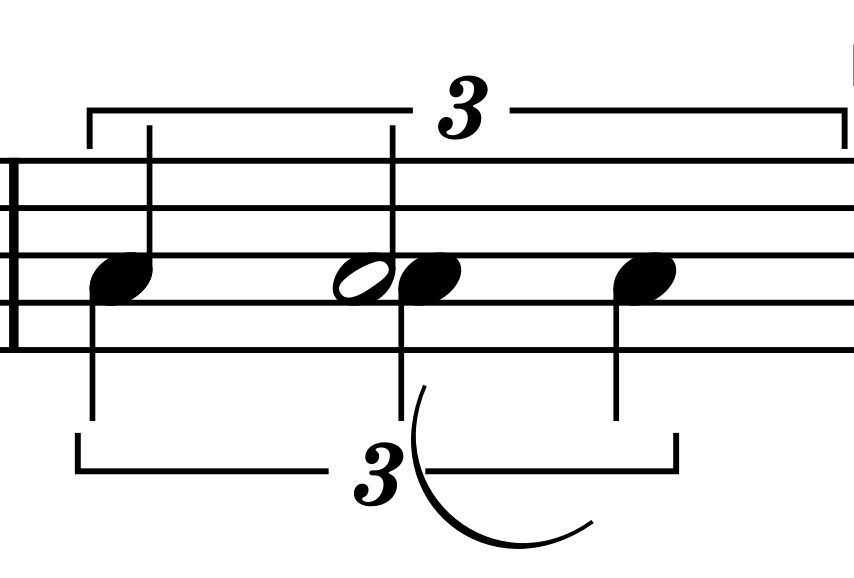
The last option is Use contracting ratio which, again, can be activated but most of the time it does nothing at all. I have not found anything on the documentation on this, so I will use my intuition: a contracting ratio is, for example, 2:3 quarter notes instead of 4:3 eight notes. This example from Schoenberg’s Five Pieces for Orchestra:

…will be shown as this if you switch on that option.

Weird, and it is not documented, so I will give credit to Derrek, a fellow user on the Dorico’s forum, who has pointed this out after finding it accidentally.
Tuplets in Engrave Mode
To wrap up this episode, we will look at what extra options are available to you in Engrave mode, which is triggered by Cmd/Ctrl-3.

The first difference you will notice is the appearance of handles around the bracket; these will let you nudge the position of the bracket either by selecting and dragging or by selecting one, holding down Option (that’s Alt on PC), and using the arrow keys. This will move the handle by 1/8 of a space, while adding the Cmd (or Ctrl on PC) modifier will move it by 1 whole space. Doing so will activate the two options to the far-right Start offset and End offset, and automatically populate the fields next to them. You will still be able to edit those values by either clicking on the up and down arrows or by directly typing in the desired value.
In the first column we have only one new entry, which is Hook length, followed by a text field and the word “spaces”. This will let you alter the hook length for a specific tuplet bracket. I would not advise this, but one never knows.

In the second column, we have the new Max. slope option, that lets us override the relative option set up in Engraving Options.

The last guest in the show is Tucking index. This will come in handy when you have a lot of notation around the tuplet. It will require a bit of memory involvement, as you will need to remember what index you have given to what element of notation. When activating this option, the number will usually be 0, and that will correspond to the nearest possible place towards the staff. For example, adding a slur to our first example generates this objectively ugly result—yes, Dorico has a lot of work to do with slurs and this is possibly the main reason why I am not using it extensively in my editions—:
In Engrave mode, we can try to change the tucking index of the slur and of the tuplet to see if this improves something:

Changing the slur’s index gives no results at all, while changing the tuplet’s index to 1 did the trick.
Bottom Line
And that’s it! Thank you for following this sixth episode in the series.
If you have any question or suggestion, please leave a comment below or contact me using the dedicated contact form. Assuming you do not already do so, please subscribe to my newsletter on Gumroad, to receive exclusive discounts and free products.
If you are looking to greatly enhance your Sibelius experience, please take a moment to consider my viewset for Metagrid that I have published back in February.
I hope you found this article helpful, if you did, please like it and share it with your friends and peers. Don’t forget to follow me on this blog and to let me know what you think.
If you are interested in my music engraving services and publications don’t forget to visit my Facebook page and the pages where I publish my scores (Gumroad, SheetMusicPlus, ScoreExchange and on Apple Books).
You can also support me by buying Paul Hudson’s Swift programming books from this Affiliate Link.
Thank you so much for reading!
Until the next one, this is Michele, the Music Designer.
