Episode 4 – First Steps (cont’d)
Instruments set-up (Part 3)
Solo singers
What would be an opera without solo singers? Well, it would just be a massive symphony, though also this statement could be discussed at length. There are special conventions on how to prepare singers’ staves, and they are like nothing I had ever encountered before. This is because there is an extra component that a symphony doesn’t have: the stage!
The vocal part of an opera singer is only half of the story, in fact, the other half being its theatrical presence. This part of their role needs to be shown on the score somehow. I could not pinpoint the exact spot in time when this became a convention but, at the very least, most if not every opera composed in the XX century uses this convention. Let’s give it a look.
For every stave in your score you have a “Full” staff name and a “Short” staff name, and the same applies to the singers, unless the current system is the first one where they appear in the score.

This is the beginning of Scene 1 of Benjamin Britten’s Owen Wingrave, Op. 85. See how Coyle’s stave doesn’t have a staff label, rather a text object signalling the singer’s entrance. Assuming the same singer is playing in the following system, the normal convention will be reinstated:

How do we do this in Sibelius? It is not complex per se, just quite tedious and delicate. When you first add solo singers’ staves to your score, you should select the “Solo” version of each voice and, for this tutorial, I have added a copy of each main voice, also creating a copy of the “Solo Soprano” instrument to have “Solo Mezzosoprano”, which is very common in operas. Your personal score will dictate how many of each kind you need.

Now, for each of these voices, you need to create a copy of the instrument and change a few parameters:

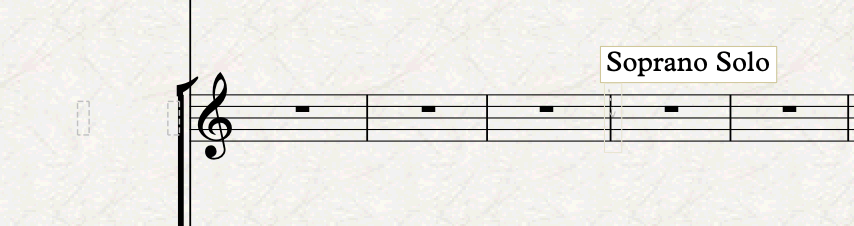
For “Name in dialogs”, substitute my “Solo Soprano (no name)” with “<character> “(no name)” where <character> is the name of the role you are building the instrument for. In the case above, it should have been “Coyle (no name)”. For the following fields in the “Name” section, erase them all. Simply press OK. Back in the score, select from the beginning of the system where the singer will enter to just before its entrance, and insert an Instrument change there, selecting your (no name) version of the same singer. This action will result in this:

See how there is no staff label at the beginning of the system (actually, it is there, but it has no text), and then there is a restoration text object where the original instrument resumes. If you have configured everything corrected, this “Soprano Solo” label will read “Coyle”, or whatever your character name is.
Repeat this process for all your solo singers, and be ready to fiddle a bit with the positioning of the restoration text object for some edge cases.
On-stage instruments / Off-stage choir
By convention, off-stage choir or on-stage instruments are placed at the top of the score, above everything else, including piccolo. The reason behind this is that this extra section is immediately visible and easy to spot on system breaks and page turns. Every opera is different, and yours may not have any on-stage instruments or off-stage choir. Since most have, though, I have gone through and added the very basic ones: a condensed SATB choir and a percussion stave. You are welcome to add a marching band, or other brasses, which can easily be misplaced to the stage.
Be sure to label these instruments accordingly. The ideal would be to have a square bracket with a group label, but Sibelius makes this so hard to create and to position system by system, that it is not worth the time spent, in my opinion. I prefer to do something like this, instead of having to create a vertical text style, attach it to a line with zero width that repeats on each system, then fiddling with the spacing of the text label… just to see all these efforts get crushed when staff spacing inevitably changes system by system. Sibelius is just not the right tool for this kind of notation, at least not for now (2023.6).

Stage instructions
The last stave we need to have in our score is one where stage instructions can live undisturbed without affecting other instruments. If you are wondering what stage instructions are, here’s an example:

They show what happens on stage in a general sense. Individual actors’ instructions should go above their respective staves.
There are two main things you should do to achieve this in a safe and forward-looking way: add a dedicated staff and create a dedicate text style.
The dedicated staff should be a copy of the “No instrument (hidden)” instrument, and should be placed on top of everything, even above on-stage staves. There is nothing special beyond this, just know that vertical spacing may suffer a bit from always having an invisible stave above each system. We are already offsetting this by using a one-line stave (actually a 0-line one, but it occupies the same vertical space).
The dedicated text style, it can look like anything you want, but be sure that, upon creation, you use a staff text style and not a system text style. This is because we do not want this text to appear on every stave, nor in every layout, rather just on top of this specific stave. In my template, I have called it “Stage Instructions”. Having a dedicated text style will allow you to make edits to it that will automatically apply to each instance of these text objects.
Bottom Line
We have done it! You now have a completely functional score that is ready to accept note input. In the next episode, we will begin looking at specific conventions that come to play when engraving an opera! Stay tuned, and thank you for reading so far!
If you enjoy what I do, please consider liking this article, sharing it with your peers and colleagues, and subscribing to this blog to be notified of upcoming articles. If you use an iPad and would like to improve your Sibelius experience, please give a look at my profile for MetaGrid Pro here.
I also have a newsletter that follows my publishing journey, check it out if you are interested in cello (and more) and would like to receive special gifts. You can also browse my online catalogue here.
Thank you for your time and continuous support.
See you in the next episode!
Michele

One thought on “How to engrave an Opera (in Sibelius)”