It is time now to create our first app from scratch based on what we learned in these first three projects. It will have to do with flags but this time it will show them and give the possibility to share it instead of playing with them. Let’s get started.
Project setup
Let’s create a Single View App and substitute the main view controller with a Table View embedded into a Navigation Controller. In ViewController.swift we modify the class inheritance to read UITableViewController instead of UIViewController.
Importing the images
The only image source I found of good quality was one with only the ISO codes instead of names of the files. Not too bad, it could make for a good game sometimes in the future. The source had 100px, 250px and 1000px formats so I renamed the last two by adding a “@2x” and “@3x” extension. I then moved everything inside of a folder and dragged its content to the Assets.xcassets folder inside of the Xcode project. In this way all of the images disposed themselves nicely according to screen resolutions.
After doing this I realised this was a mistake because all of these images do not have a common prefix or suffix for me to access via the Assets catalog. I may of course go out and change the name of the files (a very easy fix in macOS’s Finder) but then I would get a filename that I am not satisfied with for the next part of the project.
Also, I could have appended them manually but this is not what Paul suggests in his walkthrough of the challenge.
I then switched to importing the files directly in the Document Outline. When the next window appears I never know which option to choose (and why) between the “Create groups” and “Create folder references”. Now that I’m writing I know I chose the wrong (and default) one (folder references) and I am waiting for Xcode to finish the import so that I can cancel them and try with something else.
I now tried with the Create groups option but it didn’t work. Every single file was instead copied there. Looking for a solution to this (strange) issue on the Internet did not help as no one seems to have written anything about a said “Content” folder so I solved it by selecting all of the images and, from the contextual menu, hitting “Create Group from selection“. I then called it Content and hit Build and Run. By now it worked…
Anyway, the steps to follow were illustrated in this article and I followed them precisely. Nevertheless the folder did not get created.
Conclusion
I realised that if I want to use images dynamically in my app I need to have them in a folder inside of the app whereas if I want them to be used as simple graphics for my views I need to insert them in the Assets.xcassets folder. Of course I may be wrong and there might be a way to do things otherwise but, as of now, I do not know them.
Here is my ViewController.swift file as it stands now:

Detail View Controller
In order for us to show the image we need another View Controller so let’s drag one out in Main.storyboard.
We then create a new Cocoa Touch Class file to manage this new view controller and we set up the ViewController’s class to be our new DetailViewController.swift.
Always with the Object Library we drag out an Image View and pin it to the corners of our new View Controller. With the Assistant Editor open we create a new @IBOutlet for our image view.
We also add a var selectedImage: String? so that we can store the title of the image we will select in our main view controller.
Now let’s head back to the main view controller as we have to set up our table view.
Setting up the Table View
Right now our app loads as an empty table which hardly is what we want.
The main things we need to do when setting up a Table View are:
- How many rows should it have (and sections, of course, but by now this is more than fine).
- What should go in any row
- What should happen when a user taps a row.
How many rows
We created an array and initialised it with the titles of the images we imported in our app’s bundle. Thus, our array has a finished amount of items which we can count. In ViewController.swift let’s type:

What in each row
We call another Table View data source method and override it with what we need, without forgetting —of course— to also change the cell’s identifier to “Cell”. I do not remember but, wasn’t that called “Reuse Identifier”? Anyway, here’s the code:

Before going on we check that it builds and runs.
In my case it does run but I hate that I have the .png name in the tableView, it makes it look like a database. Also I would like it to be uppercased …
Bonus!
As I am an insatiable person who cannot stand things which look awful graphically-wise I went on StackOverflow and looked for a way to remove the file extension from my Strings. It turned out that Swift Strings are not as powerful as their Objective-C counterparts —NSString—, therefore an extension to the String data type must be put in place. For your reference, this is the article on StackOverflow.

This allows us to have two new methods for all of our strings. The first deletes the file extension if present and if it is the last component of the filename, while the second returns that extension. Brilliant, right?
I then modified the loop with which we imported the files into the array, like this:

In this way we already have an array of filenames which are uppercased and without file extension! Urrah!
Load pictures into Detail View Controller
The last method we need is the one that governs what happens when a user taps on a row. We must be sure that our Detail View Controller has a StoryboardID set to “DetailViewController”. Here is the code:

This instantiates a new ViewController with our desired identifier as a DetailViewController class instance. We then access that class’ selectedImage property and assign it to the corresponding item in the flags array. Next is setting the view controller’s title to the name of the file which will just be a couple of letters. Finally we push our view controller with an animation.
Last touch
Inside DetailViewController.swift we need to be sure that, if an image is found, it is loaded as well.
Everything should work and, instead, nothing is! Changing the filename into the array disconnected it from the list of our items, so that iOS, in the end, is not finding our files.
We need to revert the for-loop to its previous state and perform the changes elsewhere, more precisely:
- add a constant that will store the converted string in the two Table View data source methods (
cellForRowAtandDidSelectRow). - change the parameter in the following lines and try it now.

I could have created a global variable as here I am breaking the DRY rule but it sounded more complicated than to leave it as it was now.
If we build and run now everything will work, just the images will be stretched our and unbearable to look at. We switch to Main.storyboard and change the Content Mode to Aspect Fit, the option that maintains the original proportions of the file while making it occupy as much space as possible at the same time.
Also, let’s set the cell’s accessory type to Disclosure Indicator so that the user knows that something will happen when he presses the cell.
Sharing our flag.
Inside viewDidLoad() we create a Right Bar Button Item into the Navigation bar at the top of type .action, target self and action #selector(shareTapped).
We then write the shareTapped method as follows: 
I have added a nice message for the activityItems so that a user can send an image to a friend and they can play together to guess the right flag given the code and the picture!
On a first launch the Message sharing didn’t work on my iPhone XS and I wonder if this was due to the fact that I didn’t let it save the pictures to disk. Let’s see if by adding the permission to the Info.plist file helps.
Indeed, that was the case, but I can make it better. I want the name in the message to be just the uppercased name without .png. I know, I am a nerd.
I tried to create a global variable once more for this but it didn’t work, not yet sure why. Not even a computed property with a conditional binding did the trick as it said something about the fileName method being a get-only thing. Bah … can’t stress about that now. I changed the shareTapped method to this:

Last touches
First thing: we want our main view controller to have a title and we want it to be big, so:

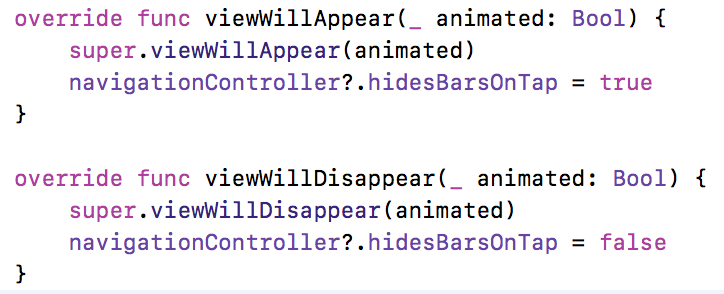
Last thing is that we want the user to be able to tap the image once and have the navigation bar disappear. That is done in the following way in DetailViewController.swift:
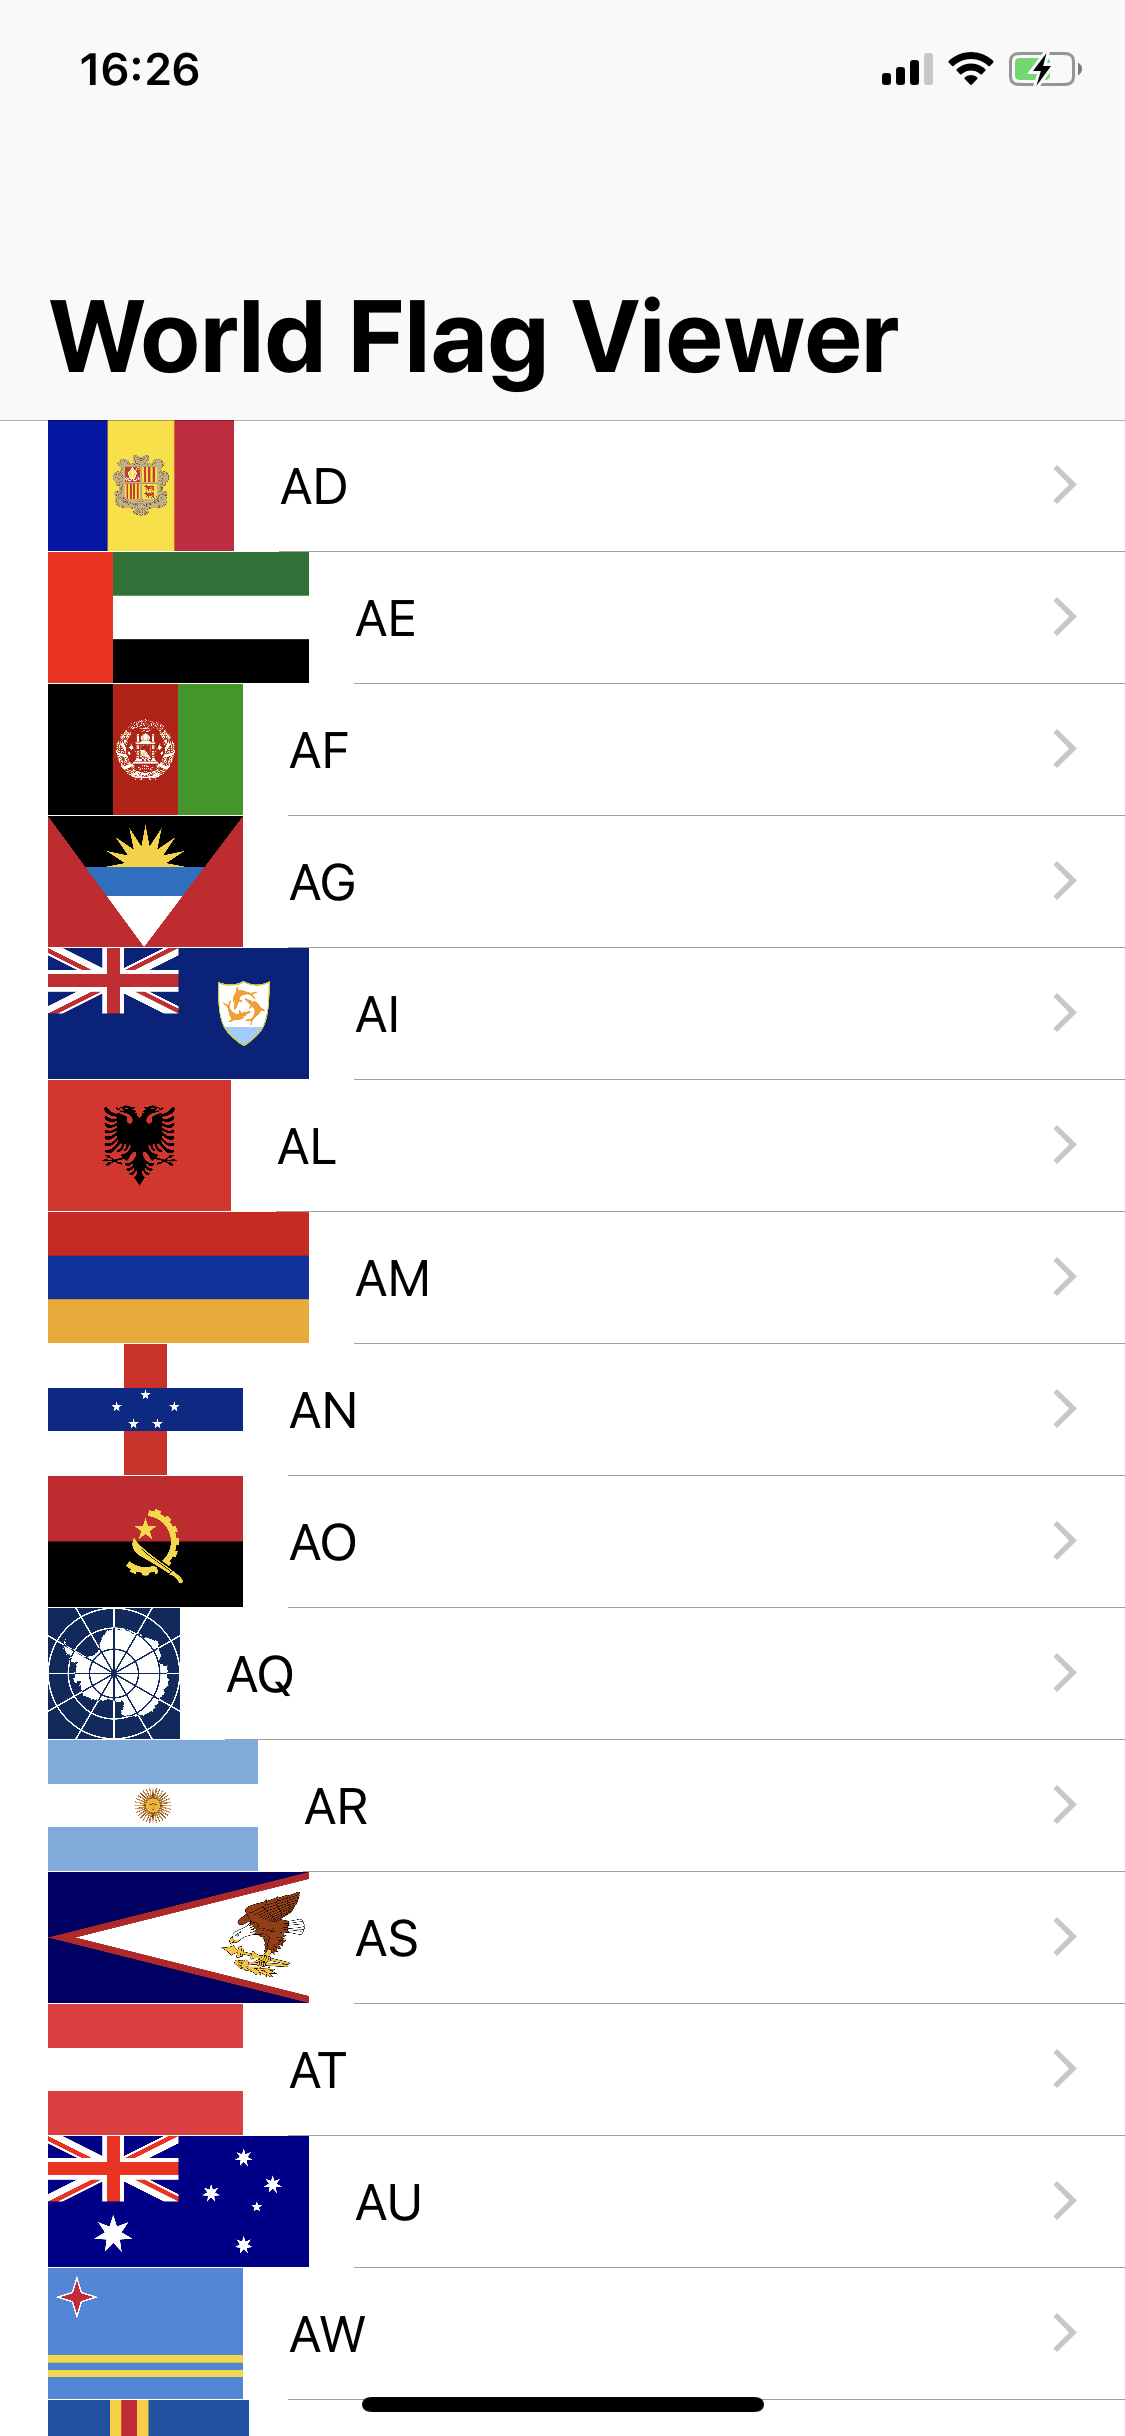
Upon building, because the iPhone XS screen is too narrow to show the title in capital letters. Trying with lowercase letters is much better: “World Flag Viewer”.
I would like to understand why when I scroll sideways in the DetailViewController it doesn’t pass between images, but I guess this is something we will learn in due time and much beyond the scope of this challenge.
The last thing Paul asks us is to try setting the imageView property of the table view cell. Inside of the cellForRowAt method let’s add this line: cell.imageView?.image = UIImage(named: flags[indexPath.row]). The result is amazing:

The only thing is that, naturally, every flag has different width and I would really like all of the texts to be aligned vertically between them. I didn’t find any option that would help me solve it so, please, if you can, give a look at the project on GitHub and let me know what you think of it.
Thank you so much Paul for this!
If you like what I’m doing here please consider liking this article and sharing it with some of your peers. If you are feeling like being really awesome, please consider making a small donation to support my studies and my writing (please appreciate that I am not using advertisement on my articles).
If you are interested in my music engraving and my publications don’t forget visit my Facebook page and the pages where I publish my scores (Gumroad, SheetMusicPlus, ScoreExchange and on Apple Books).
You can also support me by buying Paul Hudson’s books from this Affiliate Link.
Anyways, thank you so much for reading!
Till the next one!
