AP Computer Science Principles with Swift
Unit 4. App building
Introduction
In this unit we will build several apps and, if we encounter problems, we are encouraged to look online to see if other people may have encountered the same issue. We are then warned not to copy the found solution but to understand it and integrate it in our code.
When debugging sometimes all it takes to fix a bug is to explain our code out loud, in what the genius David J. Malan from Harvard University explained as the duck method. You take a toy-duck and just talk to her about your coding problem! Believe me, it works!
We are then introduced to the concept of Quality assurance, also known as QA. A good QA engineer needs to have empathy flowing in two directions, putting himself in the place of different users of every level and kind. His tasks are, among others:
- Understand how an app should behave
- Anticipate all the possible paths a user could take through the app
- Test all those paths
- For those that fail, report the failure in detail.
Debugging
Sometimes the Swift compiler instantly tells us where an error lies, but some other times we don’t see the error until the app crashes or perhaps it doesn’t even crash, yet it doesn’t work as it should.
Debugging is very akin to investigation. Some possible errors are:
- make a type
- misuse an index
- copy and paste without altering the relevant parts
- set a variable to the wrong value or at the wrong time
- forget to insert/remove an element from an array
- make a mistake in Interface Builder and so on.
The hardest bugs to solve are logic errors, that is bugs that arise from us misunderstanding the way the algorithm works.
Testing
Functions: we know that functions are a kind of abstraction and for this to work properly, they always have to work as expected, otherwise the abstraction is broken. We should think about all the possible values for each argument and create a sample set of inputs to cover those possibilities. Finally, we should run the function on those inputs, maybe in a playground (assuming it doesn’t crash on you!).
Apps: as developers, we have a blind spot: we know why and how we designed the app so we will use it exactly as we would like it to work, but users won’t probably do so and to test this we will need to try and get free of this layer.
4.1 : Topic in Focus: Cryptography
In this chapter we will explore existing ciphers such as the Caesar and Vigenère ones (which I had already faced in CS50 but it is good to tackle them back in Swift). We will encode and decode simple messages using different ciphers, then compare their strengths and weaknesses.
We will also have an history lesson about cryptography and then invent our own cipher, creating then a Pages document to explain all of them.
Key vocabulary
Cryptography: it is the process of encoding data in order to keep it secret from everyone other than the sender and the receiver. Using special information that only they possess, the sender encrypts data and the receiver decrypts it.
Symmetric encryption: it relies on shared keys — ones that are known to both sender and receiver. Shared-key encryption is vulnerable to attacks that attempt to intercept or guess the key.
Advanced Encryption Standard (AES): it is a widely used standard for public-key cryptography. It relies on a numeric key to encrypt and decrypt data using a series of complex mathematical operations.
Certificate authorities: public-key encryption relies on them to establish a chain of trust so that users can verify the owner of a public key. A certificate authority verifies the identity of a company or other entity and provides a signed certificate that’s both unique and impossible to fake.
Secure enclave: it is a hardware-based encryption key manager that is isolated from the main processor to provide an extra layer of security. When an app stores a private key in the secure enclave, it never actually handles the key, making it difficult for the key to become compromised. Instead, an app instructs the secure enclave to create the key, securely store it, and perform operations with it.
Let’s now make some research based on what the Assignment: Codes and Cryptographers activity suggests, starting from the Caesar cipher:
In cryptography, a Caesar cipher, also known as Caesar’s cipher, the shift cipher, Caesar’s code or Caesar shift, is one of the simplest and most widely known encryption techniques. It is a type of substitution cipher in which each letter in the plaintext is replaced by a letter some fixed number of positions down the alphabet. For example, with a left shift of 3, D would be replaced by A, E would become B, and so on. The method is named after Julius Caesar, who used it in his private correspondence.
The encryption step performed by a Caesar cipher is often incorporated as part of more complex schemes, such as the Vigenère cipher, and still has modern application in the ROT13 system. As with all single-alphabet substitution ciphers, the Caesar cipher is easily broken and in modern practice offers essentially no communications security.
Encryption of a letter x by a shift n can be described mathematically as:
Decryption is performed similarly:
For more informations on the Caesar cypher, consult this Wikipedia article.
Day 181: spent 5 hours building my app. A lot was learnt!
Day 182
Let’s continue our study with the Vigenère cipher.
The Vigenère cipher (French pronunciation: viʒnɛːʁ) is a method of encrypting alphabetic text by using a series of interwoven Caesar ciphers, based on the letters of a keyword. It employs a form of polyalphabetic substitution.
First described by Giovan Battista Bellaso in 1553, the cipher is easy to understand and implement, but it resisted all attempts to break it until 1863, three centuries later. This earned it the description le chiffre indéchiffrable (French for ‘the indecipherable cipher’). Many people have tried to implement encryption schemes that are essentially Vigenère ciphers. In 1863, Friedrich Kasiski was the first to publish a general method of deciphering Vigenère ciphers.
In the 19th century the scheme was misattributed to Blaise de Vigenère (1523–1596), and so acquired its present name.
The first well-documented description of a polyalphabetic cipher was by Leon Battista Alberti around 1467 and used a metal cipher disk to switch between cipher alphabets. Alberti’s system only switched alphabets after several words, and switches were indicated by writing the letter of the corresponding alphabet in the ciphertext. […]
In 1586 Blaise de Vigenère published a type of polyalphabetic cipher called an autokey cipher – because its key is based on the original plaintext – before the court of Henry III of France. The cipher now known as the Vigenère cipher, however, is that originally described by Giovan Battista Bellaso in his 1553 book “La cifra del Sig. Giovan Battista Bellaso”. Bellaso’s scheme meant the pattern of substitutions could be easily changed, simply by selecting a new key. Keys were typically single words or short phrases, known to both parties in advance, or transmitted “out of band” along with the message. Bellaso’s method thus required strong security for only the key. As it is relatively easy to secure a short key phrase, such as by a previous private conversation, Bellaso’s system was considerably more secure.
But how does it work in practice?
In a Caesar cipher, each letter of the alphabet is shifted along some number of places. For example, in a Caesar cipher of shift 3, A would become D, B would become E, Y would become B and so on. The Vigenère cipher has several Caesar ciphers in sequence with different shift values.
To encrypt, a table of alphabets can be used, termed a tabula recta, Vigenère square or Vigenère table. It has the alphabet written out 26 times in different rows, each alphabet shifted cyclically to the left compared to the previous alphabet, corresponding to the 26 possible Caesar ciphers. At different points in the encryption process, the cipher uses a different alphabet from one of the rows. The alphabet used at each point depends on a repeating keyword.
So, encryption is done with the following formula:

…and, conversely, decryption works like this:

Enigma machine
The Enigma machine is an encryption device developed and used in the early- to mid-20th century to protect commercial, diplomatic and military communication. It was employed extensively by Nazi Germany during World War II, in all branches of the German military.

Enigma has an electromechanical rotor mechanism that scrambles the 26 letters of the alphabet. In typical use, one person enters text on the Enigma’s keyboard and another person writes down which of 26 lights above the keyboard lights up at each key press. If plain text is entered, the lit-up letters are the encoded ciphertext. Entering ciphertext transforms it back into readable plaintext. The rotor mechanism changes the electrical connections between the keys and the lights with each keypress. The security of the system depends on Enigma machine settings that were changed daily, based on secret key lists distributed in advance, and on other settings that change for each message. The receiving station has to know and use the exact settings employed by the transmitting station to successfully decrypt a message.
As used in practice, the Enigma encryption proved vulnerable to cryptanalytic attacks by Germany’s adversaries, at first Polish and French intelligence and, later, a massive effort mounted by the United Kingdom at Bletchley Park as part of the Ultra program. While Germany introduced a series of improvements to Enigma, and these hampered decryption efforts to varying degrees, they did not ultimately prevent Britain and its allies from exploiting Enigma-encoded messages as a major source of intelligence during the war. Many commentators say the flow of communications intelligence from Ultra’s decryption of Enigma, Lorenz and other ciphers shortened the war significantly and may even have altered its outcome.
Navajo code talking
A code talker was a person employed by the military during wartime to utilise a little-known language as a means of secret communication. The term is now usually associated with United States service members during the world wars who used their knowledge of Native American languages as a basis to transmit coded messages. In particular, there were approximately 400 to 500 Native Americans in the United States Marine Corps whose primary job was to transmit secret tactical messages. Code talkers transmitted messages over military telephone or radio communications nets using formally or informally developed codes built upon their native languages. The code talkers improved the speed of encryption and decryption of communications in front line operations during World War II.
AES
The Advanced Encryption Standard (AES), also known by its original name Rijndael (Dutch pronunciation: ˈrɛindaːl), is a specification for the encryption of electronic data established by the U.S. National Institute of Standards and Technology (NIST) in 2001.
AES is a subset of the Rijndael block cipher developed by two Belgian cryptographers, Vincent Rijmen and Joan Daemen, who submitted a proposal to NIST during the AES selection process. Rijndael is a family of ciphers with different key and block sizes.
For AES, NIST selected three members of the Rijndael family, each with a block size of 128 bits, but three different key lengths: 128, 192 and 256 bits.
AES has been adopted by the U.S. government and is now used worldwide. It supersedes the Data Encryption Standard (DES), which was published in 1977. The algorithm described by AES is a symmetric-key algorithm, meaning the same key is used for both encrypting and decrypting the data.
For more info, quite complex, visit this page.
Cryptographers
Charles Babbage
Charles Babbage (/ˈbæbɪdʒ/; 26 December 1791 – 18 October 1871) was an English polymath. A mathematician, philosopher, inventor and mechanical engineer, Babbage originated the concept of a digital programmable computer.
Considered by some to be a “father of the computer”, Babbage is credited with inventing the first mechanical computer that eventually led to more complex electronic designs, though all the essential ideas of modern computers are to be found in Babbage’s analytical engine. His varied work in other fields has led him to be described as “pre-eminent” among the many polymaths of his century.
Cryptography
Babbage achieved notable results in cryptography, though this was still not known a century after his death. Letter frequency was category 18 of Babbage’s tabulation project.
As early as 1845, Babbage had solved a cipher that had been posed as a challenge by his nephew Henry Hollier, and in the process, he made a discovery about ciphers that were based on Vigenère tables. Specifically, he realised that enciphering plain text with a keyword rendered the cipher text subject to modular arithmetic. During the Crimean War of the 1850s, Babbage broke Vigenère’s autokey cipher as well as the much weaker cipher that is called Vigenère cipher today. His discovery was kept a military secret, and was not published.
Computing pioneer
Babbage’s machines were among the first mechanical computers. Babbage directed the building of some steam-powered machines that achieved some modest success, suggesting that calculations could be mechanised.
While Babbage’s machines were mechanical and unwieldy, their basic architecture was similar to a modern computer. The data and program memory were separated, operation was instruction-based, the control unit could make conditional jumps, and the machine had a separate I/O unit.
Difference engine
Babbage began in 1822 with what he called the difference engine, made to compute values of polynomial functions. It was created to calculate a series of values automatically. By using the method of finite differences, it was possible to avoid the need for multiplication and division.
Analytical Engine
After the attempt at making the first difference engine fell through, Babbage worked to design a more complex machine called the Analytical Engine. The Analytical Engine marks the transition from mechanised arithmetic to fully-fledged general purpose computation. It is largely on it that Babbage’s standing as computer pioneer rests.
The major innovation was that the Analytical Engine was to be programmed using punched cards: the Engine was intended to use loops of Jacquard’s punched cards to control a mechanical calculator, which could use as input the results of preceding computations. The machine was also intended to employ several features subsequently used in modern computers, including sequential control, branching and looping. It would have been the first mechanical device to be, in principle, Turing-complete. The Engine was not a single physical machine, but rather a succession of designs that Babbage tinkered with until his death in 1871.
Day 183
I started with more than one our of building my app so I will not have too much time to study today. Let’s see where I can get.
Alan Turing
Oh my goodness! Read this! Amazing to say the least!
Claude Shannon
Great article here as well.
The student’s guide goes at length explaining what was presented in the teacher’s guide. Here are some key picks:
- Encoding and decoding information, known as cryptography, is a critical technique for security in the digital age.
- Symmetric encryption relies on shared keys — known to both sender and receiver. Shared-key encryptions are vulnerable to attacks that attempt to intercept or guess the key.
- The most secure encryption techniques are asymmetric. Asymmetric encryption, or public-key cryptography, relies on two keys, one of which the receiver uses and never shares. As long as the receiver keeps their key private and secure, this encryption technique is much harder to attack computationally.
- Public key encryption’s algorithm is based on the properties of very large prime numbers. The most secure asymmetric encryption techniques require centuries of computing effort to break.
- The primary weakness in public key encryption is the matter of trust. How can you be sure that the public key you use to send data to your bank was actually created by the bank—and not by an attacker posing as the bank?
- Certificate Authorities come to the rescue: public-key encryption relies on certificate authorities to establish a chain of trust so that users can verify the owner of a public key. A certificate authority verifies the identity of a company or other entity and provides a signed certificate that’s both unique and impossible to fake.
- To ensure the security of user data, iOS uses AES cryptography all the way down to the hardware level.
- On iOS, Data protection secures our apps’ files and prevents unauthorised access to them. Data protection is enabled automatically when the user sets an active passcode for the device. An app reads and writes files normally, but the system encrypts and decrypts the content behind the scenes. The encryption and decryption processes are automatic and hardware-accelerated.
Day 184
Unit 4.2 : Explore Task Performance
This looks like a task to be completed over 8 hours. Not sure this is very apt to the way I am studying all this but I will see. Again, not really sure to have understood what a computation artifact is, it sounds so fantasy!
After reading the assignment it seems that this is targeting college students so let’s move on.
Unit 4.3 : ChatBot
The goals of this lesson are to be able to understand and explain the data source pattern, their relationship between its objects and other objects within an app and to implement an object that communicates data to/from the UI.
Key vocabulary in this unit
Cell: a cell in a table view displays a single item from the data collection. For example, if a table view is displaying a movie schedule, one cell might show a thumbnail image of the movie poster, the movie title, the average viewer rating and its next available date and time.
Data source: a table view uses a data source to find out what information it should display and how it should display it.
Table view: a table view user interface element shows a vertically scrolling list of items.
We should now open the ChatBot project in Xcode and explore it.
Look at the organisation of the files. By now this is something that I do myself but I learned how to do that all on my own. I really wish the previous courses had shown me that.
Go to ConversationDataSource.swift and change the messageCount constant to be a var and make it a computed property that returns messages.count.
Now add that new property at the top, an array of Messages called messages, containing a single element called openingLine.
Add code to the add(question) and add(answer) methods:
func add(question: String) {
    print("Asked to add question: \(question)")
    messageCount += 1

    let message = Message(date: Date(), text: question, type: .question)
    messages.append(message)
}

/// Add a new answer to the conversation
func add(answer: String) {
    print("Asked to add answer: \(answer)")
    messageCount += 1

    let message = Message(date: Date(), text: answer, type: .answer)
    messages.append(message)
}
At the end of messageAt(index:) replace the return statement with return messages[index].
Day 185
Unit 4.4 : Actions and Outlets
After the big disappointment that was the last chapter (a pity as the introduction was really good), let’s hope this one gives something more.
Key vocabulary for this unit
Action: an action connects a method in source code and a control in Interface Builder, enabling the code to run when a user interacts with the app’s controls. For example, a certain method may be associated with a button tap or a switch update.
CGFloat: like a Double, a CGFloat is a type of number that can have a decimal point, such as 3.5, 7.0, or -5.5. While both Doubles and CGFloats are decimal numbers, they aren’t implemented in exactly the same way, and some types (like UIColor) will only interact with CGFloat numbers.
Enabled / Disabled: when a button or control is enabled, it’s available for interaction. The user can tap, slide, or otherwise engage with the control and cause its associated code to run. When a button or control is disabled, the user can still see the user interface element, but touching or otherwise trying to activate the control will have no effect on the app. A disabled control will usually have a slightly dimmed appearance.
Outlet: an outlet connects a variable in source code to an object in the storyboard allowing the code to access those objects and get information or make changes when the app is running.
Slider: a slider control in our app’s UI allows a user to select a single value between a minimum and maximum number.
Switch (UI): a switch control in our app’s UI acts like an on/off button. You can see examples in the Settings app for options such as Airplane Mode and Bluetooth.
Activity
In this chapter we will build a colour-picker app, and learn how to connect our app’s interface to our Swift code. That code will then change the way the app displays and we will also learn how to use switches, sliders and buttons in our UI.
Part 1 – Creating Outlets
Create a new Single View app in Xcode and call it “ColorMix”.
Open the main.storyboard file. Drag a UIView to the view controller’s scene (which is a storyboard representation of a screen of our app). Align it to the top center of the screen. Go to Editor > Canvas > Bounds rectangles to see an outline of everything on the scene.
Open the Assistant Editor or, if you use Xcode 11, open a new editor with the View Controller inside. I am learning the new shortcuts and it is a pain for the brain … that is, it’s good! Create an outlet from the view to the view controller’s file and call it colorView.
Now add this line to viewDidLoad(): colorView.backgroundColor = .black.
Part 2 – Creating Actions
Some of this is starting to sound awfully familiar to what was already proposed in the other book … why Apple? Oh why can’t you make new and more interesting material? Something that is really useful?
Anyway, open the Storyboard and add a switch to the center of the scene. Now select it and, in the Attributes Inspector, set its Value property to Off.
Open the assistant editor and create an action called switchChanged, with the type set to UISwitch. Add this code inside the action:
if sender.isOn {
    colorView.backgroundColor = .red
} else {
    colorView.backgroundColor = .black
}
Part 3 – Multiple Actions and Outlets
At this rhythm we are going to develop something useful in 2035!
The genius who proofread this book didn’t check that the list numbering restart in this part. So part 1 had bullets from 1 to 4, part 2 from 1 to 9 and part 3 from … 10?! I mean …
Whatever … go to the storyboard and duplicate the switch twice, making them align one under the other. Using the assistant editor or a new editor, add outlets for each switch, calling them redSwitch, greenSwitch and blueSwitch.
Add this method to the ViewController class:
func updateColor() {
    var red: CGFloat = 0
    var green: CGFloat = 0
    var blue: CGFloat = 0

    if redSwitch.isOn {
        red = 1
    }
    if greenSwitch.isOn {
        green = 1
    }
    if blueSwitch.isOn {
        blue = 1
    }

    let color = UIColor(red: red, green: green, blue: blue, alpha: 1)
    colorView.backgroundColor = color
}
Remove all the code which was setting the colours and replace it with a call to this updateColor() method.
Day 186
Part 4 – Sliders
Shift-drag to draw a selection around the three sliders and move them to the left of the screen. Then, move them apart a bit on the vertical axis.
Drag a slider from the Object Library onto the canvas and align it vertically with the top switch and horizontally inside of the scene. Keep Option pressed and create a copy of it twice, aligning the copies to the other switches.
Select all the sliders and, in the Attributes Inspector, set their Value to 1.
Create three outlets, one for each of the sliders, in the View Controller file, calling them coherently with their colour.
Create a new action, sliderChanged, from the top slider into the View Controller file, then drag from the filled dot in the gutter to the other two sliders. Inside this action call the updateColor() method. Now change it so that it updates the colour of the CGFloat value of the slider.
Now run the app to check that everything is working as it should. I have just downloaded the Xcode 11 GM which includes the new iPhones simulators so I expect to wait a few ages before being able to run this!
Look at this nice peach colour:
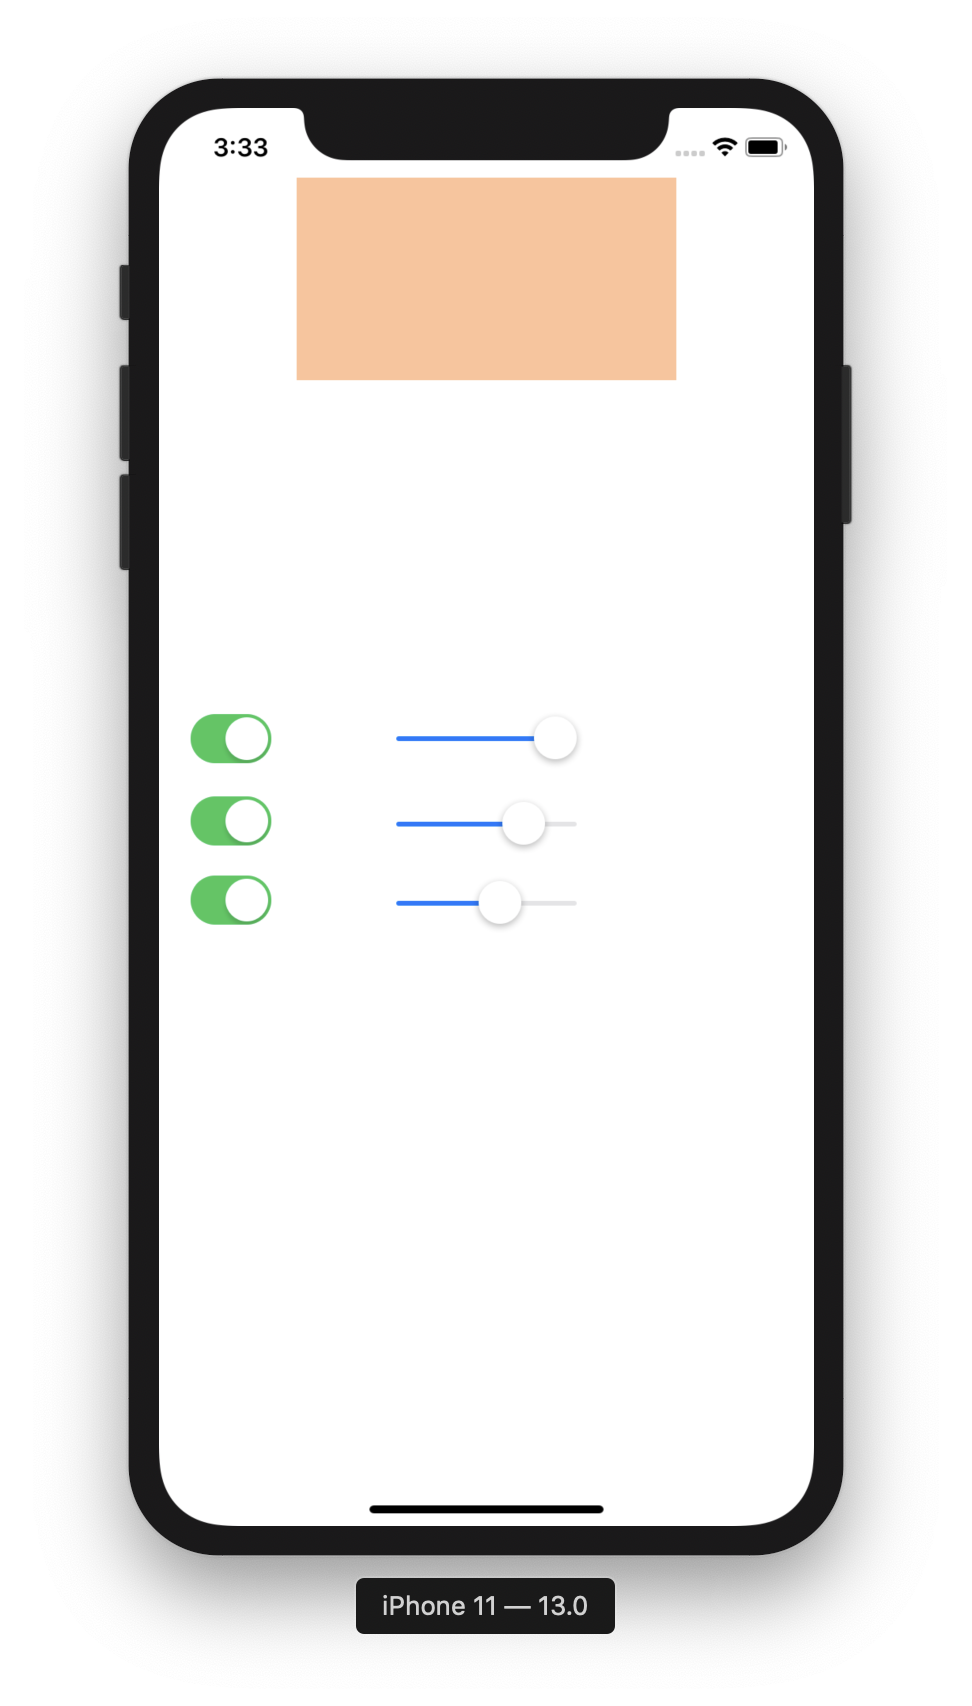
Part 5 – Reset Button
Add a button to the bottom center of the screen and change its title to be “Reset”. Add an action from that button to the View Controller file and fill it with this code:
@IBAction func reset(_ sender: UIButton) {
    redSlider.value = 1
    greenSlider.value = 1
    blueSlider.value = 1

    redSwitch.isOn = false
    greenSwitch.isOn = false
    blueSwitch.isOn = false

	updateColor()
}
Part 6 – Polishing the Interface
Tinting the Switches
We choose a tint colour to change the key colour of UI elements. Every view type uses this tint colour in its own way. For example, a red tint on a button control makes its text red, and a green tint on a slider makes the active part of its horizontal track green.
A switch can have two custom colours: the onTintColor and the thumbTintColor.
Select each one of the switches and, in the Attributes Inspector, change the colour of the On Tint property to match the one of the colour they will influence. In this new Xcode (and iOS 13 accordingly), there are new System-colours which I guess will adapt very well to Dark Mode.
Tinting the Sliders
Sliders have three tinting options: the colour of the track on the low and high sides of the thumb and on the thumb itself. Change the minTrackTintColor to be coherent with the right colour. The other two properties are called maxTrackTintColor and thumbTintColor.
Adding a Border
Add the following lines to viewDidLoad():
colorView.layer.borderWidth = 5
colorView.layer.cornerRadius = 20
colorView.layer.borderColor = UIColor.black.cgColor
This creates a five-point wide black coloured border, with rounded corner.
Disabling Sliders
Add this new method to the file:
func updateControls() {
    redSlider.isEnabled = redSwitch.isOn
    greenSlider.isEnabled = greenSwitch.isOn
    blueSlider.isEnabled = blueSwitch.isOn
}
Call this from the switchChanged() action, from viewDidLoad() and from reset(_:).
Day 187
4.5 Adaptive User Interfaces
This unit should teach a lot about Auto Layout which, as we know, makes simple things hard and hard things simple!
In the app I am currently developing I tried to add a separator view to a custom made cell so that I could have that cell grow in size when needed. This just didn’t work as some cells started to behave strangely, the automatically generated constraint for cell’s height was broken and so on and so forth …
I abandoned that part of the project by now because it is not at all vital for the progression of the app.
Key vocabulary
Asset catalog: the asset catalog in Xcode is the best place to keep all the images used in our app. ITs file extension is .xcassets, and we can access it from the project navigator.
Auto Layout: in Xcode, we use Auto Layout to build adaptive layouts, so our UI elements keep certain relationships to each other’s positions, no matter the screen’s size or orientation. For example, we can add a rule that a button must always be a certain distance above an image view, and another rule that the image view must always be entered at the bottom of the screen. By defining these rules in Auto Layout, the two UI elements will adhere to our rules whether the screen is large or small, in portrait or in landscape orientation.
Constraint: a constraint is a rule in Auto Layout that defines how views should be laid out or sized.
Stack View: we use a stack view to set up UI elements in a column from top to bottom or in a row from left to right.
In this unit we will build a quiz about chemical elements and an animal sound game for young children (the second of which I recall we already built in the original book).
We will learn how to build a user interface that adapts to different screen sizes, how to create and display images in code and how to reuse provided code to play sounds.
PART 1 – SimpleCenter
Now, create a new Xcode project using the Single View Application template, name it “SimpleCenter” and save it somewhere sensible. In Main.storyboard, set the View as option to iPhone 4s (the smallest device possible).
Not adapting
Add a UILabel to the canvas and use the layout guides to center it horizontally and vertically. Change the text to be “Hello!”. Notice how changing orientation or device doesn’t keep the label in the same position.
But why so? The size and location of every view in Interface Builder is defined as a rectangle, known as its frame. A view’s frame describes its position and size as a rectangle that’s a certain distance from the top and a certain distance from the left.
Making Views Adapt with Auto Layout
In the storyboard, with the label selected, click on the Align button in the bottom right and set the label to be aligned “Horizontally in Container” and “Vertically in Container”. Click “Add 2 Constraints”.
PART 2 – ElementQuiz
Create yet another Xcode project called “ElementQuiz”.
Drag an Image View, a Label and two Buttons from the Object Library and position them stacked vertically one below the other on the canvas.
Image View Size
When we use Auto Layout with an image view, by default the view will adjust its size to fit the size of the image. In this case, though, set the width and height of the image view to 140 in the Size Inspector and also by adding the necessary constraints. Ignore the warnings by now.
Configuring Label and Buttons
Select the Label and, in the Attributes Inspector, set the font style to bold and its size to 24, before changing its text to “Answer Label”.
Change the title of the top button to “Show Answer” and that of the bottom button to “Next Element”.
Adding a Stack View
Select the four views and click Embed > Stack View or choose the menu Editor > Embed > Stack View.
Centring the Stack View
Use the previously learned technique to center the stack view in the canvas.
Configuring the Stack View
Select the Stack View and, in the Attributes Inspector, set its Alignment to Center and its Spacing to 12.
Adding Images
Using the provided resources for this course, drag the images from the Element Images folder to the asset catalog in Xcode.
Adding Outlets and Actions
Create an outlet named imageView for the image view and one named answerLabel for the label view, then create a showAnswer() action for the first button and a gotoNextElement() action for the second button.
Adding Code
Add these two properties to ViewController.swift:
let elementList = ["Carbon", "Gold", "Chlorine", "Sodium"]
var currentElementIndex = 0
Updating the Element
Create a new updateElement method. Inside it, set the answer label’s text to "?", then create a constant elementName equal to the currentElementIndex index of the elementList array, then another constant image equal to an instance of UIImage(named:) with elementName passed in as its only argument. Finally set the image property of the imageView to image.
Now call updateElement() inside viewDidLoad().
Showing the Answer
Insert this line into the showAnswer() method:
answerLabel.text = elementList[currentElementIndex]
Navigating Between Elements
In the gotoNextElement() method increase the currentElementIndex by one and call updateElement().
Now, if we build and run and increase a few times the app will crash because we have reached the end of the array.
A Crash
Update the gotoNextElement() method by inserting this code after the first line.
if currentElementIndex >= elementList.count {
    currentElementIndex = 0
}
PART 3 – AnimalSounds
Animal Sounds App
Repeat the drill for creating a new app, just calling it “AnimalSounds”.
Create a Row of Buttons
Drag a button onto the canvas, set its title to 🐱 and the font size to 72. Duplicate the button twice, setting its new title to 🐶 and 🐮, then embed all three of them in a Stack View, setting its Alignment to Center and its Spacing to 18.
Create the Rest of the Interface
Add a label above the stack view with “Animal Sounds” as text at 24 points in size, then another one below the stack with “Tap an animal” as text.
Embed all this in a Stack View, set its Alignment to Center and its Spacing to 10.
Adding Constraints
Center the outer stack view horizontally and vertically into the container.
Writing the code
Create an animalSoundLabel outlet for the top label and an action for each of the animal buttons. In each of the actions, sets the text of the animal sound label to something sensible, like “Meow!”
Playing Sounds
Go to the class Resources > AnimalSounds folder and drag its content into the project… Now … the image on the book says “Create folder references” but normally I never use this … I really wonder why this is done so. Just be sure that the proper target is selected.
In ViewController.swift create a constant like this:
let meowSound = SimpleSound(named: "meow")
…then repeat the drill for the other two sounds, using “woof” and “moo” as names.
Then, in the button actions call the .play() method on each of those constants.
Day 188
Unit 4.6 – Enumerations and Switch
Key vocabulary
Case: in an enum, the case keyword declares a name for one of the enum’s options. In a switch, the case keyword introduces a pattern to try to match a value against.
Default (keyword): the default keyword labels the last, catch-all option in a switch statement. If none of the other, more-specific cases match the input, the code in this block will run.
Enum: the enum keyword declares a type made up of a group of related choices. An instance of an enum will be exactly one of the enum’s choices. The keyword enum comes from the word “enumeration”, which means “listing distinct things one by one”.
Exhaustive: something that is exhaustive is comprehensive and all-inclusive. An exhaustive list contains every possibility.
Switch (keyword): the switch keyword chooses between different courses of action based on some value’s characteristics. The options for the values are written in case statements. Once the switch statement finds the first match between the value and a case, the block of code next to the case statement is executed. If cases don’t match, the default statement’s code is executed. Once one of the blocks has executed, the program continues running the next code after the end of the entire switch statement.
In this lesson we will build a program to organise lunch provisions at the school cafeteria (supposing we are at school!). We will learn how to define and use enumerations, or enums and when it makes sense to use one. We will possibly realise how enumerations make our code easier to write and understand.
This lesson is focused on learning about types that can have a limited number of values. We should now open the “EnumsAndSwitch.playground” file and complete the activities therein.
A very interesting thing to learn here is that we can add properties and methods to our enum, like this:
enum LunchChoice {
    case pasta, burger, soup

    var emoji: String {
        switch self {
        case .pasta:
            return "🍝"
        case .burger:
            return "🍔"
        case .soup:
            return "🍲"
        }
    }
}
let lunch = LunchChoice.pasta
lunch.emoji
Another good example is to look at the value of cards in the game of Bridge:
enum Suit {
    case spades, hearts, diamonds, clubs

    var rank: Int {
        switch self {
        case .spades: return 4
        case .hearts: return 3
        case .diamonds: return 2
        case .clubs: return 1
        }
    }

    func beats(_ otherSuit: Suit) -> Bool {
        return self.rank > otherSuit.rank
    }
}
Once we have an instance of said enumeration, we can then call the beats() method on it and have it return a true or false statement. Brilliant!
Here is a summary of what was learnt in the playground:
- Enumerations are used when we want to represent one of a group of related values. Each possible value is called a
case. - When we create an
enum, we are making a new type. Instances of that type can only have values matching one of the specified cases. - Using
enums can make our code easier to read and write, because it’s always clear what the possible values are and what they mean. - We can compare
enumvalues with==, or use aswitchstatement to test for all possible values. - Like
ifstatements,switchstatements are another way of making decisions in your code. Switch statements work very well with enums, but can be used to switch on any type of value. - Because
switchstatements must be exhaustive, we must handle every possible value. To handle any values that haven’t been specified, we can use a default case. - Like with structs, we can add calculated properties and methods to enums.
The exercises at the end of the unit were fine but nothing really worthy of inclusion in this article. I hope to be finishing this unit tomorrow or the day after that.
Day 188
Unit 4.7 Final Project
In this unit we will be able to choose whether we want to build a Rock, Paper, Scissors game or a Meme Maker app.
Let’s start from the Rock, Paper, Scissors one.
Create a new project based on the Single View App template and name it RPS. Create a new Swift file called Sign.swift. Inside, create a new enum called Sign with three cases (rock, paper, scissors) and add a computed property that returns the proper emoji for the case.
In my short period as an apprentice I have always heard them being called computed properties but, in this book, we have them baptised calculated properties. Are they the same?
Game state
Anyway, the course goes on explaining the possible game states: start, win, lose and draw. Let’s create another Swift file with a new enumeration that will take care of this.
We should now add an instance method to the Sign enumeration so that we can compare two Sign instances to give a GameState. This is my first try so I am not yet sure it will all work.
func play(against sign: Sign) -> GameState {
    switch self {
    case .rock:
        switch sign {
        case .paper: return .lose
        case .rock: return .draw
        case .scissors: return .win
        }
    case .scissors:
        switch sign {
        case .paper: return .win
        case .rock: return .lose
        case .scissors: return .draw
        }
    case .paper:
        switch sign {
        case .paper: return .draw
        case .rock: return .win
        case .scissors: return .lose
        }
    }
}
Random sign
We need to generate a random Sign to act as the app’s move. Add this method to the Sign file.
func randomSign() -> Sign {
    let sign = Int.random(in: 0...2)
    if sign == 0 {
        return .rock
    } else if sign == 1 {
        return .paper
    } else {
        return .scissors
    }
}
Building the UI
Proceed with creating the UI so that it looks like this:
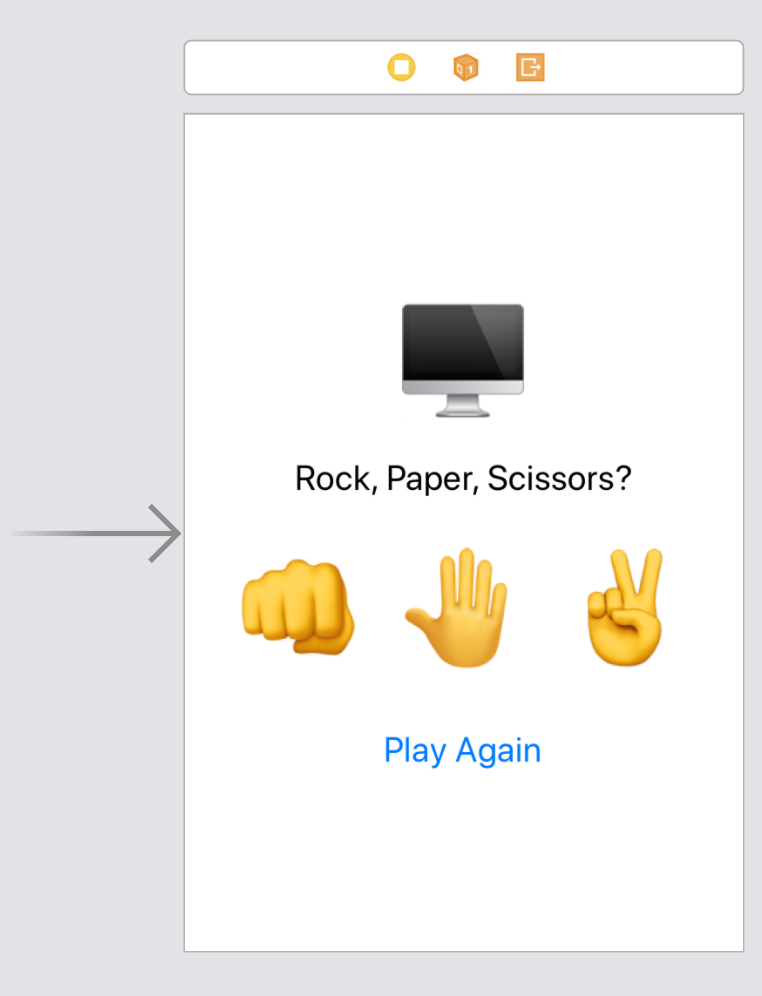
Create an outlet for each of the elements of the UI (stack views excluded) and an action for the four buttons.
Putting it together
Let’s update the user interface. When the game moves from one GameState to another, we have to update the UI. We need a method on the ViewController class to update the UI based on a GameState parameter.
This is the first draft of the method (it will change!)
func updateUI(for gameState: GameState) {
    gameStatus.text = gameState.message
    view.backgroundColor = gameState.color

    switch gameState {
    case .start:
        appSign.text = "🖥"
        playButton.isHidden = true

        let playerButtons = [rockButton, paperButton, scissorsButton]
        playerButtons.forEach { $0?.isHidden = false }
    default: break
    }
}
Call this method from viewDidLoad() and from the playAgainTapped() methods in the form updateUI(for: .start).
Handle player button taps
Now there is an error because if I try, in the view controller, to call the randomSign() method on a new constant I get this error: “Instance member ‘randomSign’ cannot be used on type ‘Sign’; did you mean to use a value of this type instead?”. By now I solved it by putting static in front of the randomSign() method but I am pretty sure something is missing here. Most probably the tutorial, which leaves the learner quite alone here (as it should, don’t get me wrong!), doesn’t specify that the random sign generator method should go in the view controller instead of in the Sign type. Let’s see if I can get this to work anyway.
Here is the new play(with:) method:
func play(with playerSign: Sign) -> GameState {
    let appSign = Sign.randomSign()
    appSignLabel.text = appSign.emoji

    let untappedButtons = [rockButton, paperButton, scissorsButton].filter { $0?.titleLabel?.text != playerSign.emoji }

    untappedButtons.forEach { $0?.isHidden = true }

    let gameState = playerSign.play(against: appSign)
    return gameState
}
I have used the .forEach and .filter closures to avoid repeating code. And here is the revised updateUI(for:) method:
func updateUI(for gameState: GameState) {
    gameStatus.text = gameState.message
    view.backgroundColor = gameState.color

    let playerButtons = [rockButton, paperButton, scissorsButton]

    switch gameState {
    case .start:
        appSignLabel.text = "🖥"
        playButton.isHidden = true

        playerButtons.forEach {
            $0?.isHidden = false
            $0?.isEnabled = true
        }
    case .draw, .lose, .win:
        playButton.isHidden = false
        playerButtons.forEach { $0?.isEnabled = false }
    }
}
The app works perfectly!
Now, on with the next one, the Meme generator. I had already done something like this in one of the Challenges for the 100 Days of Swift but I am curious to see how this goes and if I will remember something of it!
Day 189
Meme Maker
Create a new iOS app based on the Single View App template and call it MemeMaker.
BUILDING THE UI
Add elements to the storyboard, from top to bottom: a segmented control, a label titled “Top Caption”, an image view, another label titled “Bottom Caption” and another segmented control. Segmented controls are used to offer a choice between a limited number of options. When the user taps one of the segments, the Value Changed control event is sent.
Drag an image into the Asset catalog and check that the content mode is set to Aspect Fit. Add a constraint to set the image view’s height at 250 and ignore the errors by now. Now embed all of the UI elements into a stack view and center it vertically and horizontally in the container.
Add outlets for the segmented controls and for the labels and then a single action for both segmented controls.
DEFINING CUSTOM TYPES
Create a new Swift file called “CaptionChoice.swift”. Define a CaptionOption struct inside it with two String properties: emoji and caption.
PUTTING IT TOGETHER
Creating the choices
Create two arrays of Strings called topChoices and bottomChoices filled with CaptionOption choices like this:
var topChoices: [CaptionOption] = [
    CaptionOption(emoji: "🕶", caption: "You know what's cool?"),
    CaptionOption(emoji: "💥", caption: "You know what makes me mad?"),
    CaptionOption(emoji: "💕", caption: "You know what I love?")
]
var bottomChoices = [
    CaptionOption(emoji: "🐱", caption: "Cats wearing hats"),
    CaptionOption(emoji: "🐶", caption: "Dogs carrying logs"),
    CaptionOption(emoji: "🙉", caption: "Monkeys being funky")
]
Configuring the segmented controls
Inside viewDidLoad(), remove all the segments from the top segmented control and use a loop to insert a new one for each element of the topChoices array, then set the first segment to be the selected one. Now repeat the same configuration operation for the bottom segmented control.
Configuring the caption labels
Create a method to manage the text in the labels, like this one:
func setCorrectCaption() {
    switch topCaptionSegmentedControl.selectedSegmentIndex {
    case 0:
        topCaptionLabel.text = topChoices[0].caption
    case 1:
        topCaptionLabel.text = topChoices[1].caption
    default:
        topCaptionLabel.text = topChoices[2].caption
    }

    switch bottomCaptionSegmentedControl.selectedSegmentIndex {
    case 0:
        bottomCaptionLabel.text = bottomChoices[0].caption
    case 1:
        bottomCaptionLabel.text = bottomChoices[1].caption
    default:
        bottomCaptionLabel.text = bottomChoices[2].caption
    }
}
Call it from viewDidLoad() and from the action method connected to the segmented controls.
Done! It works!
CS CONCEPT: CROWDSOURCING
Crowdsourcing is the effect of combining the power of many users and many connected devices with the vast quantities of data they generate every day.
Collaborating on Code
An open source project is one which anyone can download, modify and run. The owner(s) of the project is(are) responsible for guiding their contributions and approving any/all changes.
Open source software provides the foundation for much of the Internet. The Swift programming language and its compiler are also open source projects.
Solving Problems
By connecting millions of digital devices, the Internet effectively forms the world’s most powerful computer. To solve certain tough problems a central server can farm out computing jobs to anyone willing to donate their computing power.
Sometimes the biggest challenge is finding enough data. The Stanford Heart Study is using crowdsourcing via the Apple Watch to work around this issue.
Days 190-193
Had the worst flu I’ve ever experienced in the last 10 years to say the least so I could not reach for the computer and, instead, fell into the trap and started the 100 Days of SwiftUI once more by our almighty lord Paul Hudson!! You can find more about that here.
I’ve completed the first 5 days in 4, as much as the energy I had was allowing me to do! I’ll continue the book (which is almost over) in the next days of course and, this time, I will not fall into the trap of dedicating hours and hours per day to solve the challenges… I won’t have that time now! I’ll try them and then come back at them the day after! Maximum 1.5h per day! That’s how much I can give now!
Day 194
Completed Day 6, the first part of the review on closures and then took 30 minutes on the first test of Day 7, titled “Using closures as parameters when they accept parameters”. It was very confusing because from one side you get more flexibility (you can have a different closure behaviour at each call) from the other you have to specify the parameter of the closure before-hand in the function’s declaration, which looks very dumb and limiting to me.
I will stop here for today, I am still too tired …
Day 195
Completed Day 7 and 8 of 100DaysofSwiftUI.
Day 196
Completed Day 9 of 100DaysOfSwiftUI, no time to do anything else …
Day 197
Completed Day 10 of 100DaysOfSwiftUI, on classes. Once more came home very late and had only so much time to practice Swift.
Day 198
Completed Day 11 of 100DaysOfSwiftUI on protocols and extensions!
Then I read and studied the article on RelativeDateFormatter, a new class introduced in the iOS 13 SDK.
Now I have some minutes to try and finish this book!!!
The final chapter of this book, the 4.8 Final Task, ask the student to create an app from scratch. As I am working on my own app in the free time I have I will consider this chapter done as it is already much more complex than anything created until now in this book.
So, yes, the book is finished now!
I still have 30 minutes of so of time to dedicate to my app.
Starting with tomorrow I will study some SwiftUI to get ready for next week’s Pragma conference in Bologna!
Come say hi if you are there!
If you like what I’m doing here please consider liking this article and sharing it with some of your peers. If you are feeling like being really awesome, please consider making a small donation to support my studies and my writing (please appreciate that I am not using advertisement on my articles).
If you are interested in my music engraving and my publications don’t forget visit my Facebook page and the pages where I publish my scores (Gumroad, SheetMusicPlus, ScoreExchange and on Apple Books).
You can also support me by buying Paul Hudson’s books from this Affiliate Link.
Anyways, thank you so much for reading!
Till the next one!
