Good morning from Day 63 of my Swift Learning path, as today is Friday (again, sadly), I will have very little time for basically anything so let’s just keep moving and do as much as possible before I have to rush out for work.
Today I tackle Day 59 of Paul Hudson’s 100 Days of Swift initiative where we need to consolidate our learning with writing a full app from scratch once more.
First let’s review what was learned in projects 13 to 15.
What I learned
Project 13 was all about Core Image filters. I have to say I am not impressed with what I did but simply because I expected something nicer. The barebone is for sure impressive but I am looking forward to learning more about that.
Project 15 introduced Cora Animation. Impressive but without a proper explanation about how it works and why I found it rather disappointing. I’m sorry but I need to understand things to enjoy them, but that’s me.
Reading the list of techniques we worked with I feel a bit strange because I know that without looking back at the projects I would not be able to recreate or reuse them. They have not yet sunk in and I need to find a way to make them stick more quickly!
Key points
DispatchQueue.main.asyncAfter(deadline:). This code lets us “plan” the execution of a code block so that it can be run later on, according to the delay we want to add after the deadline. In the trailing closure that follows we need to use either[unowned self]or[weak self]in order not to create strong reference cycles. In this particular case we could avoid it but it is a good practice to use it.- In project 15 we learned that some functions can even accept more than a single closure, such as the
animate(withDuration:)one. As a reminder, focus is put on the importance of closure capturing, as forgetting it when it’s not needed is not a problem but doing so when it is needed will at least leak memory, if not something much worse (like?!). - Always in project 15 we met our first animations and the
transformproperty of image views. Here the focus is out on the use ofself.for capturing because we are in a closure, the fact that angles are expressed in radians instead of degrees (sigh…) and that theCGAffineTransform.identitymatrix is useful to reset the image to what it was before.
Challenge
Our challenge today is to make an app that shows facts about countries. The suggestions here is to use a table view to show a list of countries and another table view to show facts about it. I have some ideas in mind and I just know it is going to be a long one (at least for me).
Thanks to Rob Baldwin (again) I now have a .json file which contains most of what is needed to work with the app. It has names, codes, capital, region, population, time zone and so on. My idea would be to create the second table view with sections according to what needs to be loaded but I am not too sure on where to begin for that. Let’s make a plan and then we start with it.
Plan
- Set up the storyboard and the main working files
- Set up the table view and parse the JSON.
- Create a search bar to complete the main view controller
- Make an operative detail-view-controller
Action
- In the storyboard, erase the current view controller and replace it with a table-view controller, make it the initial view controller, embed it in a navigation controller and create a new table-view controller for our future detail view (for the idea I have envisioned I changed the content to Static, the style to Grouped and made 3 sections with one cell each by now and both a header and a footer, just to visualise).
- In ViewController.swift change conformance to
UITableViewControllerand, back in the storyboard, set it as well in the Identity Inspector of the new view controller. - Make a new Cocoa Touch Class that inherits from
UITableViewControllerand call it DetailTableViewController.swift. - In the storyboard make the new view controller inherit from our newly created DetailViewController class.
- Create a new Swift file called Country.swift and make a
structcalled Country inside that conforms toCodable. That’s it for the basic setup. - Set up the view controller and instantiate the detail view controller
- Complete the display of the detail view controller (survive if you can!)
Here we start with Day 64.
- Import the “data.json” file in the project (checking “Create groups” and “copy files if needed”).
- Create the
loadCountriesmethod to parse and load the data. As I want to use the juicy and spicy techniques learnt with GCD I will mark@objcthis method and proceed as follows: be sure that there is a JSON at the resource path indicated inside our main app’s bundle. Thanks to theguard letstatement we can print afatalError("Can't find JSON")message to the console in case we don’t find it. Really, we should always find it but, who knows… Next we should store the found data using thetry? Data(contentsOf:)buffer, throwing again a fatal error if we are unable to load the JSON. Last but not least we net to load the result of the decoding process into a constant via thetry? JSONDecoder().decode([Country].self, from: data)call (always with a fatal error in case we fail to decode the JSON). After this we can store this result in ourcountriesproperty and perform a selector on the main thread to reload the table view. This last step is really important because, without it, all the parsing will succeed but nothing will appear on the screen! - Call this method in
viewDidLoad()via theperformSelector(inBackground:)method. - Implement the table view data source methods:
numberOfRowsInSectionshouldreturn countries.countandcellForRowAtshould dequeue a cell, creating aCountryconstant (for abbreviation purposes, nothing more really), set it equal tocountries[indexPath.row]and then set thecell.textLabel?.text = country.namebefore returning the cell. - Before trying and running the app I needed to be sure that my Country.swift file had everything it needed. It ended up with no less than 24 properties, many of which arrays of custom types and many others also optional because not all the countries had all of them. There are even some abbreviations I didn’t understand but fine, I cannot be omniscient! Always inside that file the following new data types were created (they could have had their own file but, really, they are in use only there in this app so why?):
Currency,Language,TranslationandRegionalBloc. - At this point I felt like browsing through about 250 countries would have not been so comfortable for a user so I decided to stretch my knowledge and learn a new skill: implement a search bar. Many if not most table-view based apps use this feature but, surprisingly, the tutorial on the Apple Documentation is cryptic at best and the sample code provided is not really of much help to me (at least not at my level). I therefore resorted on this tutorial on the Ray Wenderlich website that seemed to teach exactly what I needed (also, the explanation was really good!).
- So, following the tutorial, I created a
filteredCountries = [Country]()and asearchController = UISearchController(searchResultsController: nil)properties. The first is a variable because we need to temporarily store the filtered countries in there while the second one is a constant. Setting the second property tonilmeans that we want to use our view-controller to manage and display the search results. - The setup for this search controller was pretty straightforward: in
viewDidLoad()I set the.searchResultsUpdaterproperty to beselfso that our main view controller is responsible for updating the search results (errors will spring up, just wait!); I set the.obscuresBackgroundDuringPresentationproperty tofalseas this is needed only when we use another view controller for showing the results; I set the search bar’s placeholder text to “Search countries…”; I set thenavigationItem.searchController = searchControllerso that the search bar will appear at the top of the screen when we pull down on the table-view and, finally, I set thedefinesPresentationContextto true. This last one is a Boolean value that indicates whether this view controller’s view is covered when the view controller or one of its descendants presents a view controller (you know, just in case!) - I then created an
extensionto ourViewControllerclass so that it conforms to theUISearchResultsUpdatingprotocol. Inside the extension we write the stub methodupdateSearchResults(for:)and leave it empty for now. - Just below our
loadCountriesmethod we write asearchBarIsEmpty() -> Boolmethod that will return true if the text is empty or nil in the search bar. - We then write a
filterContentForSearchText(_:)method that assigns the result of afilterclosure to thefilteredCountriesarray. The code for this is:
func filterContentForSearchText(_ searchText: String) {
    filteredCountries = countries.filter({ (country) -> Bool in
        return country.name.lowercased().contains(searchText.lowercased())
    })

    tableView.performSelector(onMainThread: #selector(UITableView.reloadData), with: nil, waitUntilDone: false)
}
- We then write an
isFiltering() -> Boolmethod which returns whether the search controller is active AND if the search bar is not empty! - With this in place we can go back to our extension and write
filterContentForSearchText(searchController.searchBar.text!)inside ourupdateSearchResultsmethod. - Now for the finishing touches: inside
numberOfRowsInSectionwe add a control flow statement so that if we are filtering we are returning the filtered countries array’s count instead of the ordinary one and then, incellForRowAtwe perform a very similar change so that the proper array is chosen when we are loading the cell’s content.
From here we go on with Day65 of my Learning Swift path.
I took yesterday off because I spend all Sunday with a colleague in Torino and I could not find the strength to get anywhere near the computer afterwards.
- Now it’s time to fill in the DetailViewController.swift. First things first, I put the
detailCountry: Country?variable property at the top of the file. - Inside
viewDidLoadI setnavigationItem.largeTitleDisplayMode = .neverso that when we see the name of the country it doesn’t get cut if it is too long (I found some countries to be too long anyway and no apparent way to set the title on two lines). - After a good two hours of struggle and crashes while trying to create sections and then rows in sections I surrendered and returned
16to thenumberOfRowsInSectionmethod. Why 16 instead of 24, being the properties will become clear in a short while. - Now for the controversial part. I created a huge
cellForRowAtmethod because I switched all the single cases. I am pretty sure this could have been done better but my knowledge stopped here and all my researches didn’t really help. So, I will divide into sub-steps all the single cases, for clarity. First I dequeued a reusable cell and set its.textLabel?.numberOfLines = 0to allow for multi-line text. - I then switched over
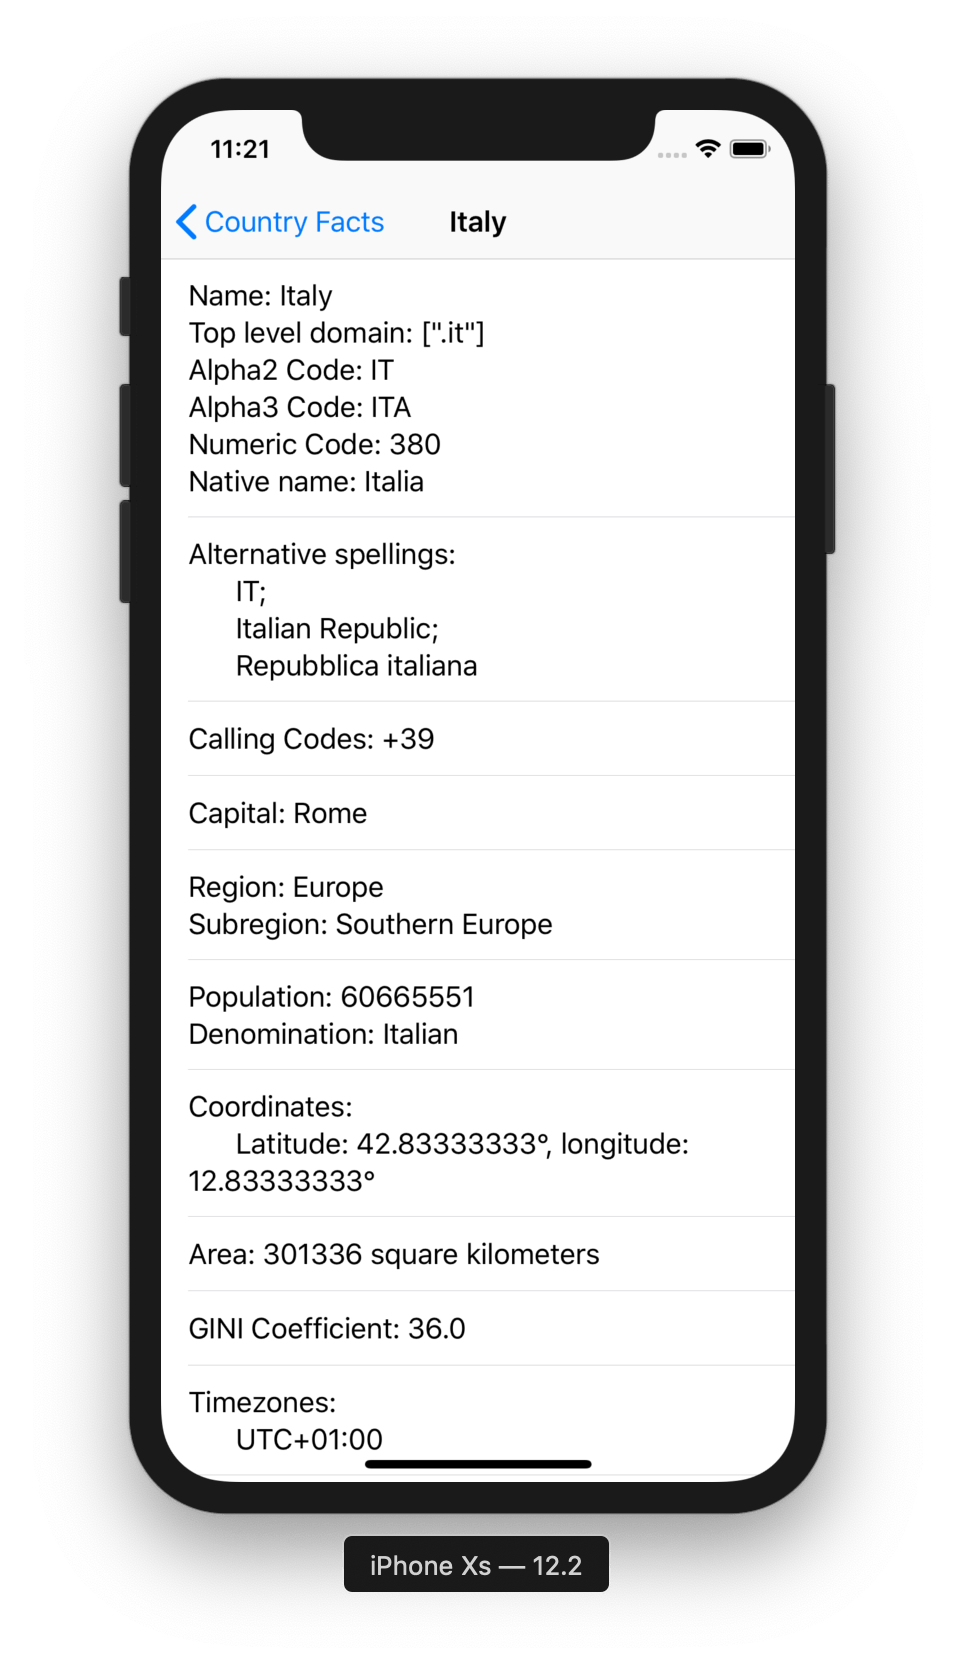
indexPath.row. Here is case0where I reunited the “name”, the “top level domain”, “alpha2code”, “alpha3code”, “numeric code” and “native name” together in a single cell.
case 0: cell.textLabel?.text = """
            Name: \(detailCountry!.name)
            Top level domain: \(detailCountry!.topLevelDomain)
            Alpha2 Code: \(detailCountry!.alpha2Code)
            Alpha3 Code: \(detailCountry!.alpha3Code)
            Numeric Code: \(detailCountry!.numericCode ?? "Numeric code not found")
            Native name: \(detailCountry!.nativeName)
            """
Someone I showed to code to criticised my choice of all those force-unwrap. First let me say that I agree it doesn’t look nice. Second, though, if we would not have a detailCountry object this view controller would not exist but, as it could not exist, we have to set it as an optional at the top of the view controller. Then, if I would put a question mark instead of the exclamation mark Xcode would complain saying:
String interpolation produces a debug description for an optional value; did you mean to make this explicit?
As I didn’t want a thousand of these warnings around my code I just force unwrapped them because I knew this would have just worked. I found another way to be safe, which is to wrap every case in a if let country = detailCountry block. This makes all the warnings go away.
case 1:
if let country = detailCountry {
    let altSpellings = country.altSpellings
    if altSpellings.isEmpty {
        cell.textLabel?.text = "No alternative spelling found"
    } else {
        cell.textLabel?.text = "Alternative spellings:\n"
        if altSpellings.count == 1 {
            cell.textLabel?.text! += "\t\(altSpellings[0])"
        } else {
            for spelling in altSpellings {
                if spelling == altSpellings.last {
                    cell.textLabel?.text! += "\t\(spelling)"
                } else {
                    cell.textLabel?.text! += "\t\(spelling);\n"
                }
            }
        }
    }
}
This is the first of many cases where we have arrays for our descriptions. I created a constant to make code writing faster then I started with checking what would have happened if that piece of data was empty (thank you Antarctica for all the crashes you caused during testing!). In case this was not empty I created the beginning of the text with a new line then checked if the array contained only 1 item as this was important to avoid the extra ; at the end of the list. In case the array contained 2 or more items I checked, for every item, if it was the last one and in that case I removed the last ; otherwise I attached the text with a semicolon and a newline. I know, it looks contorted, but if you have better ideas on how to display this kind of data in a table view you are welcome to show me the light! Really!
Also, I know of the !s after text but really, I could not add a guard statement or another if let before each one of them.
- This was an easy one because normally every country has only one calling code.
- Again you may wonder why I put the first part of the if-else statement. Simply because countries like Antarctica do not have a capital city and opening them would have made our app crash.
-
This first branch of the
ifstatement is interesting because I was getting weird results for thesubregionpart of theCountrystruct. I realised then that when that part was empty it was notnilbut was an empty string. - This one is self-explanatory.
- Arrived at this point I realised that I could wrap all of the switch statement in a big
if let country = detailCountryand… brilliant, it worked! Mistakes are really our most precious gift! Thanks to this I also discovered the Find and Select Find Matches in Selection function which allowed me to select and change all those occurrences in a breeze. -
This was interesting because I wanted to get it right and also I didn’t want to have endless decimals after the dot, but I couldn’t find a way to reduce the amount of cyphers after it. I recall that in C there was something that made this possible but now I don’t remember how to do that. After a few research I stumbled upon this Stack Overflow article which explains 9 different ways to perform this action in Swift 4.2. I therefore changed my code to this:
"Coordinates:\n\tLatitude: \(((country.latlng[0]) * 1000).rounded() / 1000)°, longitude: \(((country.latlng[1]) * 1000).rounded() / 1000)°". This will ensure that I get maximum 3 digits after the dot. - Some of you may ask: « Hey, but every country has an area! ». Indeed but not every country in this data feed had one so I needed to play it safe!
- I have read something about this GINI coefficient, interesting stuff but I wonder how many people knew this existed.
- This case required the same care of the other arrays.
- This was a tricky one because some countries (like single-countries islands) do not share their borders with anyone else so I needed to show a different message for when this happens. Otherwise the array’s management is the same as before.
- Now we start to enter a minefield because we get arrays with arrays inside of them. Also, we start to see custom data inside our custom data, which means we need to make them conform to
Equatablein order to be used. Here is the code for case 11:
The main issue here is that some the three properties in theCurrencydata type are all optionals and we cannot force unwrap them as this would cause a nasty crash! So we need to add a nil-coalescing operator and statement for that eventuality. - Now, on the same side of the boat, we get languages. They can have an ISO639 first abbreviation or they can not have it but they will all have an ISO639 abbreviation, a name and a native name so our text need to take all of this into account. Also, some countries have only one language, some have many and they needed to be all spaced coherently:
The double new line was the hardest one to make work consistently across all categories. - Finally some respite here… The nil-coalescing needs to be there because not every country has a translation for every language listed here.
- Now for the beast: regional blocs. This data type had four properties inside, fortunately no optional one, but two of them were arrays themselves so all of the previous calculations needed to be expanded for each of them. Did the main array had anything inside, 1 element or more? In any of these three cases, did the
otherAcronymsarray have anything inside, 1 element or more? For any of these three cases, again, how was theotherNamesarray behaving? So, the result is a mammoth nest ofif-elsestatements. If anyone who reads this has a better idea please enlighten me.
Yeah, I know… about 120 lines of code only for this… I will one day learn to move my code away and separate it nicely. - I have not found enough infos on what the CIOC code is but it seems something related to military. Nevertheless, I had to include it.
- I ended it with a default statement because even if I covered all possible cases Xcode would not be happy. After this I returned the cell.
- That’s it for the DetailViewController.swift file. The last thing I want to do is to make this app flexible in case any of these countries may change in the near or far future. I therefore decided to modify the
loadCountriesmethod so that it would download the data from the Internet (the same API from which we created the JSON file) and try to parse the data from there. In case anything would go wrong, we would use our already working code to load data from the file.
I tried it and it works!
So happy and proud!
Please find the code for this project here for your review.
If you like what I’m doing here please consider liking this article and sharing it with some of your peers. If you are feeling like being really awesome, please consider making a small donation to support my studies and my writing (please appreciate that I am not using advertisement on my articles).
If you are interested in my music engraving and my publications don’t forget visit my Facebook page and the pages where I publish my scores (Gumroad, SheetMusicPlus, ScoreExchange and on Apple Books).
You can also support me by buying Paul Hudson’s books from this Affiliate Link.
Anyways, thank you so much for reading!
Till the next one!
