Learning Swift – Day 209-210
100 Days of SwiftUI – Day 23, second round
Yesterday we started to look at views and modifiers. Today we continue down this path.
Why modifier order matters
It seems that applying a modifier to a SwiftUI view creates an entirely new view (bah…!). If we write this:
Button("Hello World") {
	// do nothing
	}
	.background(Color.red)
	.frame(width: 200, height: 200)
…which, by the way, has no initialiser that lets us write it exactly like this. The one we are looking for is:
init(LocalizedStringKey, action: () -> Void)
But try to get that with autocompletion, for health’s sake! It is not possible! You need to get to the Documentation, see that this exists and then use it yourself. Still, this is all what you will find in the docs:
init(_ titleKey: LocalizedStringKey, action: @escaping () -> Void)
Incredibly helpful, I know …
Anyway, this is the result of running the code above:

Paul says we would not have seen a red button … I can confirm it is not 200 x 200 … but the button is red. What is happening here?
Each modifier is creating a new struct with the return value of that modifier applied, instead of setting the property of the view. It is very personal, but I prefer to change a property instead of destroying and recreating everything from scratch, regardless of how cheap it is… I can see the potential of all this, but is this the best concept Apple could come out with?!
If we add a print(type(of: self.body) statement inside of the button we will get this, when the button is pressed:
ModifiedContent<ModifiedContent<Button<Text>, _BackgroundModifier<Color>>, _FrameLayout>
Paul is probably using another version of Xcode as his message is slightly different. Anyway, we need to read that type from the inside out, as if it would be a mathematical expression. So, we have a button with some text and a background colour and, outside, a frame. Every modifier takes a view, transforms it and returns it. So, now, the order of modifiers suddenly takes on a completely different importance.
So, in our example, applying the colour and then the frame had exactly the result we got because the redrawing of the frame happened after the colouring (skepticism rising …). Paul ensures us that this is not exactly how SwiftUI works, but that it is easier to think about it like that.
If we invert those two lines, we get this:

If we now try this code:
Text("Hello World")
    .padding()
    .background(Color.red)
    .padding()
    .background(Color.blue)
    .padding()
    .background(Color.green)
    .padding()
    .background(Color.yellow)
We get this result:

I’m not sure I totally understand this but let’s see if the Documentation comes to my rescue:
Summary
Pads (imbottisce in Italian) this view using the edge insets you specify.
Declaration
Discussion
The following example only pads the horizontal edge insets:
Parameters
edges: The set of edges along which to inset this view.
length: The amount to inset this view on each edge. Ifnil, the amount is the system default amount.Returns
A view that pads this view using edge the insets you specify.
Syntax apart, so we are getting this result because, applying the .padding() modifier, we get to avoid the previous view. But what if I would like to get more specific? Also … are the blue-green-yellow colour-view just hollow squares or is their colour going also behind the preceding views? In theory they should not, according to what we studied yesterday, but this is absolutely not clear to me.
Why does SwiftUI use “some View” for its view type?
some View means “one specific type that conforms to the View protocol, but we don’t want to say what”. I am not understanding why it would not be possible to just write View but… let’s move on as Paul does his best to explain this to us.
The difference between returning some View and View are two: we have to return always the same type of view and even if we do not know what that type is, the compiler will know.
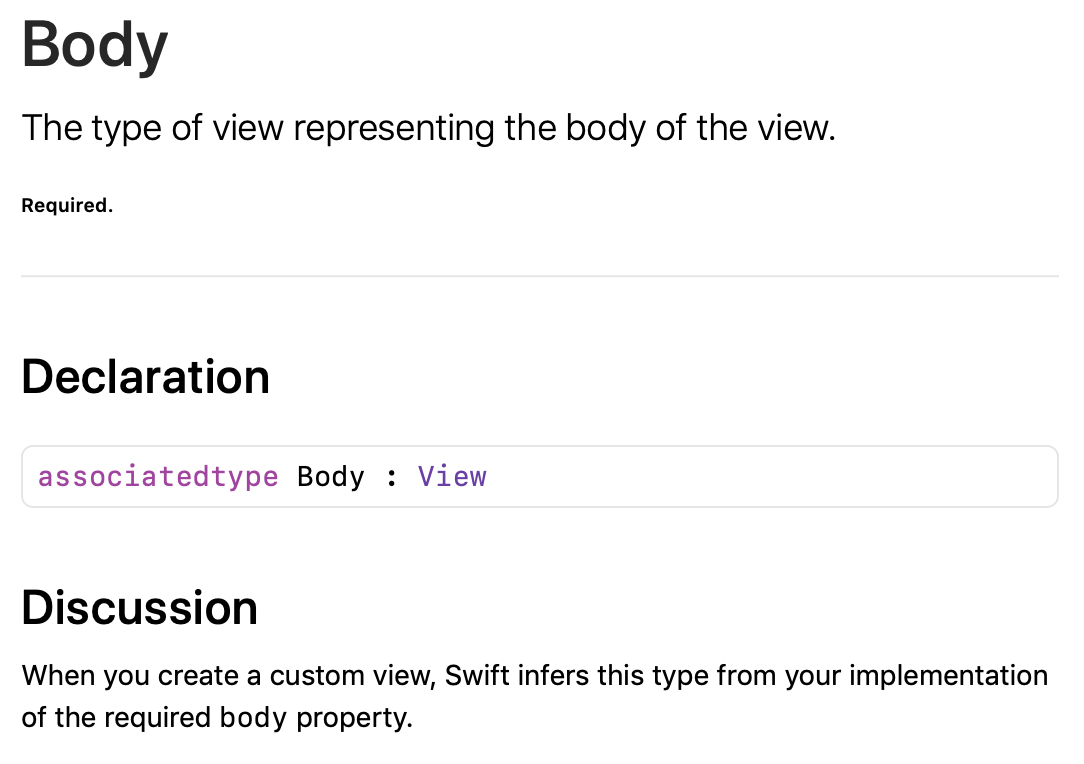
Let’s give a look at the View protocol and at its attached associated type. Scrolling almost down to the end of the description we find this:

…which means …
By the way, here begins Day 210, I could not do anything more yesterday.
Paul goes on to explain what happens when we create a Stack, of any ordering. SwiftUI creates a TupleView to fill the “what kind of view conforms to View?” question. This tuple-view thing is the reason behind SwiftUI not accepting more that 10 views inside a parent.
Conditional modifiers
If we want to use a modifier that enters the game only when certain conditions are met, we should use the ternary operator. Create an @State Boolean, then a Button with some text as title, toggle the Boolean inside the action and set the modifier to check for the property’s value and set the view accordingly.
Using if-else statements is possible but risky and often fails, so use it with care.
Environment modifiers
Many modifiers (such as .font()) can be applied to containers so that every view inside of them will receive the same modifier. In this case the modifier is called an environment modifier! If one of the children views overrides the same modifier, the child’s one gets precedence.
Other modifiers do not accept this usage, such as .blur() and, by now, there is no way to know which modifier is an environment one and which one is not. We just need to experiment.
Views as properties
We can create a view as a property to use inside our layouts. They can also be computed properties and help us keep the body property cleaner and easier to read.
View composition
If we have multiple views in our body property that are equal or similar, we can create another struct OutView: View { }, create a property (or more than one) to store what would change between our views once instantiated and then simply create an instance of that new struct inside the body property of our original view.
Custom modifiers
We can create a custom ViewModifier struct like this:
struct Title: ViewModifier {
    func body(content: Content) -> some View {
        content
            .font(.largeTitle)
            .foregroundColor(.white)
            .padding()
            .background(Color.blue)
            .clipShape(RoundedRectangle(cornerRadius: 10))
    }
}
We can consequently call the modifier() modifier (!) passing an instance of Title() as its only argument. A bit of a strange way to use this but, well, it seems to work! It is still advisable to create an extension on the View type so that our modifier has a more meaningful and easier to understand name, like this:
extension View {
    func titleStyle() -> some View {
        self.modifier(Title())
    }
}
At this point we can simply call the .titleStyle() modifier to get the same result in a much nicer way.
Custom modifiers can also create new view structures if we so desire.
As Paul warned, these are a little buggy in non-up-to-date versions of Xcode (in my case 11.1 is not working as intended). Never mind, we need to create another struct which conforms to ViewModifier, give it a property to manage what will need to be a parameter and then create our view structure inside of the func body(content: Content) -> some View method. We will then extend View again, with an appropriately named function and call self.modifier(OurStruct(parameter:)), before applying it to our main ContentView struct.
Custom containers
Let’s create a new SwiftUI view file, call it GridStack and open it. Add <Content: View> between GridStack and the : which creates a generic struct, meaning that we can provide any content to it as long as it conforms to the View protocol.
Inside we provide the struct with two uninitialised Integer properties called rows and columns and with a closure that accepts two Integers as parameters and returns a Content object. I did not find any reference to the Content type in the Documentation, maybe someone can help out there with this?
Inside the body property we create a VStack which calls a ForEach(0 ..< rows) and, inside, create a HStack which by itself calls again ForEach(0 ..< self.columns) (wonder why self is needed here and not before) and, finally, call self.content(row, column). What this closure will do will depend on us.
Now switch back to the ContentView file. Inside the body property create an instance of GridStack, passing 4 to both parameters and, in the closure, define row, col as accepted parameters and create the view Text("R\(row) C\(col)"). This creates a quite ugly result but still, the possibilities are endless:
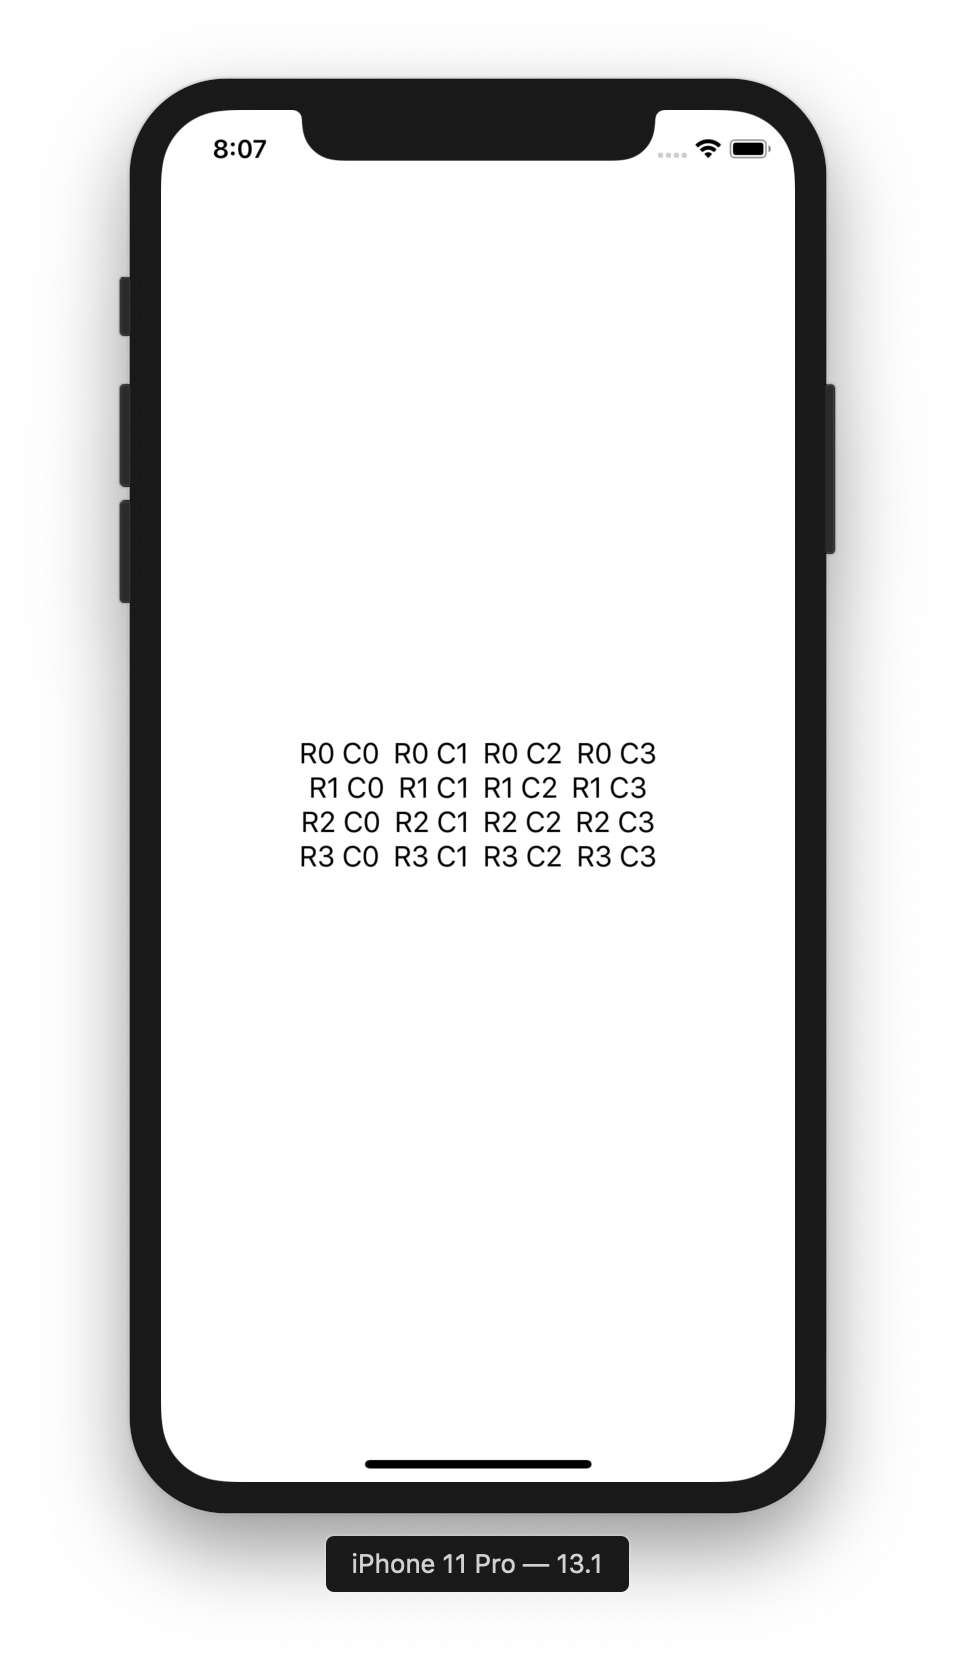
For a slightly better result we could do something like this:
GridStack(rows: 4, columns: 4) { (row, col) in
    HStack {
        Image(systemName: "\(row * 4 + col).circle")
        Text("R\(row) C\(col)")
    }
}

As you can see, the possibilities are really growing with each lecture!
Want to go further?
SwiftUI has a feature called view builders, which allows the developer to pass several views inside a “form” and have the compiler create a stack for him/her.
Create a new initialiser like this:
init(rows: Int, columns: Int, @ViewBuilder content: @escaping (Int, Int) -> Content) {
    self.rows = rows
    self.columns = columns
    self.content = content
}
It seems a simple thing but there is the new @ViewBuilder attribute and the @escaping attribute, which stores a closure for later use. The code we wrote before could be now written without the HStack part and create one automatically.
100 Days of SwiftUI – Day24
Project 3, part 2 — Wrap up
Review
- The order in which we apply modifiers affects the result we get. For example, setting the frame then applying a background color is different from applying a background color then setting the frame.
- SwiftUI views automatically stay inside the safe area unless we specify otherwise. To change this, use the
edgesIgnoringSafeArea()modifier. - Breaking SwiftUI views into smaller views has little to no performance impact. SwiftUI does an excellent job of optimising this behaviour.
- The
somekeyword insome Viewsignals an opaque return type. This lets us send back some sort of view without need to say exactly which one. - Changing any
@Stateproperty of a view causes SwiftUI to reinvade the body property. This allows us to change what our views show over time. - If a
VStackhas a foreground color and some text inside also has a foreground color, the text’s foreground color is used. Local modifiers always override environment modifiers from the parent. - We can use the ternary operator to adjust the values sent into a modifier. This lets us send different values depending on the state of our view.
- SwiftUI views should be structs, not classes. Our code might not compile or run if we use classes.
some Viewmeans that one specific type of view will be returned. We don’t need to say which type will be returned — the compiler is able to figure it out.- Custom view modifiers must conform to the
ViewModifierprotocol. This has one requirement: abody()property that returnssome View. - SwiftUI lets us create our own custom view modifiers. This can help keep our code free of redundancy.
- We can specify a maximum width and height for a view. Alternatively we can specify an exact width and height.
Challenges
Challenge 1: create a custom ViewModifier (and accompanying View extension) that makes a view have a large, blue font suitable for prominent titles in a view.
This is my solution. I tried my best to remember the procedure by heart and I could do almost all without looking. I didn’t remember the content line after the brace (I know, the most important thing, right?) and the self. in the View extension.
struct ProminentTitle: ViewModifier {
    func body(content: Content) -> some View {
        content
            .font(.largeTitle)
            .foregroundColor(.blue)
            .frame(maxWidth: .infinity, maxHeight: .infinity)
            .background(Color.yellow)
            .edgesIgnoringSafeArea(.all)
    }
}

extension View {
    func prominentTitle() -> some View {
        self.modifier(ProminentTitle())
    }
}
Challenge 2: go back to project 1 and use a conditional modifier to change the “Total Amount” Text view to red if the user selects a 0% tip.
This project is compiling very badly on me so it was quite hard to test this. Anyway, I applied the .foregroundColor() modifier to the Section(header: Text("Total amount")) setting it to ((tipPercentage == 4) ? .red : .primary).
I would have liked to have a background color changed to red, but it seems it is not possible here?! I tried to apply the background() modifier directly to the Text view but apart from taking ages to compile, it seems not to work as I get an error in a previous line saying “Type of expression is ambiguous without more context”.
I will declare myself satisfied with this, right?!
Challenge 3: go back to project 2 and create a FlagImage() view that renders one flag image using the specific set of modifiers we had.
I created a new SwiftUI View file, gave it a var name: String property and pasted the Image(name) with all the modifiers. I then called it as FlagImage(name: self.countries[number]).
That’s it!
That’s all for today, folks!
Wish me luck as tomorrow my MacBook Pro is going to the Apple Store for a good amount of issues. Hopefully it won’t stay long. Now backup to the death!
Thank you for reading!
If you like what I’m doing here please consider liking this article and sharing it with some of your peers. If you are feeling like being really awesome, please consider making a small donation to support my studies and my writing (please appreciate that I am not using advertisement on my articles).
If you are interested in my music engraving and my publications don’t forget visit my Facebook page and the pages where I publish my scores (Gumroad, SheetMusicPlus e ScoreExchange).
You can also support me by buying Paul Hudson’s book from this Affiliate Link.
Anyways, thank you so much for reading!
Till the next one!
