100 Days of SwiftUI – Day 30 – Learning Swift Day 216
Adding to a list of words
Inside ContentView.swift
- create three
@State privatevariable properties, an empty array ofStrings and two emptyStrings. - Inside the
bodyproperty create aNavigationView, with aVStackinside it.- Give it a
TextFieldwith a placeholder text of"Enter your word"and atext:property of$newWord, which is a <Binding>String, and aListgenerated from theusedWordarray, managed by theid: \.selfand withText($0)as return result. Finally, give the navigation view a.navigationBarTitlemodifier withrootWordas argument.- Add the
.textFieldStyle()modifier passing it a fresh instance of theRoundedBorderTextFieldStyle()struct along with adding.padding()around the Text Field.
- Add the
- Give it a
- Create a new method called
addNewWord()that accepts no parameter and returns no value. Inside it, create a constant calledanswerthat is the result of chain-calling the.lowercased()and.trimmingCharacters(in: .whitespacesAndNewlines)onnewWord. Thenguardcheck that the resulting String is longer than 0, otherwisereturnfrom the method. Leave some space for some future adds, then call.insert(answer, at: 0)onusedWords, before resettingnewWordto an empty String. - Add the
onCommit:parameter at the end of theTextFieldand passaddNewWord(without parentheses) as argument. Then add the.autocapitalization(.none)modifier to it. - Inside the
List, add anImageabove theText, which implicitly creates aHStack, and pass thesystemName: "\($0.count).circle)"argument as its only argument. This has the result of creating an image taken from SF Symbols which draws a circle with the number of the word’s letter-count.
Running code when our app launches
- Drag the downloaded “start.txt” file into the Project Navigator. I put it just under the Info.plist file. My Xcode window behaved properly but, if yours does not, choose the “Create groups” and “Copy items if needed” options.
- Create the
startGame()method. Paul doesn’t specify where to put it, which should in theory mean inside theContentViewstruct, but I will add anextensionafter the struct to keep the code clean. I wonder how this is preventing us from getting to the same place where we were with Massive View Controllers, which was the main issue with UIKit and MVC. This seems to be MVVM (?) but still, we wrote close to nothing and we are already at 100 lines of code… bah… Now, inside this method:- Conditionally bind (
if let) the URL for the resource “start” with extension “txt” from our main app bundle to the constantstartWordsURL. - If this succeeds, conditionally bind the return result of the String initialiser
contentsOf:(with atry?before as this is a throwing initialiser) to thestartWordsconstant, passing it thestartWordsURLparameter. - if also this succeeds, store the
.componentsof this String separated by the newline ("\n") character into a new array of strings calledallWords. Then set ourrootWordstate property to be a random element from that array or the placeholder word “silkworm”! - at this point
return. I wonder why this return keyword is necessary, but I think that it is because we don’t want to use multiple else statements after the conditional binding and we can just have a singlereturnhere, to make us exit the method. - After closing all braces apart from the top one, call a
fatalError()passing in “Could not load start.txt from bundle” as itsmessageparameter. This will make our app crash if a problem is encountered so far.
- Conditionally bind (
- To actually call this function when the view appears we need to call this from within a modifier set to our Navigation View. Add the
onAppear(perform:)modifier after setting the Navigation View title and pass itstartGame, without parentheses.
Now, a bit of reflection because things can easily confuse: this should be the same as calling the method from viewDidAppear(), right? I have kind of never used that in my very short and small experience, as I was taught to put this kind of logic in viewDidLoad(). My guts says this made it happen before but, still, using all these modifiers is kind of meh to me, I wonder how long the “new effect” of SwiftUI will last and what will be of it when people start realising that yes, it’s nice, it’s shiny… but some ways of doing things in it are really awkward and require a lot more thinking than in UIKit.
Validating words with UITextChecker
Inside the extension created for the Gameplay methods write the following methods:
isOriginal(word: String) -> Bool, which accepts a string parameter and returns a Boolean. Inside, just write!usedWords.contains(word). As you can see we are not using thereturnkeyword because this has been lifted from us in Swift 5.1 if we have only one line of executable code. That line reads: “The used words array does not contain the passed word. True or false?”.isPossible(word: String) -> Bool. This method creates a copy of our root word (so that modifying it won’t damage the original), then loops over each letter in the passedword, trying to conditionally bind the first index such letter in the copy of our word if found to apositionconstant, removing it from the temporary word string as a consequence. If this doesn’t match/succeeds at any point, we justreturn false. If we ended the loop successfully, the code will continue its execution andreturn true.isReal(word: String) -> Bool. Create an instance ofUITextChecker(), an instance ofNSRangewith0as location and the count of the letters of our word parameter in UTF16 encoding before storing the result of the call of therangeOfMisspelledWord(in:range:startingAt:wrap:language:)method on the checker passing it our word, range, 0, false and “en” as parameters. Finally, return the result of checking whether this misspelled range’s location is equal to the magic numberNSNotFoundor not. If not found is equal to true then we succeeded! Phew! 😅
Add now three @State properties to control the showing of alerts (this abuse of properties is something I really don’t like of this new programming way — and no, I’m not being sentimentalist…). Two of them will be empty strings (errorTitle and errorMessage) and one will be a Boolean set to false (showingError).
Create a new method called wordError() which will accept two string parameters (message and title) and which will set errorTitle to its title parameter, do the same for errorMessage and message and set showingError to true.
After the .onAppear modifier add a .alert(isPresented) modifier bound to the $showingError state property. Inside the closure, create an Alert passing Text(errorTitle) as first parameter, Text(errorMessage) as second and .default(Text("OK"))) as third. What an awkward way of showing alerts… I miss my UIAlertController… 😞
Now, as last thing, add three guard statements in the addNewWord() method, calling the three checking methods as conditions and, inside the else part, calling wordError with sensible messages and returning. I now see the reason for all those properties but, still, it looks a bit awkward all this (not that I could make it any better, let’s be clear!).
Good, another app done, Day 30 completed.
So, we are now at somewhere between 110 and 130 lines of code for this, according to how many comments and code organisation you implemented. The UIKit version is similar in length but it is much clearer to me in intent, even if the syntax may look more awkward. Also, right now, the app is not progressing, we are stuck with that word forever, which is not nice. Is this for our challenges? Bah …, the original project (Project 5 of the UIKit version) was going on and on alone…
Am I skeptic? Possibly… Just I am not all “ooooh” and “aaaah” on this new framework.
100 Days of SwiftUI – Day 31 — Solving the challenges
Review
Listproduces a scrolling table of rows. This is one of the most commonly used SwiftUI views.- If a
guardcheck fails we must always exit the current scope. That scope is usually a method, but it could also be a loop or a condition. - Placing two views in a
Listrow will create an implicitHStack. This effectively gives us behaviour that was the default on iOS: something on the let, then something on the right. - We can create
Listdirectly from an array. We can also create one directly from a range. - If a method has the same signature as a closure parameter, we can use the method instead. Swift blurs the lines between functions, methods, closures, and operators.
- We can use
onAppear()to run a closure when a view is shown. This lets us run one-off code in an easy way. - It’s possible to mix static and dynamic rows in a
List. We can have static rows then dynamic, then more static, then more dynamic, and so on. - We can use a
ForEachview inside aList. This lets us mix dynamic rows alongside static rows. - When creating views in a loop, SwiftUI needs to know how to identify each view uniquely. This lets it understand which views were added or removed.
- We can load files into a string if we know their URL.
String(contentsOf:)is a throwing function, so we should use it carefully. - All iOS apps have a main bundle. It stored our program, Info.plist, assets and more.
- Text fields have no border by default. We can add one using
textFieldStyle().
Additional things reviewed:
- We can control the way iOS capitalises text using the
autocapitalization()modifier. fatalError()will always cause a crash.- To read when return is pressed for a text view we should pass a valuator the
onCommitparameter. NSNotFoundis a special value that has a range of meanings.
Challenges
Challenge 1: disallow answers that are shorter than three letters or are just our start word. For the three-letter check, the easiest thing to do is put a check into isReal() that returns false if the word length is under three letters. For the second part, just compare the start word against their input word and return false if they are the same.
For the first part I decided to go my own route as I didn’t want to mess up with the isReal method. After all, the word may be real but have only 2 letters. Rare but possible. I then added a guard check just after the check for the word having at least 1 letter.
For the second part I simply added a guard check that answer != rootWord and return an alert if false.
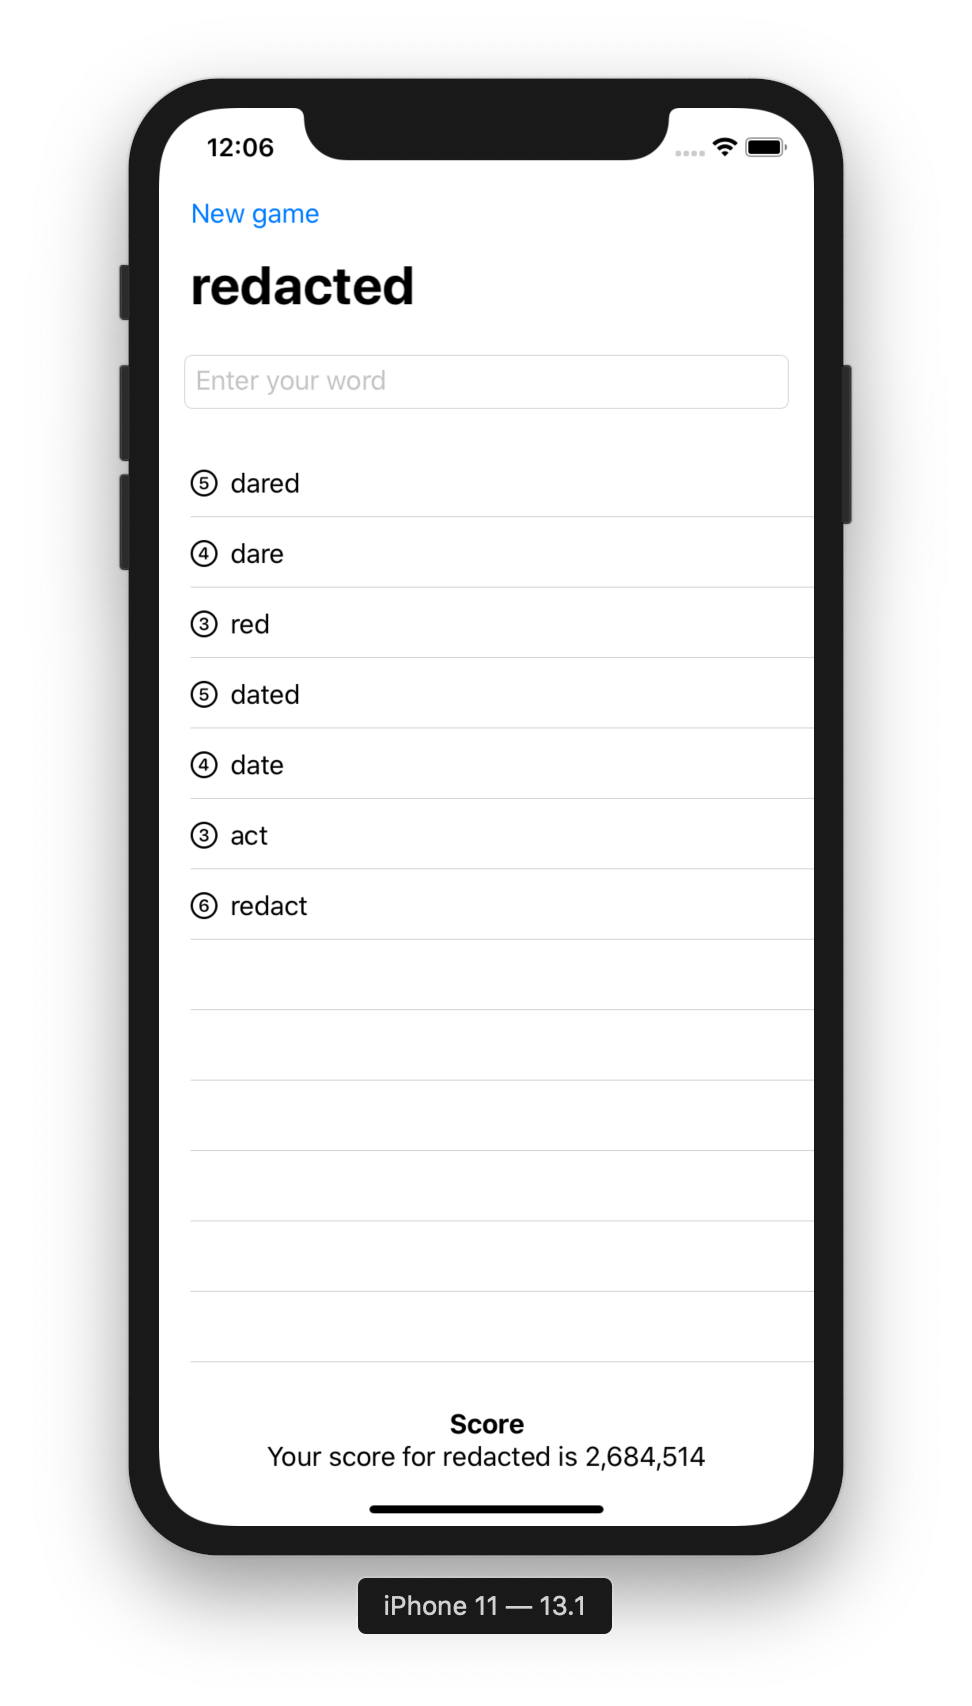
Challenge 2: add a left bar button item that calls startGame(), so users can restart with a new word whenever they want to.
This was solved by adding the following modifier to the Navigation View:
.navigationBarItems(leading: Button(action: startGame) {
                Text("New game")
            })
Don’t forget to reset the usedWords array to an empty one inside that method if you want the table view to become empty again.
Challenge 3: Put a text view below the List so you can track and show the player’s score for a given root word. How you calculate score is down to you, but something involving number of words and their letter count would be reasonable.
To solve this, which required much more time than I would have liked to, I added a section to the VStack, like this:
Section(header: Text("Score").bold()) {
    Text("Your score for \(rootWord) is \(score)")
}
After banging my head like an idiot against the wall because I am not really understanding when I should use the Binding $ sign or not and, possibly getting the fact that inside a Text that cannot be used, I created a computed property, like this:
var score: Int {
    guard !usedWords.isEmpty else { return 0 }

    var tempScore = 1.0

    for word in usedWords {
        for _ in word {
            tempScore *= 1.5
        }
    }

    tempScore *= Double(usedWords.count * 2)

    return Int(tempScore)
}
I used a Double because I wanted to give more points for each letters but twice looked too much. This checks for the array being empty to give me 0 at the beginning. It works, it is a big meh, but, fine, I accept it. I hope one day my brain will make the jump.
Anyway, that’s it for today! Need to get some lunch and go to work! See you tomorrow!
Thank you for reading!
If you like what I’m doing here please consider liking this article and sharing it with some of your peers. If you are feeling like being really awesome, please consider making a small donation to support my studies and my writing (please appreciate that I am not using advertisement on my articles).
If you are interested in my music engraving and my publications don’t forget visit my Facebook page and the pages where I publish my scores (Gumroad, SheetMusicPlus e ScoreExchange).
You can also support me by buying Paul Hudson’s books from this Affiliate Link.
Anyways, thank you so much for reading!
Till the next one!
